If you want to start a blog on Bluehost, this step-by-step tutorial will help you get started with your blog in less than 15 minutes. Additionally, you’ll be able to get a special discount if you sign up with Bluehost using this special link.
The best part?
Starting a blog on Bluehost is incredibly easy.
Even if you’re not particularly tech-savvy, it’s easy to set up your blog. And, when you are with Bluehost, you can get it done in less than $3 a month.
Pretty amazing deal, right?
Thankfully, blogging is one of the few online businesses that don’t need a massive initial investment. You can start with Bluehost at only $2.75 per month.
![How to Start a Blog on Bluehost Step by Step in 2023? [for Beginners] 2 Bluehost-homepage](https://digitalmillions.org/wp-content/uploads/2020/07/Bluehost-Homepage.png)
But why Bluehost?
There are numerous reasons why this is one of the best options. For this blog, I personally use HostGator. Bluehost, on the other hand, is an excellent alternative.
Disclosure: Please note that if you decide to buy hosting using any link on this page, I’ll get compensated, by the hosting company. And this is what motivates me to write this tutorial for you, free of charge. In fact, if you do click and buy, thank you.
Is Bluehost Really a Good Web Hosting Provider for Bloggers?
Yes, it really is. Bluehost has already established itself as one of the best web hosts since 2003 when it was launched. Also, WordPress recommends it on its official site, indicating its trustworthiness and reputation.
Let’s see what else makes it exceptional.
Best Features of Bluehost Web Hosting
- It is incredibly easy to use for beginners.
- Bluehost is extremely affordable. I strongly recommend going for the 3-year plan as it gives you the best discount and the lowest price.
- FREE domain name.
- FREE one-click WordPress installation.
- FREE website builders.
- FREE 24/7 customer support if you need any help.
- 30-day money-back guarantee if you decide it’s not for you for some reason.
- You’ll have a self-hosted WordPress blog. That means you’ll own your blog. Self-hosted websites are much more professional than free hosting sites.
Honestly, there is too much more to talk about.
So, if you’re ready to take your blogging business seriously, let’s get started with the first step. Undoubtedly, the first step is to buy hosting. Hosting is what makes it possible for your blog to be accessed over the internet.
In short, you basically rent web space from hosting providers to keep your blog online.
To create a blog, you’ll mainly require two things:
- A domain name
- A web hosting account
A domain is the unique destination URL associated with your blog. Creating a self-hosted WordPress blog is impossible without a domain name.
But, how to get a domain name and how to choose it?
Confused?
Your domain name should be a catchy and memorable name that corresponds to the subject of your website. For example, the domain name for this site is DigitalMillions.org. Make a list of a few names you would like for your blog.
So, once you’ve decided on a few names for your blog, use a domain name search engine such as Namecheap to see whether it’s available.
It’s possible that your desired domain name is already taken. So get creative and experiment with various combinations. Most domain registrars can also suggest names that are similar to the ones you searched for. Keep in mind that the shorter and more unique your domain is, the better for you and your visitors.
Once you’ve found an available domain, you can pay and register it in your name. And, that’s how you can purchase a domain name.
A web hosting provider, on the other hand, is a company that offers the tools and services you’ll need to set up a blog and get it online.
After you’ve chosen your domain, you’ll need to find a hosting provider to host it. While this can be done by two separate companies, most web hosting providers allow you to do both at the same time. Basically, you can get hosting + a FREE domain name.
Hosting, in short, is the process of making your website accessible via the internet. The hosting company’s web server will display your site when someone hits your domain name. A hosting firm will have specialized equipment (servers) for hosting a website that is reliable, fast, secure, and has additional features.
Not every hosting company is the same. You’ll want a hosting company that has the tools you’ll need to easily set up your blog and maintain it. The majority of the big web hosts have similar basic features, such as:
- 99.9% uptime
- Free domain
- One-Click Installs
- 24/7 Support
Bluehost is a well-known hosting company that offers high-quality hosting at a low cost. Their platform has all of the functionality you’ll need to start a blog and is easy to use even if you’ve never done anything like this before.
READ: 8 Benefits of Choosing WordPress to Create Your Blog.
The best thing?
If you register with Bluehost, you’ll get a free domain name.
It makes starting a blog easier for beginners who only need to pay for the hosting, and not for the domain. So, without further ado, let’s get started with the first step.
Step 1: Sign Up for Bluehost
![How to Start a Blog on Bluehost Step by Step in 2023? [for Beginners] 2 Bluehost-homepage](https://digitalmillions.org/wp-content/uploads/2020/07/Bluehost-Homepage.png)
Start by heading over to Bluehost. This is where you’ll host your blog, and it’s also where you’ll have the most control and freedom. Unlike WordPress.com or Blogger.com, which host your blog on their servers and give you no control.
While having your own host will cost you money, it will provide you the freedom to manage and control your own content as a blogger.
And, that’s what you should look for. Control.
So, let’s get started. Click this special link to visit Bluehost.com and you’ll be able to save over 60% on the regular hosting price.
When you land at the Bluehost homepage, click on the button that says Get Started. Then, you’ll be able to choose your hosting package.
![How to Start a Blog on Bluehost Step by Step in 2023? [for Beginners] 4 Bluehost Hosting Packages](https://digitalmillions.org/wp-content/uploads/2021/07/Bluehost-Hosting-Packages.gif)
Next, choose a plan that meets your requirements.
To be frank, the Basic hosting plan should be sufficient for the majority of new blogs. You can check their other plans for more features and extras if you prefer.
You can always upgrade later.
Click on the button that says Select to choose a plan. After you’ve chosen your plan, Bluehost will let you create a free domain name.
![How to Start a Blog on Bluehost Step by Step in 2023? [for Beginners] 5 Select a Bluehost Domain Name](https://digitalmillions.org/wp-content/uploads/2021/07/Select-a-Bluehost-Domain-Name.png)
Type the domain name you wish to register and hit Next.
Or, if you’ve already registered a domain from a separate registrar, you should use the field Use a domain you own and then hit Next.
If your desired domain isn’t available, try something else – or pick the option to choose your domain name later to get a free domain after setting up your account.
![How to Start a Blog on Bluehost Step by Step in 2023? [for Beginners] 6 Bluehost Choose Domain Later](https://digitalmillions.org/wp-content/uploads/2021/07/Bluehost-Choose-Domain-Later.png)
On the next screen, you’ll be able to create your Bluehost account. You can use your Google credentials to sign in or fill out the form.
It takes 2 minutes to simply fill up all the required fields as shown below.
![How to Start a Blog on Bluehost Step by Step in 2023? [for Beginners] 7 Bluehost Account Information](https://digitalmillions.org/wp-content/uploads/2021/07/Bluehost-Account-Information.gif)
Once you are done, make sure the right hosting plan is selected and choose a duration. You can grab a substantial discount by opting for a longer plan, but you must pay in full upfront. I’d suggest you go with the longest term which is 36 months.
![How to Start a Blog on Bluehost Step by Step in 2023? [for Beginners] 8 Bluehost Hosting Duration](https://digitalmillions.org/wp-content/uploads/2021/07/Bluehost-Hosting-Duration.png)
That’s how you can get the highest discount, less than $3 per month.
Quite an amazing deal, right?
Finally, under Package Extras, you can select various extra services that Bluehost recommends for your blog (or website), such as:
- Codeguard – It helps you automatically backup your site
- Bluehost SEO tools – It helps you optimize your site for SEO
- Single domain SSL – It maximizes your site’s trustworthiness with SSL
- SiteLock – It protects your site from malicious attacks, spammers and hackers
![How to Start a Blog on Bluehost Step by Step in 2023? [for Beginners] 9 Bluehost Extra Services](https://digitalmillions.org/wp-content/uploads/2021/07/Bluehost-Extra-Services.png)
If you ask me, none of these are absolutely necessary. If you decide to buy some, the price can skyrocket. So, make your choice carefully.
Finally, you’ll just need to make the payment.
![How to Start a Blog on Bluehost Step by Step in 2023? [for Beginners] 10 Make Payment on Bluehost](https://digitalmillions.org/wp-content/uploads/2021/07/Make-Payment-on-Bluehost.gif)
Simply enter your payment information, read and accept the terms and click Submit to process the payment and create your Bluehost account.
That’s it!
Now that you’ve got a hosting account, you are ready to start blogging.
Disclosure: Please note that if you decide to buy hosting using any link on this page, I’ll get compensated, by the hosting company. And this is what motivates me to write this tutorial for you, free of charge. In fact, if you do click and buy, thank you.
Step 2: Log into Bluehost
As you submit your payment information and the payment is confirmed, you’ll be able to create a password for your Bluehost account.
![How to Start a Blog on Bluehost Step by Step in 2023? [for Beginners] 11 Create a Bluehost Password](https://digitalmillions.org/wp-content/uploads/2021/07/Create-a-Bluehost-Password.png)
Just choose a password, confirm it, accept the terms, and hit Next. You can use this password and your email address to log into your Bluehost account.
As you set up your hosting and are ready to start blogging, you need a platform.
There are plenty of blogging platforms out there.
But, WordPress is definitely the most widely used blogging CMS and that’s what I recommend and use too. It’s used by some of the largest websites on the internet, including TechCrunch, CNN, and Major League Baseball.
The best thing?
Nowadays, Bluehost automatically installs WordPress for you. Right from your Bluehost account dashboard, you’ll be able to manage and control your blogs, websites, domains, various settings and also log into your WordPress dashboard.
![How to Start a Blog on Bluehost Step by Step in 2023? [for Beginners] 12 Bluehost Dashboard](https://digitalmillions.org/wp-content/uploads/2021/07/Bluehost-Dashboard.png)
You also get an email with your login credentials.
You can also log into WordPress using
Additionally, you can now log into your new WordPress site by typing in your site domain name followed by “/wp-admin”. From now on, this is how you’ll log into your WordPress site, so keep it in mind and write it down if necessary.
READ: 97 Tiniest Steps of Creating a WordPress Blog from Scratch.
Step 3: Log Into WordPress
To manage everything on your WordPress blog, you’ll need to access your WordPress admin. This is the place from where you can control almost every aspect of your newly built WordPress blog.
There are several ways to access your WordPress admin.
The most preferred way to access your WordPress admin area is by adding /login/ or /admin/ to the end of your site URL.
For example:
- yoursite.com/login/
- yoursite.com/admin/
- yoursite.com/wp-login.php
- yoursite.com/wp-admin/
Please note that you cannot access the WordPress admin area if the DNS propagation time of 24 to 48 hours is not over.
If you’ve registered your domain from a different registrar like Namecheap, your domain should point to your web hosting before you can access the WordPress admin area. So you may need to wait for 24 to 48 hours.
Make sure you change your domain’s nameserver details after you have registered with Bluehost. Your nameserver details will be sent by email.
RELATED: How to Start a Blog on GreenGeeks Hosting in 5 Easy Steps?
Step 4: Configure WordPress
To access your WordPress dashboard, you will need to log into your admin area. So visit your WordPress login URL and once you’ve logged in to your WordPress site, you’ll land on the WordPress Dashboard.
Once you log into your dashboard, you’ll soon realize that it’s pretty easy to navigate. Most options are pretty self-explanatory.
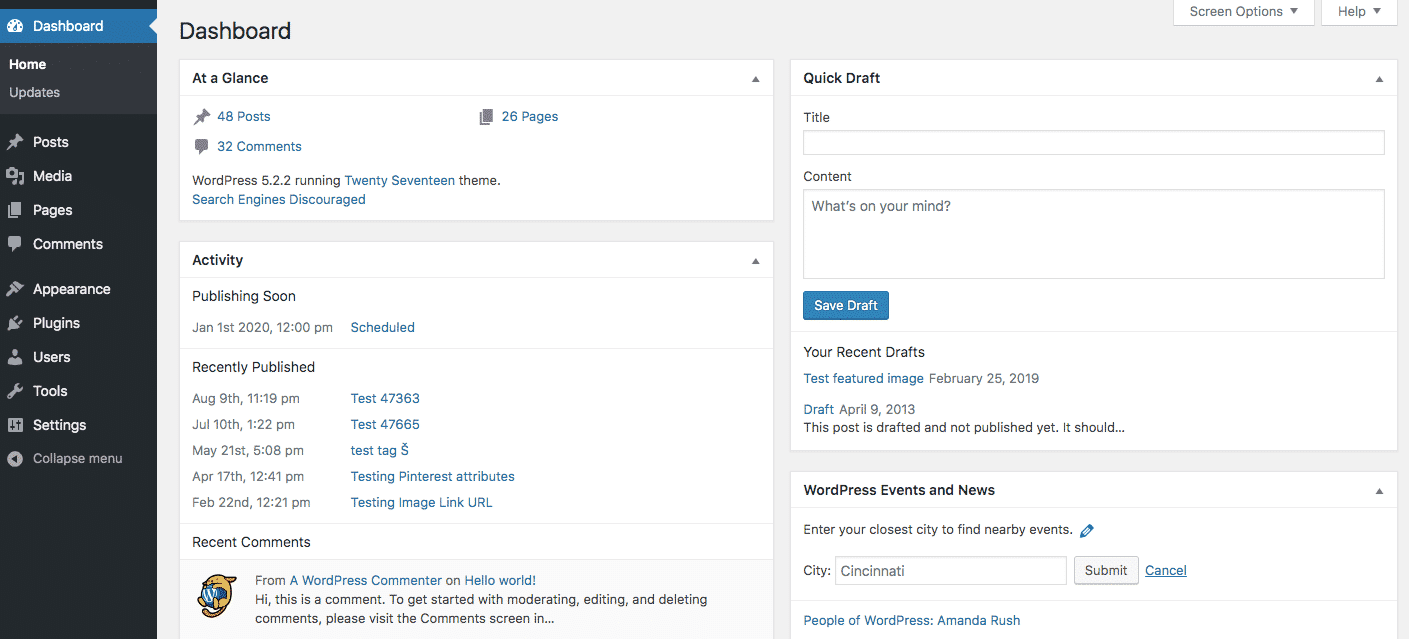
Your dashboard is the first thing you will see every time you log into your WordPress admin area. So it’s a good idea to get acquainted with what’s in here so that you can customize it or make it more useful for you.
The first thing you will see on the dashboard is the Welcome area.

This is created to help you get started with WordPress when you first start using it. Here you’ll see some basic getting-started type tasks.
However if you already logged into WordPress multiple times and find this section not very useful, you can dismiss the section by clicking on Dismiss at the upper right corner of the section.
You’ll see some of the boxes on the dashboard by default.
The first one you see is At a Glance box which provides some basic information about what content you have on your blog.
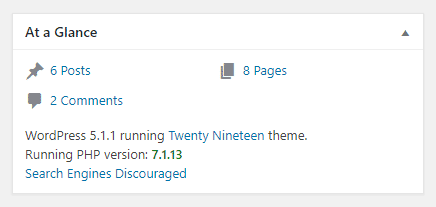
There is an Activity box that provides information on any recent activity on your blogs like any new post, publishing date, or new comments.
On the right side of your dashboard, there is a Quick Draft box.
So basically there are all kinds of different widgets. And WordPress dashboard is not restricted to only the widgets I talked about.
Many plugins can also add new widgets to your dashboard.
These widgets can be enabled or disabled. In order to do this, click on the “Screen Options” to see all the default widgets or widgets added by any plugins. Simply uncheck the widget you want to remove.
You can also minimize the widgets by clicking the titles.
Truly speaking, it’s quite user-friendly. So just spend some time on the WordPress dashboard. You’ll soon be quite familiar with it.
Now, let’s configure WordPress to get it ready for blogging.
1. Set Up ‘Search Engine Visibility ‘
This section is vitally important if you want people to find your blog. In this step, you will learn about the most crucial settings inside WordPress.
Anything wrong with these settings may ruin your success.
Did you know… There is one tiny checkbox on WordPress, and if it is set up with the wrong setting you are telling Google “Please do not ever send visitors”?
After you start a WordPress blog, you want search engines like Google to crawl your blog so that people can find you in Google search.
In order to ensure that you are not discouraging Google or search engines from doing its thing, Go to Settings > Reading.

You need to unmark the box next to Search Engine Visibility to make sure search engines can index you. As a result, your blog will be found on google.
Next, you should configure the permalinks.
Read – The Ultimate Blogging Blueprint for Success
2. Set up Your Permalinks
Permalinks are the unique URLs of your blog pages.
Permalinks are the most important thing you should set up right after you successfully log into your WordPress admin area.
The permalink (URL) for this article or webpage is:
digitalmillions.org/start-a-blog/
If you type this URL in your browser address bar and hit Enter, you will land on this webpage. This URL makes it easy for human beings or Google bots to easily understand what this page is about.
But there’s a problem with WordPress default permalinks structure.
The default permalink structure looks something like this:
www.YOURWEBSITE.com?p=678
Here 678 is a unique ID given to the post or page in the database.
This kind of link structure doesn’t give any possibility to optimize the URL for neither human beings nor Google bots.
As a result, it doesn’t help SEO.
So it’s very important to configure your permalinks the right way right after you install WordPress and have the opportunity to do it.
In order to set up your permalinks the right way, log into your WordPress admin area. Click on Settings and then Permalinks.
You will see this:
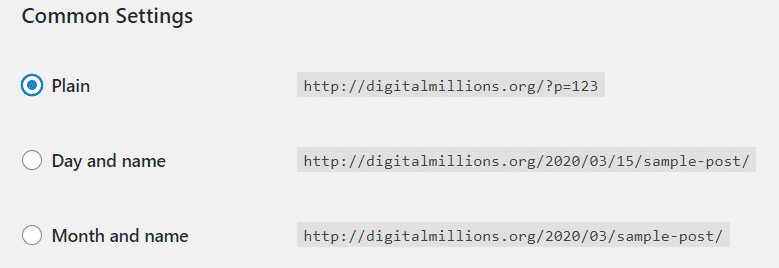
Uncheck Plain and select Post name as your permalink structure. It will help you set the permalinks for every piece of content individually.
Take a look at the image below as a reference:
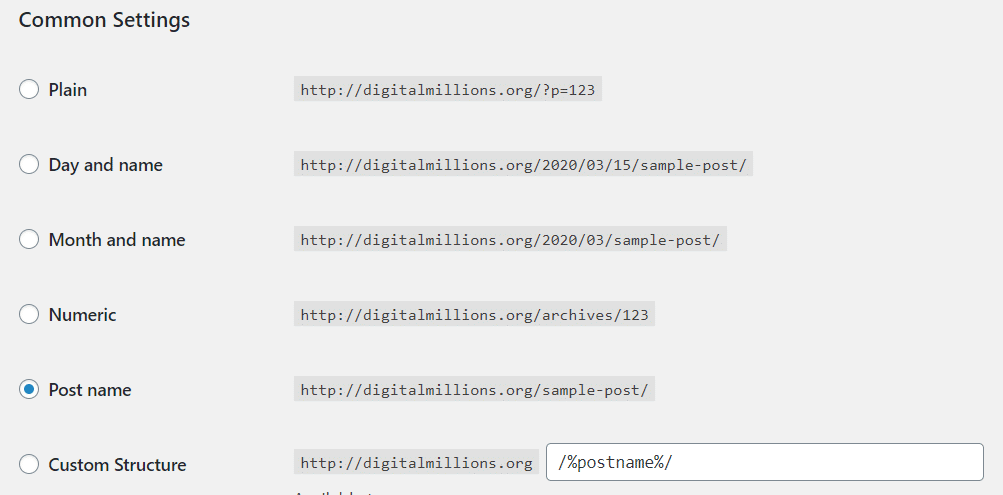
Click Save Changes to save your changes. That’s pretty much everything you should do with your permalinks.
Remember that setting up the right permalinks structure is crucial for your blog’s SEO success. So please don’t ignore it.
Let’s see how to install WordPress themes to make your blog look beautiful.
3. Install WordPress Themes
A WordPress theme is what determines how your blog will look.
It’s a collection of templates and stylesheets which are used to define the appearance and display of your WordPress-powered blogging website.
You can change the themes according to your choice to make your blog look more attractive, beautiful, and quite professional.
Different themes have different functionalities, of course.
When you install WordPress for the first time, WordPress will install a default theme for your blog automatically.
Most of the time, the default theme doesn’t serve the purpose and it lacks in many ways. What you can do is to change your theme to a better one that serves your purpose the best way.
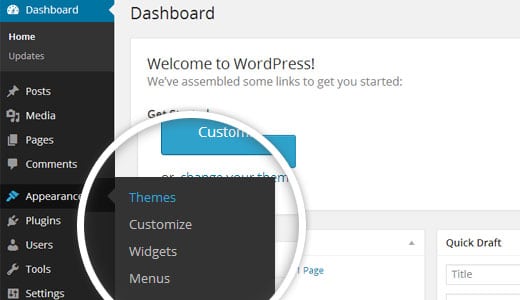
In order to install a new WordPress theme, visit your admin dashboard and click Appearance and then click on Themes.
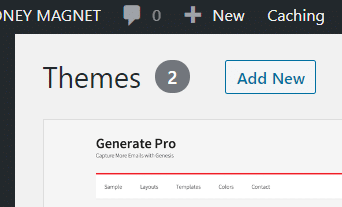
The next page will show you all the themes which are currently installed. Now click Add New button on the top.
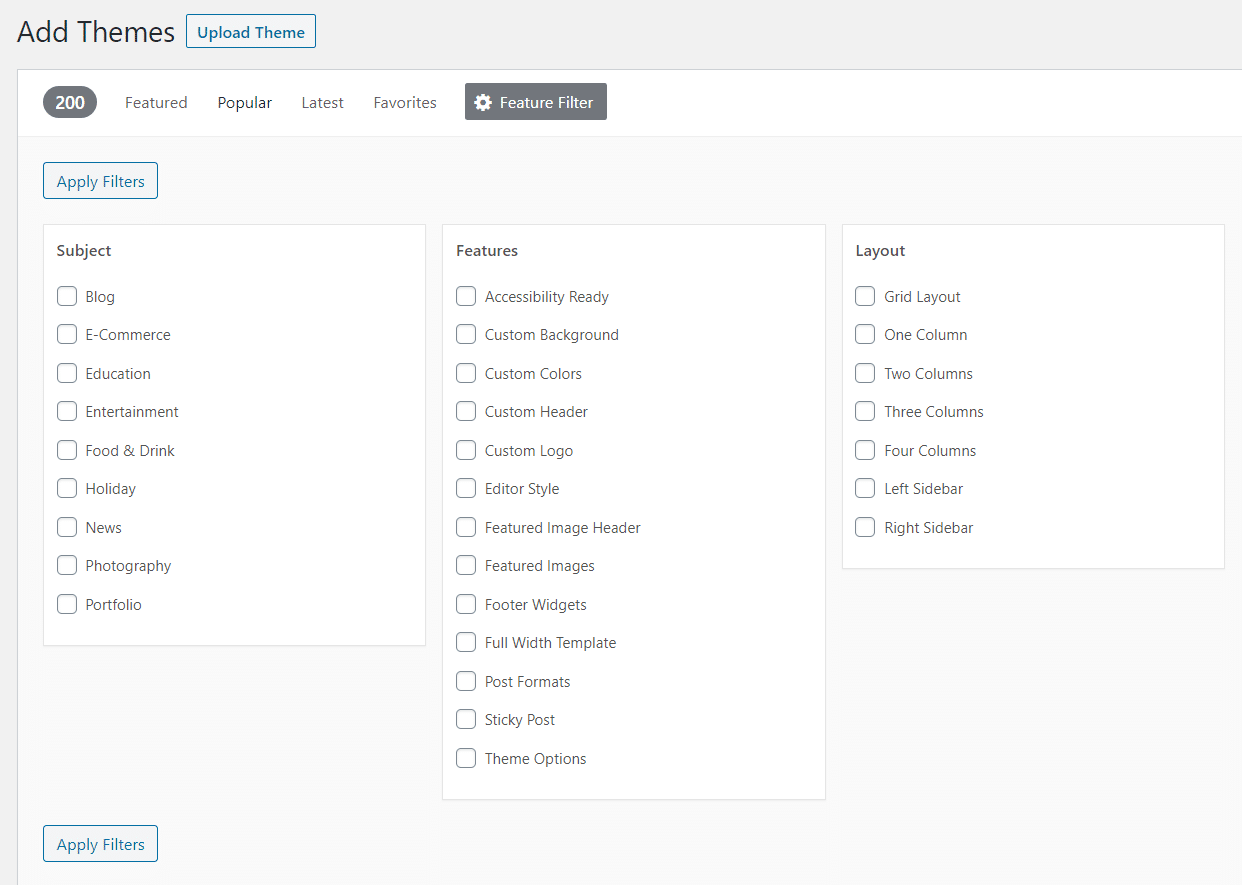
Once clicked, you’ll be taken to the theme installation page. There are thousands of WordPress themes available to download for free.
You can use Feature Filter to find out the exact theme you need.
Choose a theme of your choice and install it directly from inside WordPress.
It’s quite easy. But remember that installing a new theme will change the way your website looks and how it functions.
Even though there are thousands of free WordPress themes available to be downloaded, I don’t recommend going for free options.
Because you are trying to establish a professional blog. There are many problems you’ll face with free themes as your blog grows. And there’s nobody to help you.
In the case of premium ones, you’ll always get support and should be able to customize your blog in various different ways.
Most premium themes are good for SEO.
So it’s highly recommended that you use only premium themes on your WordPress blog. Trust me it will benefit you in the long run.
In my earlier days, I suffered a lot from using free WordPress themes on my blogs. The problems almost vanished when I started using premium themes. Below are some of the best places to find premium themes for blogging:
- Genesis Themes (good for SEO and loading speed)
- Astra WordPress Theme (fast-loading theme)
- Elegant Themes
- GeneratePress Theme
To build a wonderful blog on WordPress, you’ll need a wonderful theme. Only premium themes can help you build a wonderful blog.
You may ask which theme I’m using on this site.
It’s a called Authority pro which is based on the Genesis framework. The theme has been built by StudioPress (my number 1 choice for WordPress themes).
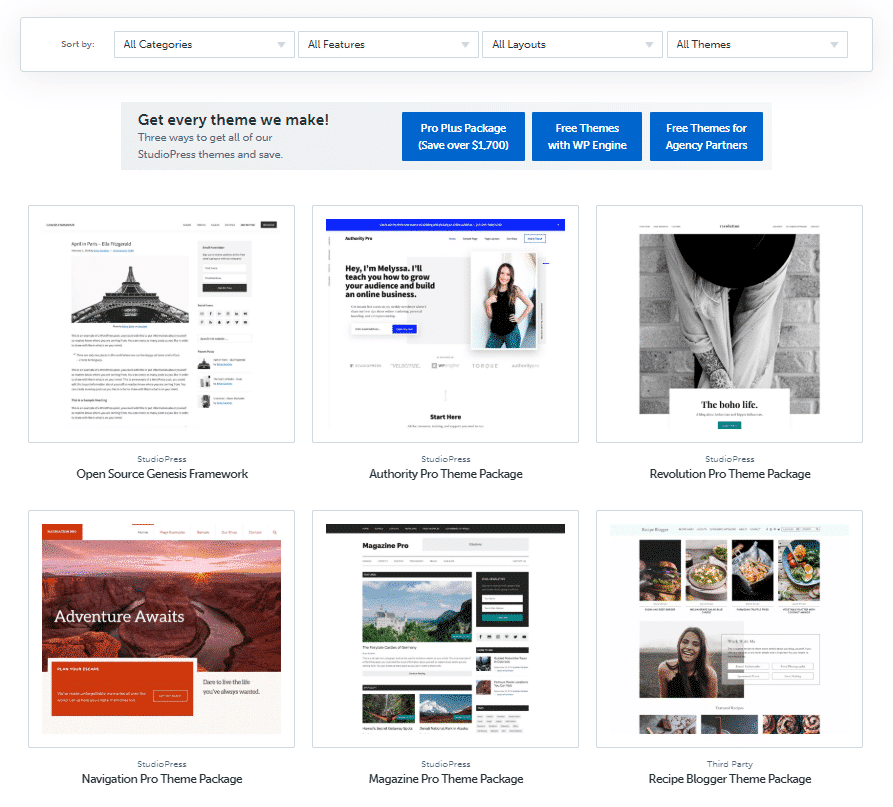
Once you purchase a premium theme, you’ll get a zip file that you can upload to WordPress and activate on your blog.
To upload a theme zip file, click the Upload Theme button on the top of the WordPress theme installation page.

You’ll be presented with the file uploader. Choose your downloaded zip file and upload it to WordPress. You’ll be asked to activate your newly installed theme.
Hit Activate and the new theme will be activated on your blog.
READ: 21 Best WordPress Themes for Blogging (Ranked And Compared).
4. Customize How Your Blog Looks
Once a new theme is activated, there are plenty of ways to customize how your new WordPress blog will look and feel. Based on which theme you install the customization options and methods will be different.
The best way to customize your blog is by using the WordPress customizer.
To access the customizer, click Appearance > Customize.
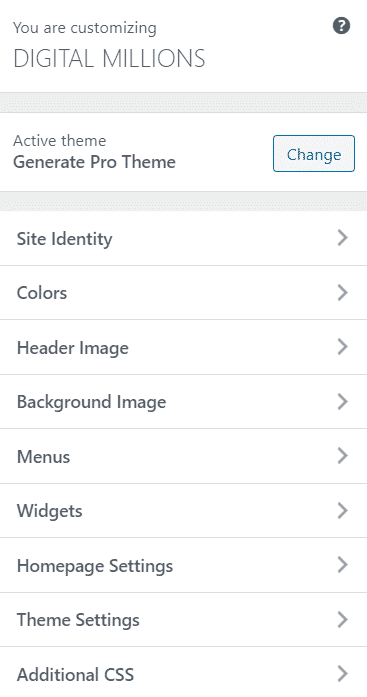
Most premium themes have lots of customization options. You can make it look and feel exactly the way you want, with the customizer.
If you are using a page builder theme like Elegant themes, you can build and design it visually. You can change almost every aspect of your blog.
If you are using a framework-based theme like Genesis themes, you can use its in-built options to make it look exactly the way you want.
Basically, it’s quite easy to customize your blog with a premium theme.
5. Install Necessary Plugins
WordPress is extremely powerful and flexible software.
But it cannot do everything. And it shouldn’t. Just because you need a specific function doesn’t mean someone else will need that too.
To add additional functionalities to your WordPress blog or website, what you’ll need is plugins. Plugins are a piece of software that can add additional functionalities to your WordPress blog.
There are over 50,000 WordPress plugins available for free.
You can install these plugins to your WordPress blog right from inside the admin area. Let’s see how to install a new plugin.
Let’s assume that you want to add eCommerce functionalities to your blog. So you need to add an eCommerce plugin to your blog.
To install a new plugin, click Plugins > Add New.
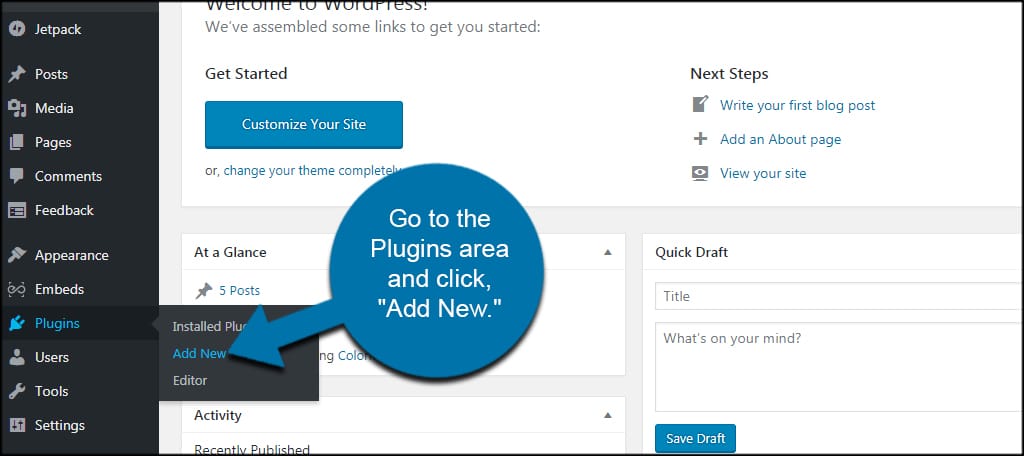
On the plugin installation page, there’s a search box available to search using your preferred key phrases.
In our case, we’ll search with the keyword “ecommerce“.
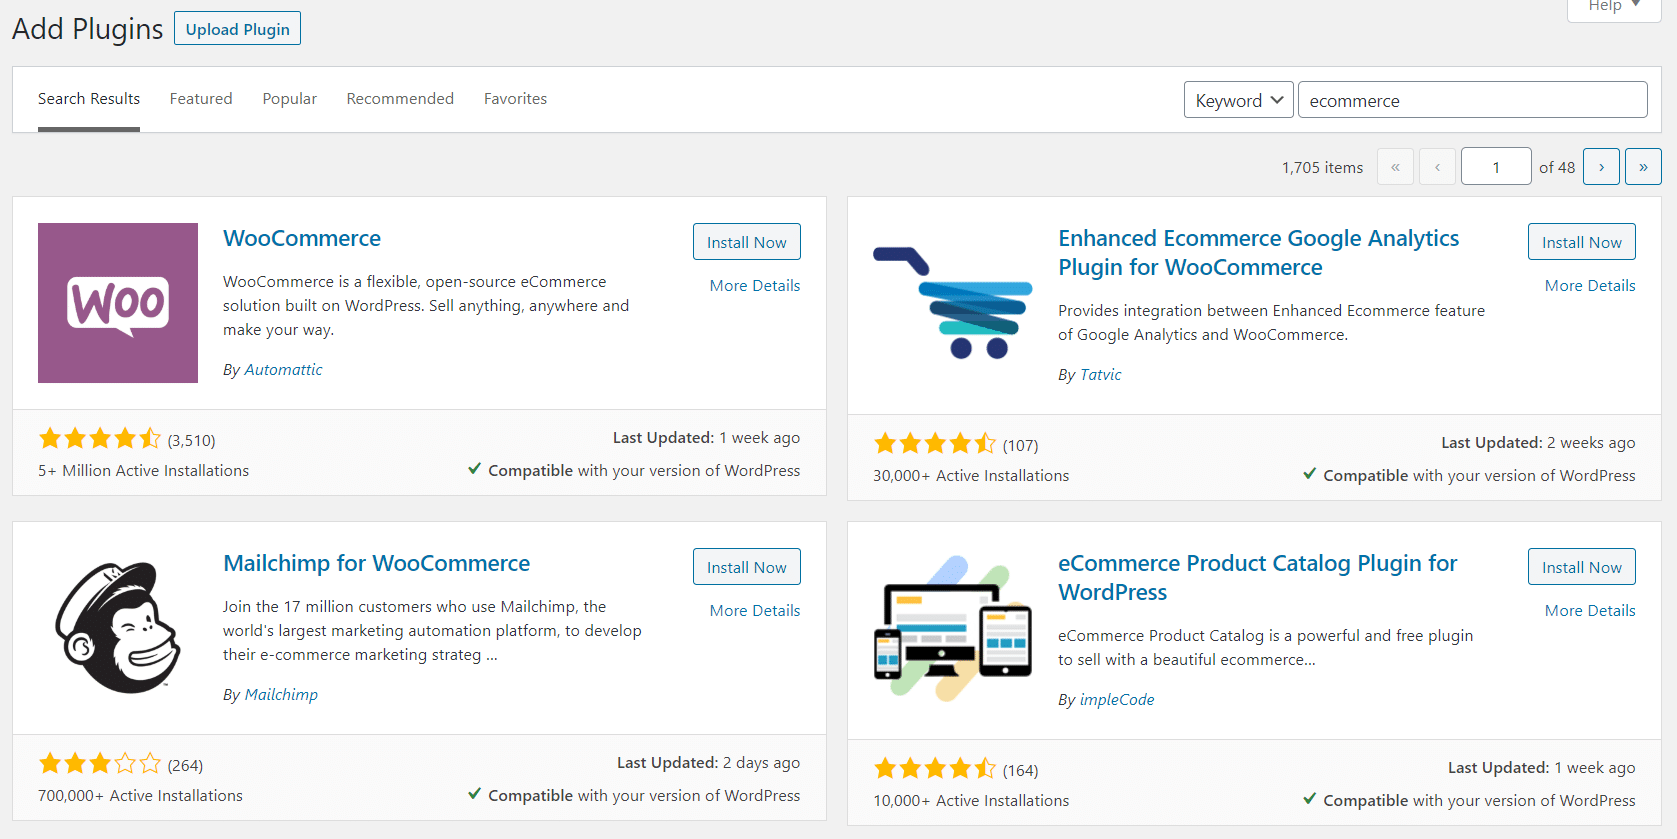
The 1st result we get is WooCommerce that can add eCommerce functionalities to our blog and is also installed on over 5 million sites.

So obviously it’s a very popular plugin. To install Woocommerce, you can click Install Now. Once it’s installed, click Activate.
It’s very easy. And of course, you can do it.
It was just an example. There are plugins to solve almost any type of needs you may have with your WordPress blog.
Below are some of the most popular search keywords used. Click on the image below to see the image at a larger size.

It will give you a rough idea of what’s possible with plugins. You can also download the plugins from WordPress.org Plugin Directory.
The plugins will be downloaded in a zip file which you can upload to WordPress using the Upload button on the Plugin installation page.
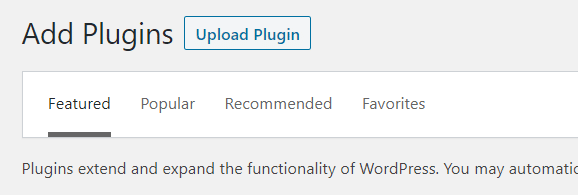
Please note that all plugins are not free. There are many third-party premium plugins that will cost you money.
In short, there are plugins to add almost any feature you may need.
READ: 9 Best Ways to Secure Your WordPress Website from Hackers.
Step 5: Write Your First Blog Post
It’s now time to start working on the most essential part of your blog:
The content – blog posts.
Undoubtedly, the most critical part of your blog is its content (the blog pots), followed by your blog design. The importance of content in attracting and retaining visitors, as well as creating your blog’s identity and brand, cannot be overstated.
You should focus on producing high-quality content that is useful to your audience. You’ll get more shares and backlinks to your content if your blog offers content that appeals to your visitors.
Naturally, it means that your blog will attract more traffic from search engines.
And, that’s what you want, right?
So let’s see how to write your very first blog post.
Just log into your WordPress admin area. And click Posts > Add New.
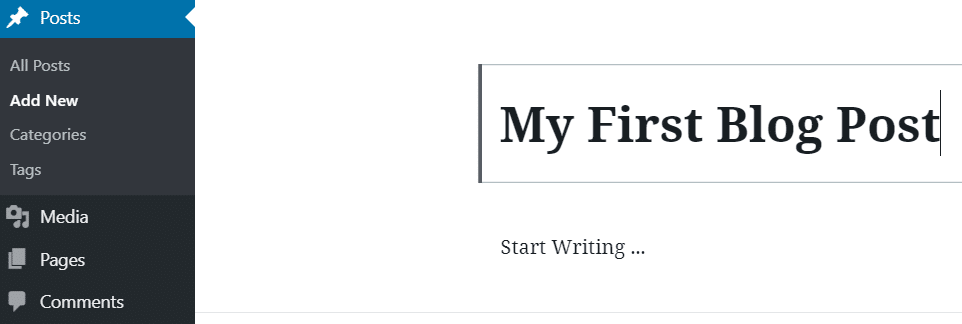
You are now on WordPress Gutenberg Editor. Enter the title of your article in the top box and then begin writing in the lower box.
To add an image to your post, click on the Plus [ + ] icon on the left side. It will show you all the available blocks that can be used.
Blocks are the various pieces of content that are going to make up your post. Click on the plus icon, search for the block you need, and use it.
![How to Start a Blog on Bluehost Step by Step in 2023? [for Beginners] 13 gutenberg-blocks](https://digitalmillions.org/wp-content/uploads/2020/03/gutenberg-blocks.png)
There are blocks for almost all sorts of needs. Below are some of the most common blocks that are used by content writers.
![How to Start a Blog on Bluehost Step by Step in 2023? [for Beginners] 14 common blocks](https://digitalmillions.org/wp-content/uploads/2020/03/common-blocks.png)
It’s fairly easy to use Gutenberg Editor. Just spend some time exploring different blocks. And you should be okay with it.
So now you can go ahead and write your very first blog post.
As a new blogger, it may take some time for new blog posts to get indexed in Google. To make it faster, you should submit new posts to Google index using the Google search console. Setting up an account is free.
Congratulations! You’ve just built a new WordPress blog on Bluehost.
But, let’s not get too much excited. You have a long way to go. The purpose is not just to start a blog, but also to make money from your blog.
And well, it’s been quite a ride.
I hope that you’ve enjoyed it, I certainly enjoyed writing it.
I wish you the absolute best of luck in your future financial ventures and remember that it always seems impossible until it is done.
And please share this tutorial if you’ve found it helpful and useful.
It helps people who might need this information and also gives meaning to the countless hours I’ve spent creating this tutorial for you, free of charge.
You May Also Like…
- 25 Best Web Hosting Services for Bloggers and Businesses
- Bluehost Affiliate Program Review: Earn Up to $125 Per Sale
- What is Web Hosting and How to Choose the Best?
- Top 7 Best Indian Web Hosting Providers of All Time
- 11 Disadavantages of Free Web Hosting Services
- Scala Hosting Review: Is Scala Hosting a Good Web Host?
![How to Start a Blog on Bluehost Step by Step in 2023? [for Beginners] 1 Start a Blog on Bluehost](https://digitalmillions.org/wp-content/uploads/2021/05/FEATURED-Start-a-Blog-on-Bluehost.png)
