Would you like to start a teacher blog that make money?
If so, you’re in the right place.
In this article, I’ll show you how to start a teacher blog, grow it, and make money from it. So, if you are interested, keep reading…
If you are a teacher, or thinking of becoming one, you’re probably wondering how you can make some extra money on the side.
After all, teaching is a noble profession.
But, it may not always pay the bills.
So, what can you do?
One option is to start a teacher blog.
A teacher blog can be a great way to make some extra money while doing something you love. In fact, if you do it right, you can even make a full-time income or more from your teacher blog.
Not only that, but a teacher blog can also be a great way to connect with other teachers and share your knowledge with the world.
My personal blogging journey started over 10 years ago.
Back then, I had no idea what I was doing.
I didn’t know how to start a blog or how to make money from it. I just knew I loved writing and I wanted to share my thoughts with the world. I created blogs in multiple niches including education, personal finance, and more.
Now, after 10 years of blogging, I’ve learned a lot.
I’ve made thousands of dollars from my blogs. I don’t want you to face the same challenges I did when I first started.
That’s why, in this article, I’m sharing with you the 7 steps you need to take to start a teacher blog that makes money.
So, without further delay, let’s get started…
How to Start a Teacher Blog?
Starting with a teacher blog is easy and it doesn’t have to cost you a lot of money. In fact, you can start a blog for less than $100/year. All you need is a domain name (which you can get for less than 0-$10/year) and hosting (which you can get for as little as $2.75/month from HostGator or Bluehost).
Don’t get me wrong, you can start a blog for free.
But, if you’re serious about making money from your blog, then I recommend you start with a self-hosted WordPress blog.
In fact, that’s how you can expect to build a brand.
Don’t get overwhelmed.
I know it may sound like a lot, but starting a blog is actually very simple and you don’t need any technical skills.
All you need to do is sign up for hosting and then install WordPress.
Don’t worry, I’m going to show you how to do that in a minute. But first, let me hold your hand and show you how to start a teacher blog step by step.
It all starts with researching the right niche for your blog.
1. Pick a Niche for Your Teacher Blog
The first step to starting a teacher blog that makes money is to do your research. This includes research on the topics you want to write about, the competition, and your target audience for your teacher blog.
When it comes to choosing a topic for your blog, you need to make sure you choose something you’re passionate about. It can be anything related to teaching, such as lesson planning, special education, or teaching strategies.
The following tools will help you with your topic research:
Using these tools will expedite your topic research process and help you narrow down to the best topics for your blog.
How to figure out the perfect topics for your blog?
Look for the following criteria:
- High search volume – You can use keyword research tools to find out the monthly search volume for your target keywords.
- Low competition – You can use SEMrush or other keyword research tools to find out the competition for your target keywords. The lower the competition, the easier it will be for you to rank in Google and get traffic.
- High commercial intent – This means that people who are searching for your target keywords are looking to buy something.
Once you’ve chosen a topic, take a look at other teacher blogs and see what they’re doing right and what they’re doing wrong.
- What topics are they writing about?
- How often are they posting new content?
- What type of content are they creating?
Now, you’ll have a better idea of what’s working and what’s not. This will give you a competitive advantage as you start your own teacher blog.
2. Choose a Blogging Platform
Now that you’ve done your research and you know what you are going to write about, it’s time to choose a blogging platform.
What is a blogging platform?
A blogging platform is a piece of software that helps you easily create and manage your blog. It’s like the house where your blog lives. You can’t create a blog without a blogging platform just like you cannot build a house without land.
This is the first thing you need when starting your teacher blog.
There are many blogging platforms to choose from.
But, the two most popular ones are WordPress and Blogger. Some other popular options include Medium, Tumblr, and Wix.
3 most popular blogging platforms
1. WordPress – The most recommended
WordPress is the most popular blogging platform.
It is used by millions of bloggers around the world, including some of the biggest brands like Forbes, CNN, Samsung, and IBM.
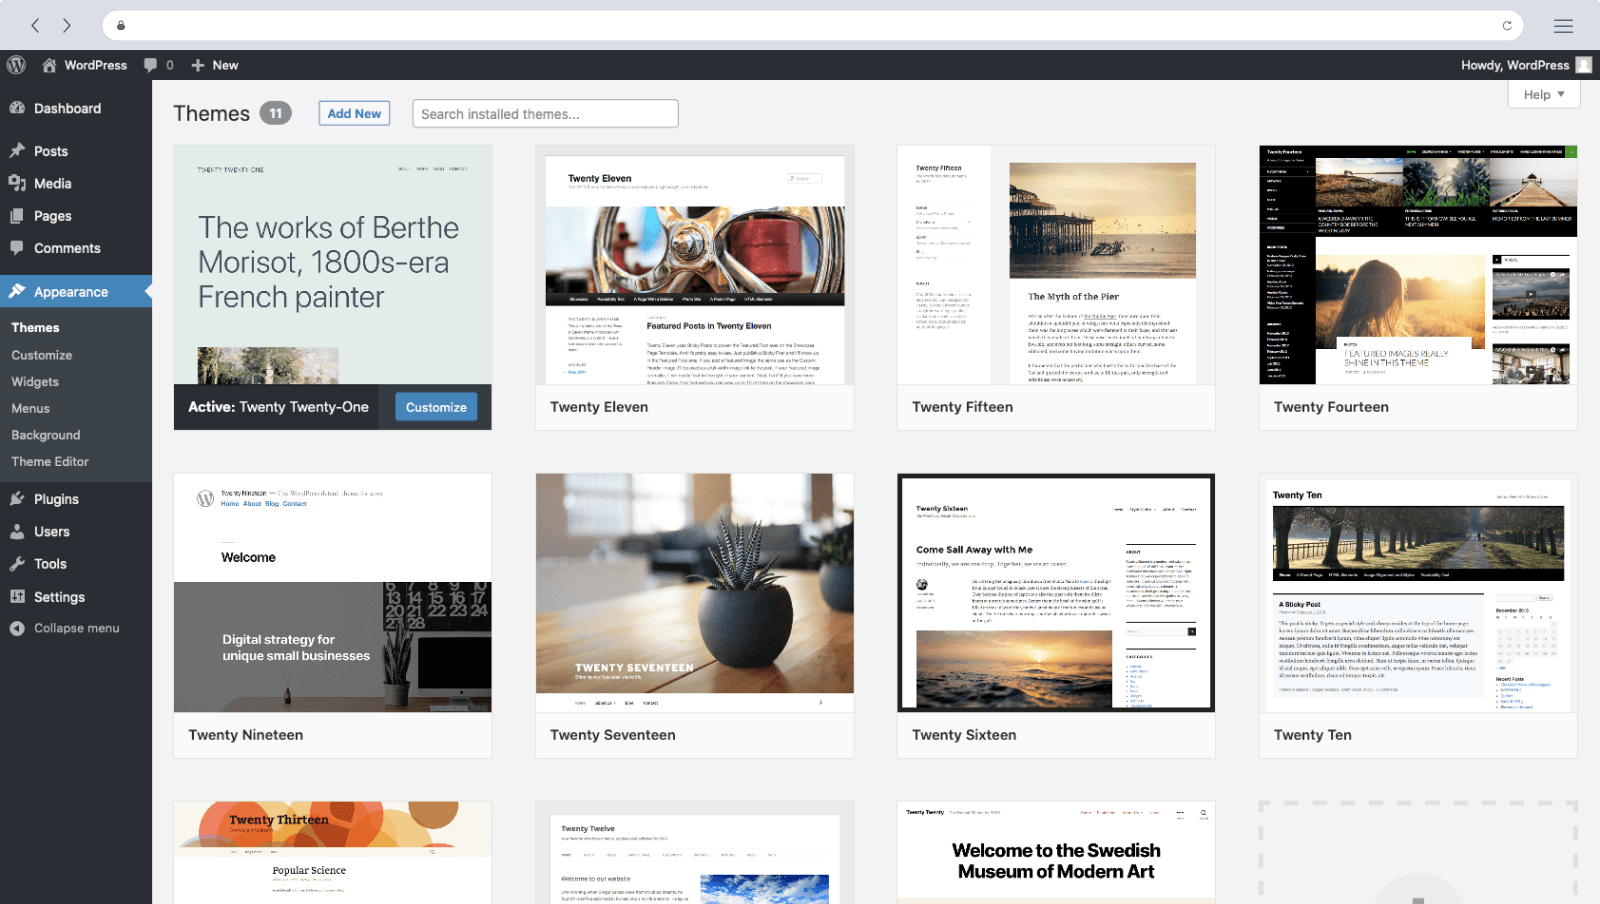
WordPress is a self-hosted platform.
To use WordPress you need to buy hosting and install WordPress on your own server. While this may sound complicated, it’s actually quite easy. And, once you get the hang of it, it’s very flexible and powerful.
Don’t worry! I will show you how to install WordPress.
Read – Start Your Own Blog: A Step-by-Step Guide to Success
2. Blogger
Blogger is a free blogging platform owned by Google.
It’s very simple to use and is a great option for beginners. However, it lacks some features that are available on WordPress. For example, you cannot install plugins on Blogger, which limits its functionality.

Blogger is not recommended if you are serious about blogging and if you want to build business from blogging.
Well, Blogger is excellent if you blog for fun. It’s free and easy to use. But, if you want to make money from your blog or want to have more control over your blog, then WordPress is the better option.
3. Medium
Medium is a popular blogging platform. It’s a great platform for bloggers who want to build an audience around their writing. However, it’s not as flexible as WordPress and does not allow you to monetize your blog.
Medium is best for bloggers who are not looking to monetize their blog and who want to build an audience around their writing.

Medium doesn’t also let you own your blog.
So, if you want to build a business around your blog or if you want to have complete control over your blog, then WordPress is the best option.
Read about some more popular blogging platforms here.
So, which platform should you choose?
If you want the most popular and most recommended option, then WordPress is the best platform for you. It’s very flexible, powerful, and easy to use.
Why WordPress is The Best Blogging Platform
- WordPress is 100% free
- WordPress is open source software
- WordPress is super popular
- WordPress powers more than 30% of all websites online
- WordPress is used by some of the biggest brands in the world
- WordPress is secure
- WordPress is easy to use
- WordPress is very flexible
- There are thousands of plugins and themes available
- You can monetize your WordPress blog
- You can create any type of website with WordPress
- Most web hosts support WordPress
- You can find support and documentation easily
Read – Why Choose WordPress to Make a Blog?
Now that you know all the reasons why WordPress is the best blogging platform, let’s move on to the next step.
3. Pick a Domain Name and Hosting
Now that you know which blogging platform you should use, it’s time to pick a domain name and hosting for your teacher blog.
A domain name is the web address of your blog (www.example.com). And, hosting is where your blog lives on the internet.
WordPress itself is a free and open source software.
But, in order to use it, you need to buy hosting and a domain name.
But, don’t worry! It’s not going to be costly. In fact, i’ll show you how you can get a free domain name with your hosting.
Here’s how much it will cost you to start your WordPress blog:
- Domain name – $0-$15/year
- Hosting – $2.95-$5/month
- Total = $34.40-$80.40/year
Not bad, right?
For your domain name, you can use a domains registrar like Namecheap, GoDaddy, Bluehost, HostGator or any other registrar.
I recommend Namecheap.
But, today you can get a free domain name with hosting.
Following are some of the best web hosting providers for free domains:
For this tutorial, I’ll use Bluehost hosting.
Yes, if you use this link, you can get a free domain with your hosting from Bluehost, one of the biggest web hosting companies in the world.
Bluehost is officially recommended by WordPress.
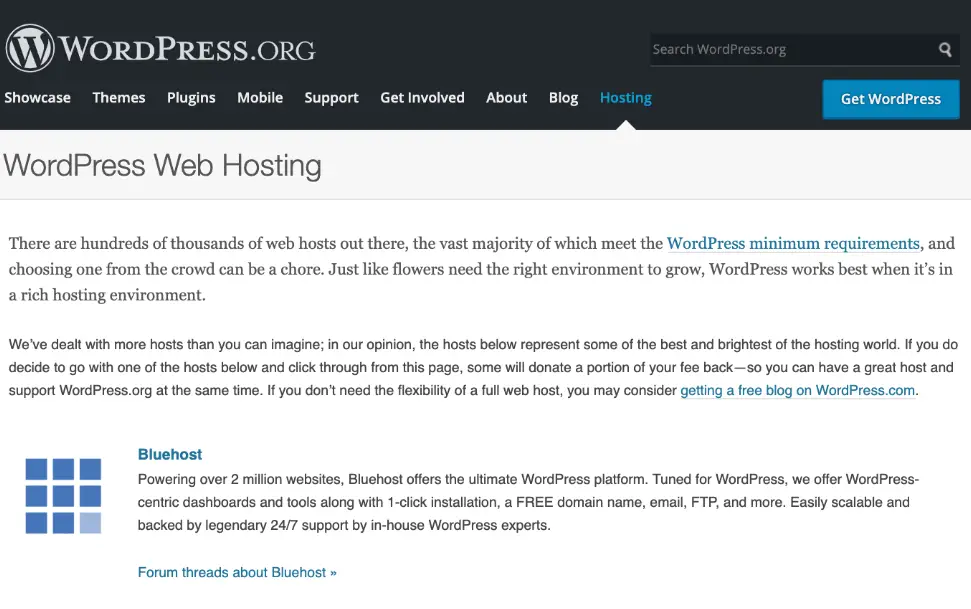
Bluehost is one of the biggest and most popular hosting companies in the world and it powers over 2 million websites worldwide. They are one of the cheapest hosting providers with plans starting at just $2.95/month.
Best Features of Bluehost Web Hosting
- It is incredibly easy to use for beginners.
- Bluehost is extremely affordable. I strongly recommend going for the 3-year plan as it gives you the best discount and the lowest price.
- FREE domain name.
- FREE one-click WordPress installation.
- FREE website builders.
- FREE 24/7 customer support if you need any help.
- 30-day money-back guarantee
- You’ll have a self-hosted WordPress blog. That means you’ll own your blog. Self-hosted websites are much more professional than free hosting sites.
And, if you use this link to buy your hosting, you’ll get a free domain name as well. So, it will only cost you $2.95/month to start your teacher blog.
Here’s how you can get started with Bluehost:
First, click here to go to Bluehost.
This is where you’ll host your blog, and it’s also where you’ll have the most control and freedom. Unlike WordPress.com or Blogger.com, which host your blog on their servers and give you no control over your blog.

While having your own host will cost you money, it will provide you the freedom to manage and control your own content as a blogger.
And, that’s what you should look for. Control.
So, let’s get started. Click this special link to visit Bluehost.com and you’ll be able to save over 60% on the regular hosting price.
When you land at the Bluehost homepage, click on the button that says Get Started. Then, you’ll be able to choose your hosting package.
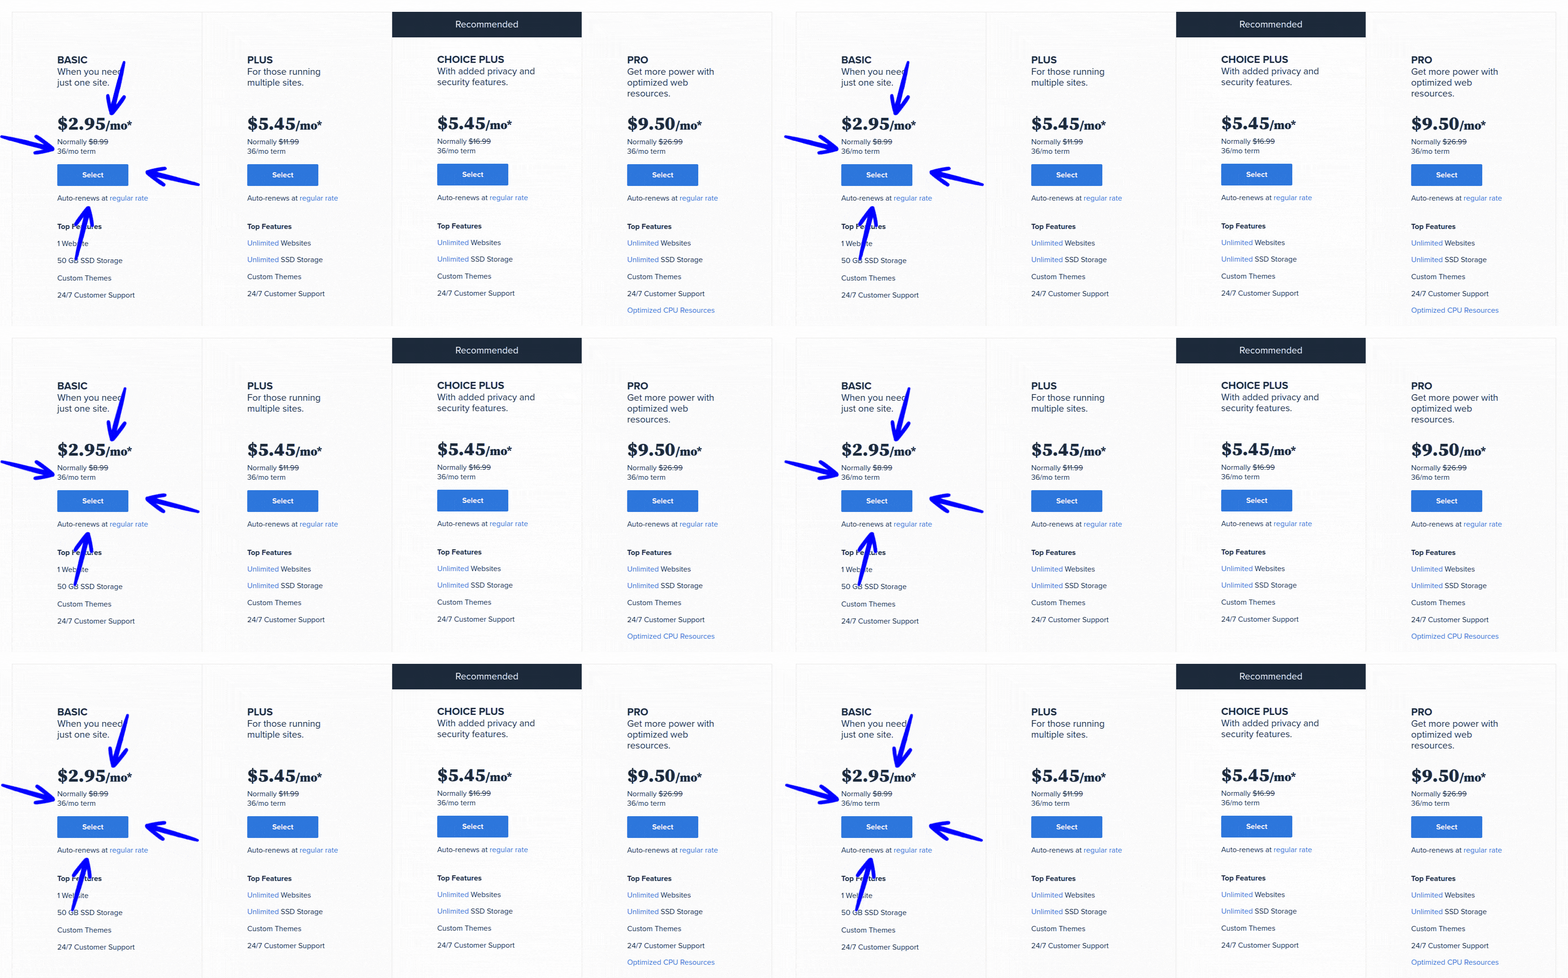
Next, choose a plan that meets your requirements.
To be frank, the Basic hosting plan should be sufficient for the majority of new blogs. You can check their other plans for more features and extras if you prefer.
You can always upgrade later.
Click on the button that says Select to choose a plan. After you’ve chosen your plan, Bluehost will let you create a free domain name.
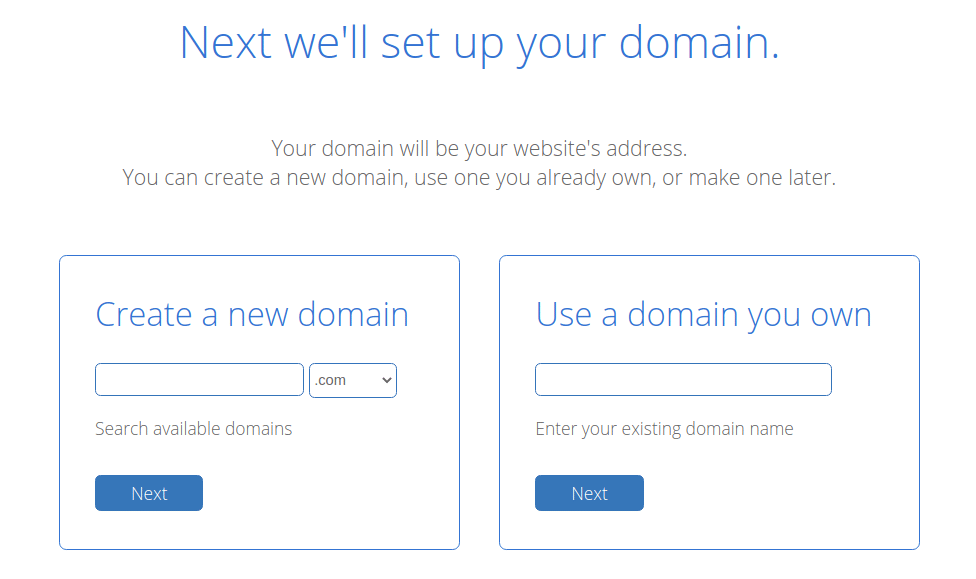
Type the domain name you wish to register and hit Next.
Or, if you’ve already registered a domain from a separate registrar, you should use the field Use a domain you own and then hit Next.
If your desired domain isn’t available, try something else.
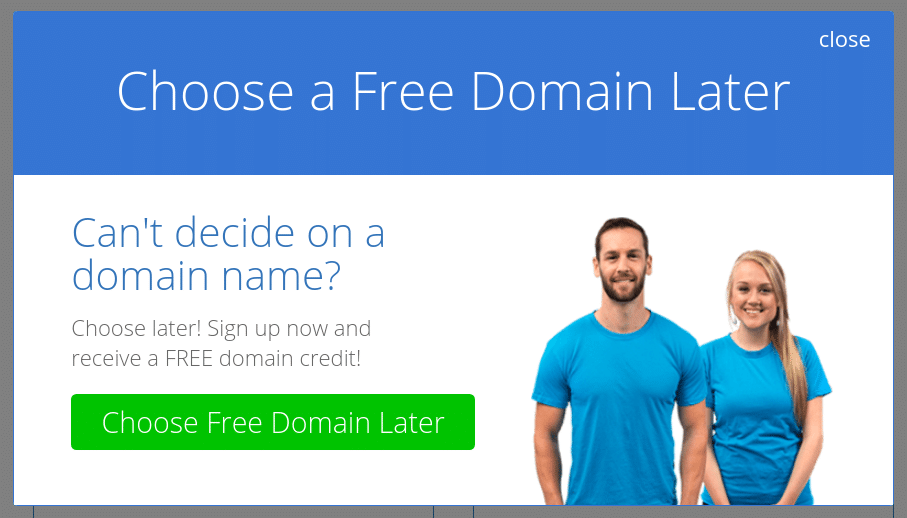
Also, you can pick the option to choose your domain name later to get a free domain after setting up your account.
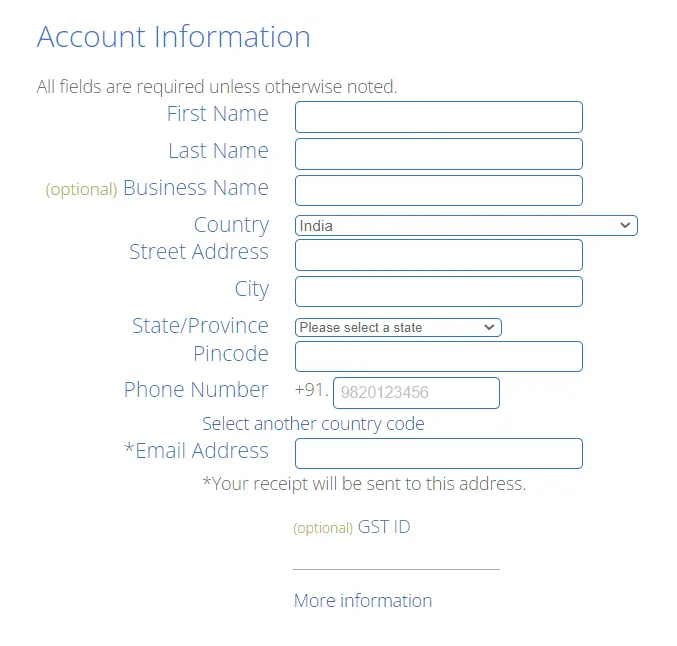
On the next screen, you’ll be able to create your Bluehost account. You can use your Google credentials to sign in or fill out the form.
It takes 2 minutes to simply fill up all the required fields as shown below.
Once you are done, make sure the right hosting plan is selected and choose a duration. You can grab a substantial discount by opting for a longer hosting plan, but you must pay in full upfront.
I’d suggest you go with the longest term which is 36 months.
Because it gives you the best deal.
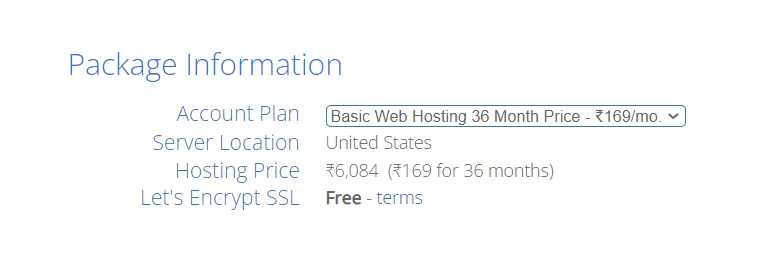
That’s how you can get the highest discount, less than $3 per month.
Quite an amazing deal, right?
Finally, under Package Extras, you can select various extra services that Bluehost recommends for your blog (or website), such as:
- Codeguard – It helps you automatically backup your site
- Bluehost SEO tools – It helps you optimize your site for SEO
- Single domain SSL – It maximizes your site’s trustworthiness with SSL
- SiteLock – It protects your site from malicious attacks, spammers and hackers
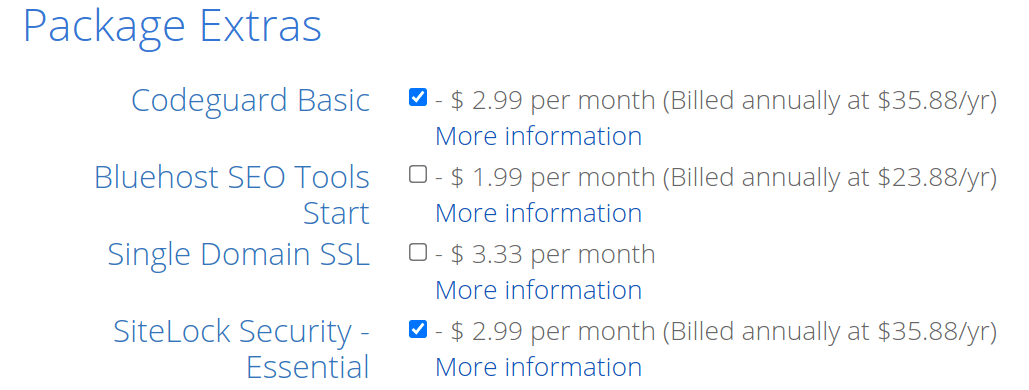
If you ask me, none of these are absolutely necessary. If you decide to buy some, the price can skyrocket. So, make your choice carefully.
Finally, you’ll just need to make the payment.
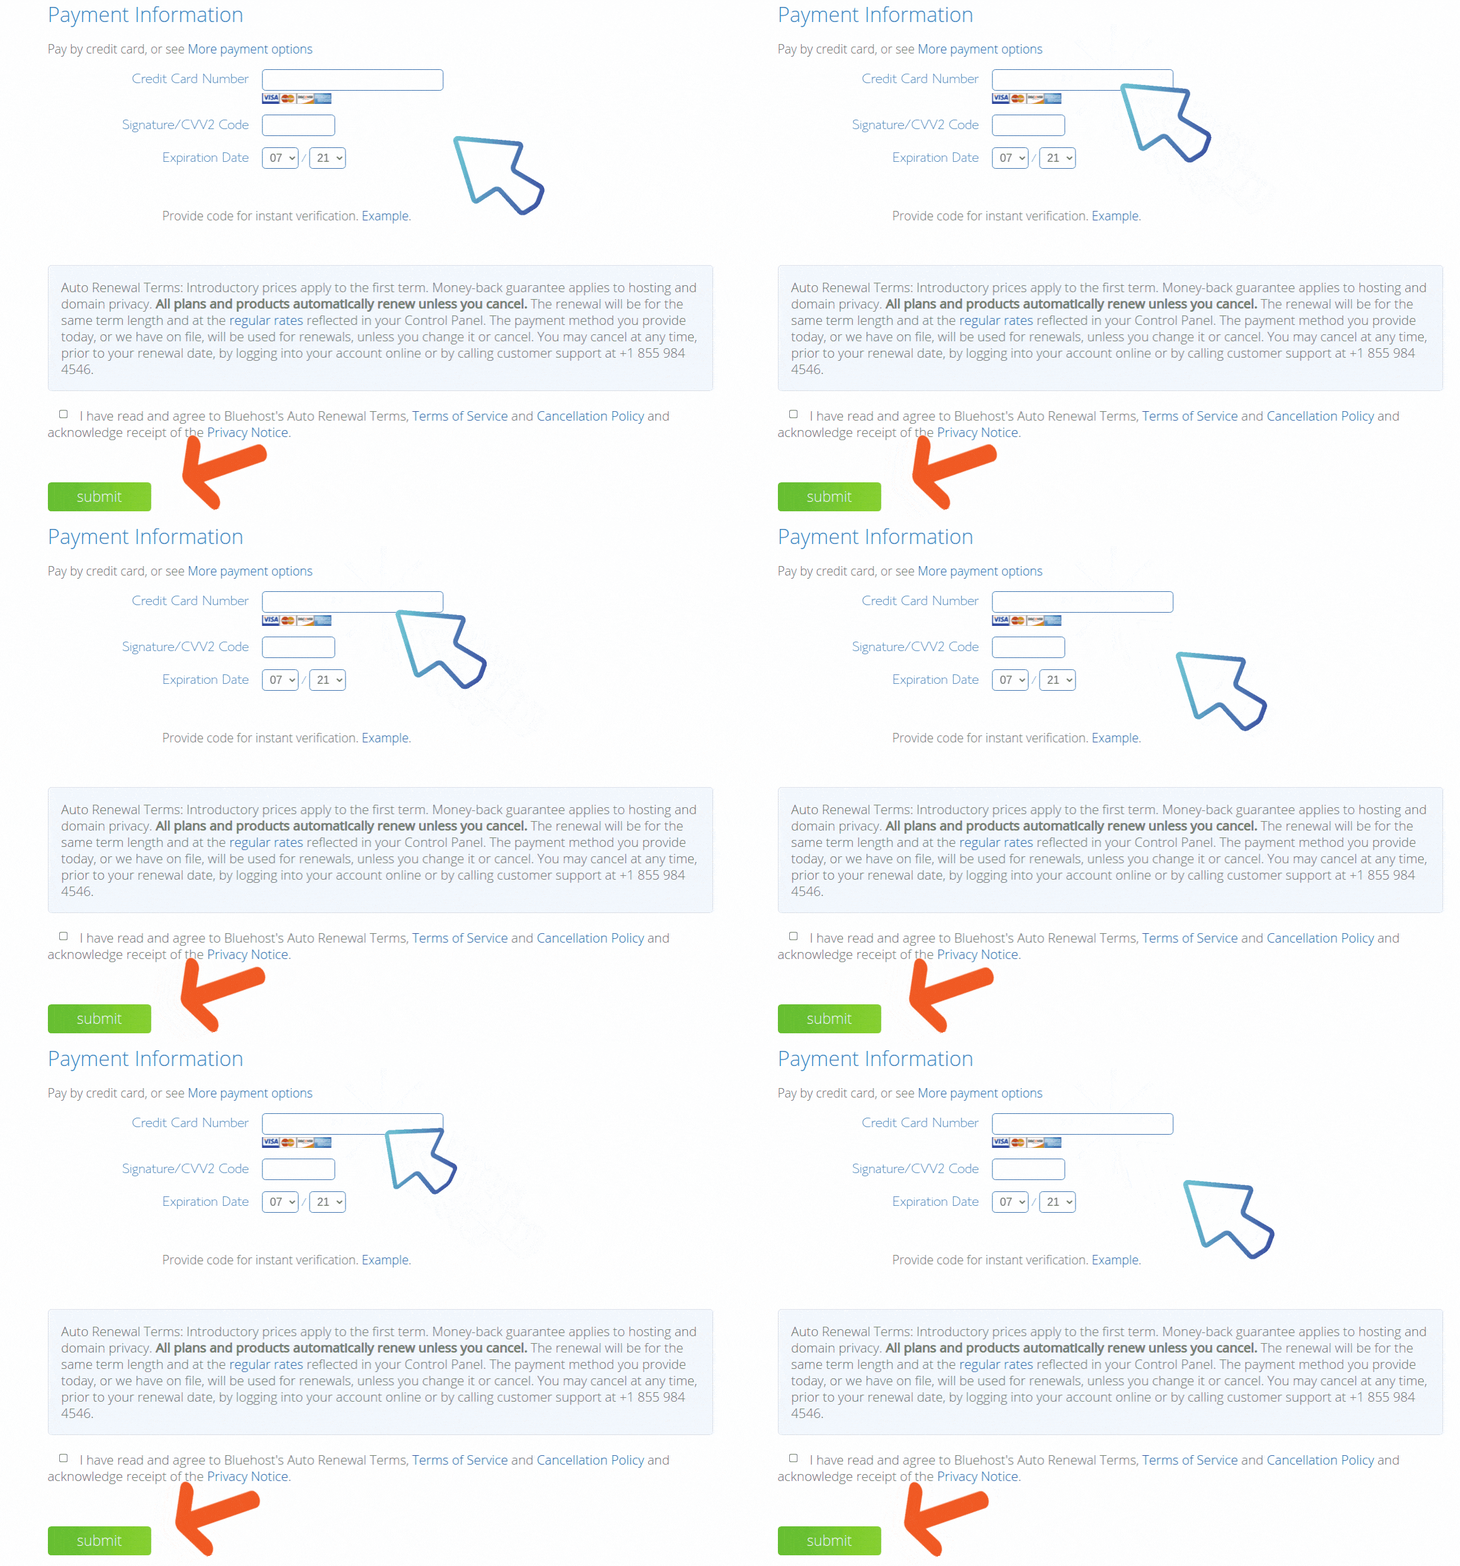
Simply enter your payment information, read and accept the terms and click Submit to process the payment and create your Bluehost account.
That’s it!
Now that you’ve got a hosting account, you are ready to start blogging.
Disclosure: Please note that if you decide to buy hosting using any link on this page, I’ll get compensated, by the hosting company. It doesn’t cost you anything extra. And, this is what motivates me to write this tutorial for you, free of charge. In fact, if you do click and buy, thank you.
4. Set Up Your Blog
Now that you have a domain name and web hosting, it’s time to set up your blog. If you’ve chosen Bluehost, this process should be pretty easy.
In fact, you don’t even need to install WordPress yourself.
Bluehost does it all in the background.
As you submit your payment information and the payment is confirmed, you’ll be able to create a password for your Bluehost account.
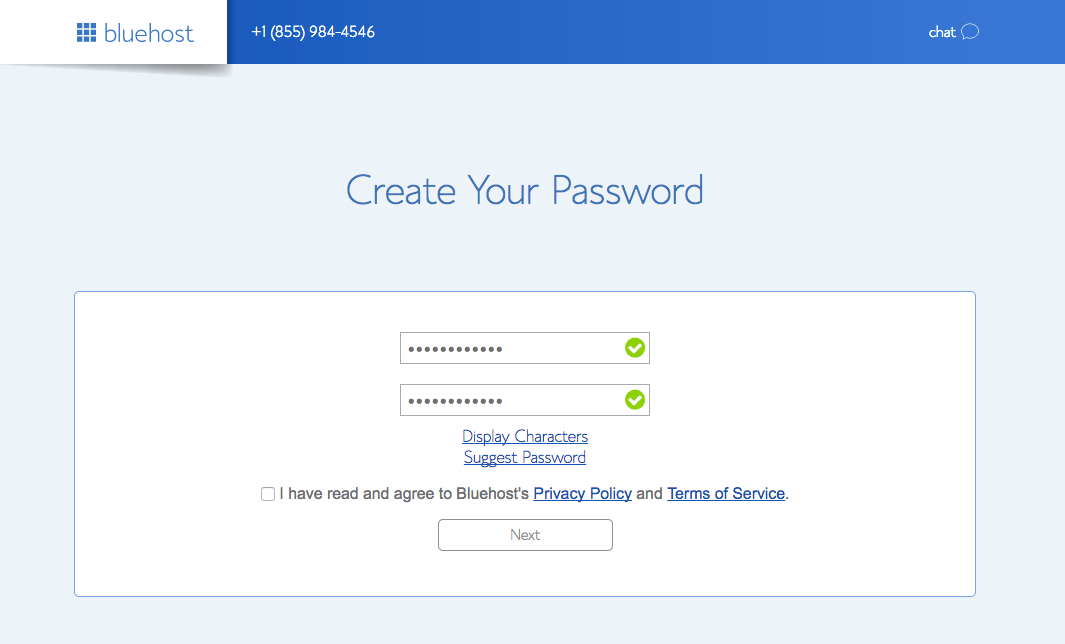
Just choose a password, confirm it, accept the terms, and hit Next. You can use this password and your email address to log into your Bluehost account.
As you get your Bluehost hosting, you are ready to start blogging.
Bluehost automatically installs WordPress for you. Right from your Bluehost account dashboard, you’ll be able to manage and control your blogs, websites, domains, various settings and also log into your WordPress dashboard.
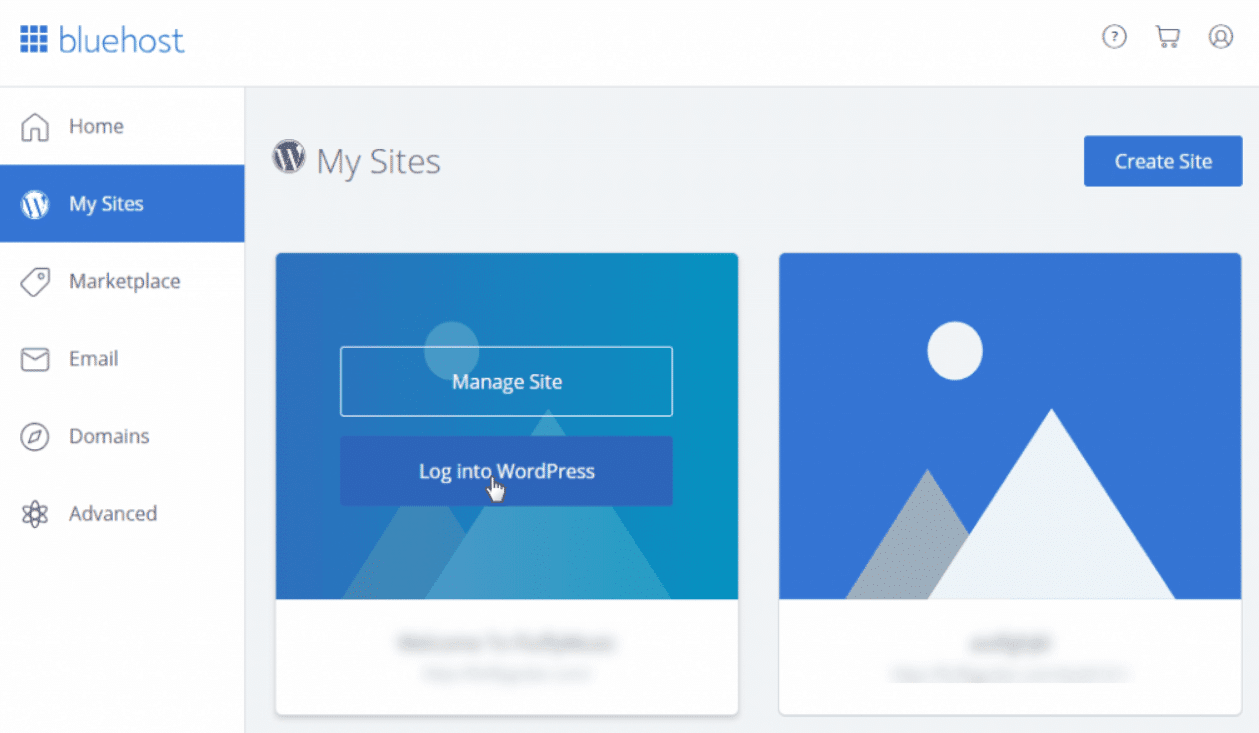
You also get an email with your login credentials.
Additionally, you can now log into your new WordPress site by typing in your site domain name followed by “/wp-admin”.
Note: Make sure you change your domain’s nameserver details after you have registered with Bluehost. Your nameserver details will be sent by email. Your domain should point to your web hosting before you can access the WordPress admin area. So you may need to wait for 24 to 48 hours.
Once you log into your WordPress dashboard, you’ll soon realize that it’s pretty easy to navigate. Most options are pretty self-explanatory.
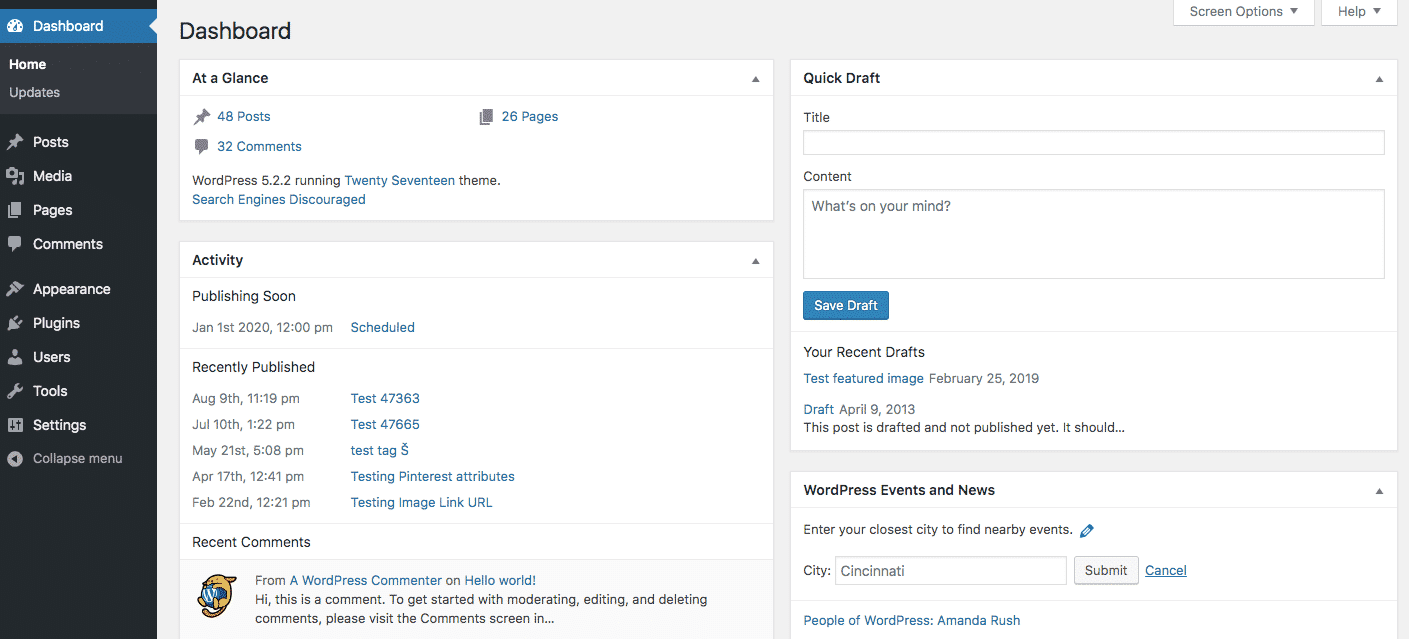
Your dashboard is the first thing you will see every time you log into your WordPress admin area. So it’s a good idea to get acquainted with what’s in here so that you can customize it or make it more useful for you.
On the left-hand side, you will see a sidebar with different links and options. These are the most important areas of your WordPress admin area:
- Dashboard – This is where you will land every time you log into your WordPress site. From here, you can quickly get an overview of what’s happening on your site and access the most important settings.
- Posts – Here you can write, edit, and publish your blog posts. You can also add categories and tags to organize your content.
- Media – In the media section, you can upload images, videos, and other files that you want to use in your posts.
- Pages – Pages are for static content like your about page, contact page, etc.
- Comments – In the comments section, you can moderate and reply to comments left on your blog posts.
- Appearance – The appearance section is where you can customize the look and feel of your site. You can add or change your theme, add widgets to your sidebar, and edit your site’s menus.
- Plugins – Plugins add additional features and functionality to your WordPress site. There are thousands of WordPress plugins for just about everything, from social media integration to security.
- Settings – The settings section is where you can configure the main settings for your teacher blog site. This includes things like your site title, permalinks, commenting settings, and so much more.
Now that you know your way around the WordPress dashboard, it’s time to start customizing and configuring your site.
Change your title and tagline
First, you need to change your site’s title and tagline. To do this, go to Settings » General in your WordPress dashboard.
On the next page, you need to enter your site’s title and tagline. The title is the name of your blog while the tagline is a short phrase that describes your blog.
You can also change your WordPress address and site address from here. However, I would recommend leaving these settings as they are.
Now that you have changed your site’s title and tagline, it’s time to choose a WordPress theme for your teacher blog.
Install a theme
A WordPress theme is a collection of files that work together to create the design and functionality of your WordPress site.
There are thousands of both free and premium WordPress themes available.
For a teacher blog, I would recommend choosing a simple and clean theme. That way, your content will be the focus, not your design.
Read – 21 Best WordPress Themes for Bloggers
To install a WordPress theme, go to Appearance » Themes. You will see the WordPress themes that are currently installed on your site.
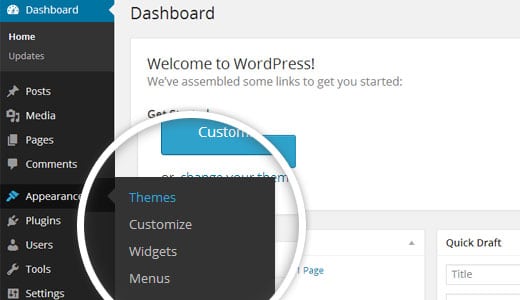
To add a new theme, click on the Add New button at the top.
On the next page, you can either upload a theme that you have downloaded from somewhere or select one of the free WordPress themes that are available in the WordPress theme directory.
To find a suitable theme, you can use the search feature or filter themes by features, subject, and popularity.
When you find a theme that you like, hover over it and then click on the Install button. WordPress will now install the theme on your site.
Once the theme is installed, you need to activate it.
To do this, click on the Activate button.
Now that you have installed and activated a WordPress theme for your teacher blog, it’s time to start adding content to your site.
Install plugins
As I mentioned earlier, WordPress plugins are like apps for your WordPress site. They add additional features and functionality to your teacher blog.
There are thousands of WordPress plugins available, and you can use them to add just about anything to your site.
Some popular WordPress plugins include:
- BlogVault
- WP Forms
- iThemes Security
- WP Rocket
- Imagify by WP Rocket
- ConvertPro
- WooCommerce
- MonsterInsights
- Yoast SEO
To install a plugin on your WordPress site, go to Plugins » Add New.
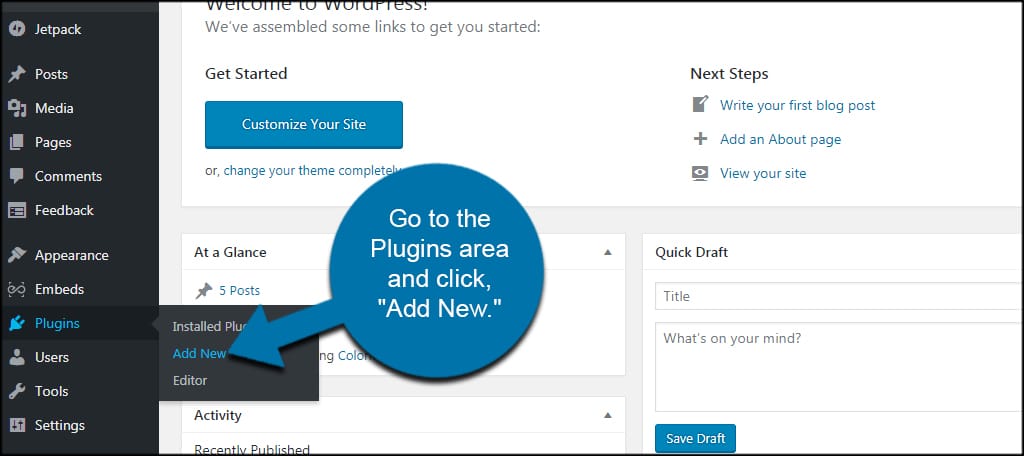
On the next page, you can either upload a plugin that you have downloaded from somewhere or select one of the free WordPress plugins that are available in the WordPress plugin directory.
When you find a plugin that you like, hover over it and then click on the Install button. WordPress will now install the plugin on your site.
Once the plugin is installed, you need to activate it.
To do this, click on the Activate button.
You have now successfully installed a WordPress plugin on your site.
Set up permalinks
Permalinks are the URLs for your blog posts and pages.
By default, WordPress uses what is called “ugly” permalinks. It’s recommended to change your permalinks to something more readable and user-friendly.
To do this, go to Settings » Permalinks.
On the next page, you need to select the permalink structure that you want to use. I would recommend using the “Post name” permalink structure.
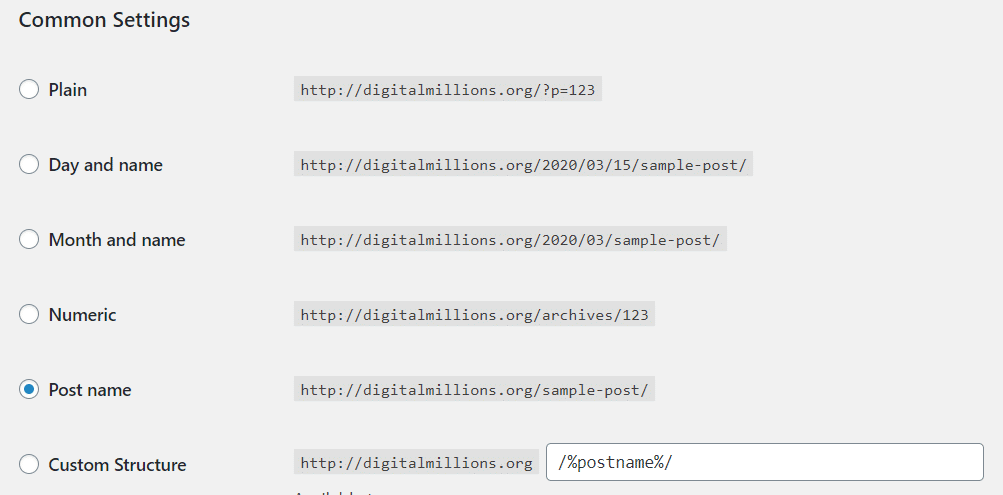
Click on the Save Changes button to save your changes.
That’s it!
Now that you have installed WordPress and set up your teacher blog, it’s time to start writing content and promoting your site.
5. Start Blogging
Once your blog is set up, it’s time to start blogging. This is what will make your teacher blog successful. Your blog posts are your assets and they will continue to generate search engine traffic and income for years to come.
So, how do you write a blog post?
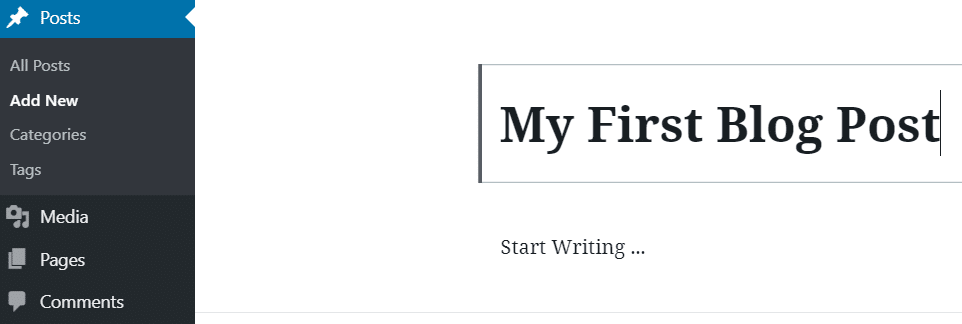
Simply log into WordPress and go to the “Posts” section. From there, you can add new blog posts, edit existing blog posts, or delete blog posts.
To add a new blog post, simply click on the “Add New” button. You’ll then be taken to a page where you can write your blog post. Once you’re done writing, simply hit the “Publish” button to publish your blog post.
It’s really that easy!
Now, it’s time to start writing some great blog posts.
Not sure what to write about?
Here are some for ideas for blog posts:
- How to be a better teacher?
- The best ways to engage your students
- How to use technology in the classroom?
- Classroom management tips
- Parent-teacher communication tips
- The best ways to assess your students
And much more!
Writing great blog posts is essential if you want to make money blogging.
Once you start writing, you’ll quickly come up with tons of ideas for blog posts. Just write about what you’re passionate about and what you think would be helpful for your target audience.
If you need help coming up with ideas, simply do a search on Pinterest or Google. You can also join some Facebook groups for teachers and see what types of questions people are asking.
You can also use Keyword Research Tools like find popular keywords that people are searching for. Then, you can write blog posts around those keywords.
Do some research and find out what type of content is popular in your niche. Then, start creating that type of content on your blog.
Really, the possibilities are endless.
A Teacher blog can be about anything related to teaching.
You just need to be creative and come up with content that your target audience will love. The rest will come with time!
Read – 10 Best Automated Grammar Checker Apps
6. Promote Your Teacher Blog
Now that you’ve written some great blog posts, it’s time to start promoting your blog. This is how you’ll get traffic to your blog.
There are many different ways you can promote your blog.
But, before you promote your blog, make sure your blog has great content that people will want to read and share. If you promote a blog with crappy content, you’re not going to get very far. So, first, take your time to write great blog posts and then start promoting your blog like crazy!
Here are some ways you can promote your teacher blog:
Search Engine Optimization
SEO or search engine optimization is the process of optimizing your blog posts so they rank higher in Google and other search engines.
This is the best way to get organic traffic to your blog.
The higher your blog post ranks in Google, the more traffic you’ll get. And, the more traffic you get, the more money you’ll usually make.
There are many different ways to do SEO.
But, the best way to learn is to just start doing it.
Start by doing keyword research and then optimize your blog posts around those keywords. You can also install an SEO plugin like WordPress SEO by Yoast or even Rankmath to help you with the process.
Also, I suggest that you Sign up for SEMrush.

This is one of the best SEO software out there to manage all your SEO tasks in one place starting from Keyword Research, On-Page SEO, Backlink Audit, Content Audit, Competitor Analysis and more.
Click here to try SEMrush premium features.
Additionally, you can read blog posts on SEO to learn more about it.
Just make sure you don’t get overwhelmed with all the information out there. Start small and then scale up as you get more comfortable.
I’ve written an extensive guide on how to optimize your blog content for SEO. It will help you get started with SEO and show you exactly what you need to do to get your blog posts ranking higher in Google.
Read – 10 Proven Ways to Optimize Your Blog Content
Social Media
This is probably the most effective way to promote your blog.
Share your blog posts on social media sites like Facebook, Twitter, and Pinterest. You can also join Facebook groups and share your content there.
Make sure you’re sharing high-quality content that people will want to read. No one wants to read a bunch of crap. So, make sure your content is top notch!
Using social media is free and it’s a great way to get traffic to your blog.
These initial traffic numbers might seem small, but don’t worry, they will grow over time. Just keep promoting your blog and the traffic will come!
Guest Blogging
Another great way to promote your blog is by guest blogging. This is when you write a blog post for another person’s blog. In return, they’ll usually let you put a link back to your own teacher blog.
This is a great way to get exposure for your blog and it can also help you build relationships with other bloggers in your niche.
To find guest blogging opportunities, simply do a Google search for “guest blog” + your niche or topic. For example, if you’re in the education niche, you would search for “guest blog + education.“
This will bring up a list of websites that accept guest blog posts.
Then, simply reach out to the website owner and ask if they’re interested in having you write a guest blog post for their site.
Tell them who you are and how you can help their readers. Most importantly, make sure you include a link to your own blog so they can check it out. If they’re interested, they’ll usually give you a list of guidelines to follow. Once you’ve written the guest blog post, simply submit it to them and wait for it to go live.
Assuming your guest blog post is high quality, you should get a decent amount of traffic from it. You might even get some new followers!
Apart from the traffic, the links you receive from guest blogging can also help with your SEO. This is because when other websites link to your blog, it tells Google that your site is high quality and relevant. It will help your blog rank higher in the search engine results pages (SERPS).
Commenting on Other Blogs
Another great way to promote your blog is by commenting on other blogs in your niche. When you leave a comment on someone else’s blog, make sure you include a link back to your own blog. This will help people find your blog and it might even lead to some new followers.
Just make sure you’re leaving quality comments.
No one wants to read a bunch of useless comments. So, take your time to read the blog post and leave a thoughtful comment.
If you do this enough, you’ll start to build relationships with other bloggers and they’ll be more likely to visit your blog and comment on your posts. This is a great way to get exposure for your new teacher blog.
Paid Advertising
Another great way to promote your blog is by using paid advertising. This is where you pay to have your blog ads displayed on other websites.
The great thing about paid advertising is that it’s very targeted. You can choose to only have your ads shown to people who are interested in education.
This is a great way to get exposure for your blog.
But it can be a bit expensive.
So, if you are on a tight budget, you might want to try some of the other methods on this list first. But if you have a bit of extra money to spend, paid advertising can be a great way to get your blog in front of new readers.
7. Make Money Blogging
Now that you’ve started your teacher blog and you’re getting some traffic, it’s time to start making some money!
When it comes to monetizing your blog, there are a few different options available to you. You can sell advertising space on your blog, become an affiliate for products that you recommend, or sell your own products and services.
Let’s understand each of these monetization methods in more detail.
Sell Advertising Space
One of the most common ways to make money from a blog is to sell advertising space. You can do this by signing up for an ad network like Google AdSense, Ezoic, Mediavine or Media.net. Once you’re approved, you can start displaying ads on your blog and earn money every time someone clicks on one of the ads.
One of the best ad networks I recommend is Ezoic.
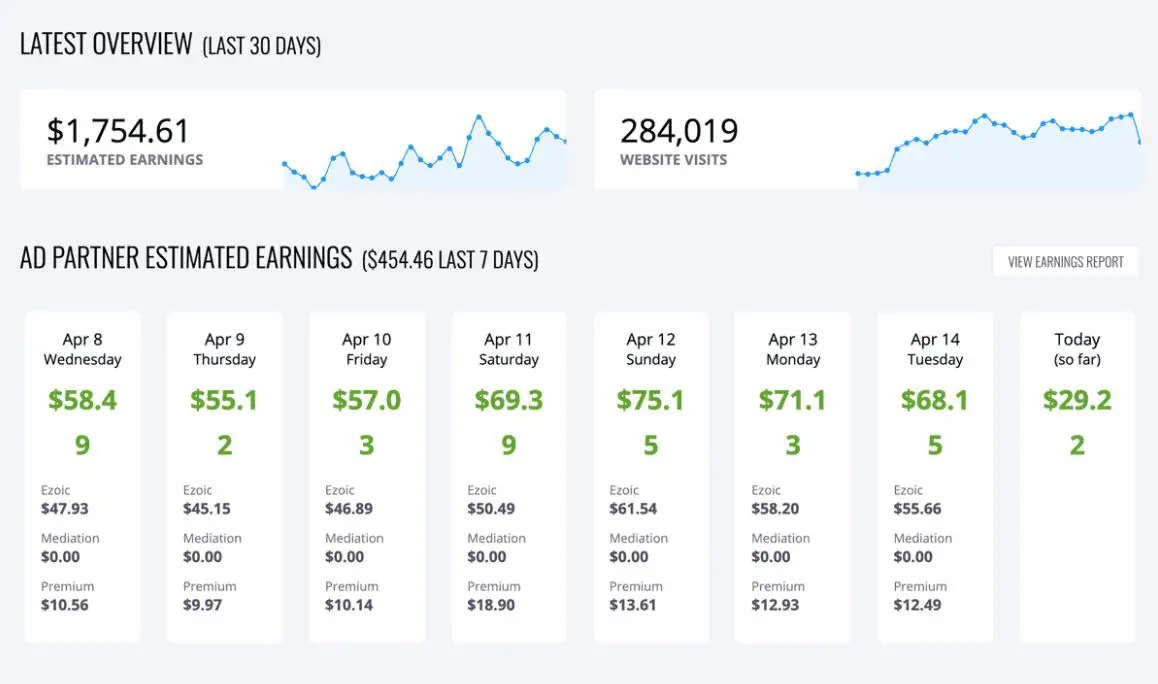
Ezoic is a Google Certified Publishing Partner and they’re also one of the few ad networks that allow you to connect your Google AdSense account. This means that you can continue to show Google ads on your blog while also taking advantage of Ezoic’s advanced features.
Ezoic allows you to test different ad layouts on your site and see which one performs the best. This is a great way to maximize your ad revenue and get the most out of your advertising space.
Read – Ezoic Review – Does AI Increase Ad Revenue?
Become an Affiliate
Another great way to make money with your blog is to become an affiliate for products that you recommend. When you’re an affiliate, you earn a commission whenever someone buys a product that you recommend.
For example, let’s say you’re a teacher and you have a blog about education. You could become an affiliate for an online course that you recommend to your readers. If someone buys the course through your affiliate link, you’ll earn a commission. This can sigificantly increase your blogging income.
Becoming an affiliate is a great way to earn money from your blog because you’re only recommending products that you believe in. And, you’re not selling ad space on your blog. So, you’re not compromising your content in any way. Some people do not like advertisements while reading blogs.
Learn Affiliate Marketing from Experts
If you want to learn about affiliate marketing, I strongly recommend that you check out Wealthy Affiliate. They offer a free starter membership. You can learn EVERYTHING about affiliate marketing.
Sell Your Own Products
If you have your own products or services that you sell, you can also promote them on your blog to earn additional income.
For example, let’s say you’re a teacher and you offer an online course for teachers. You could promote your course on your blog and earn money every time someone makes a purchase.
Selling your own products and services is a great way to monetize your blog because you’re in control of the price and you keep all of the profits.
Sqribble can help you create beautiful ebooks that you can sell on your blog or website. This easy to use software makes it quick and easy to create and design beautiful professional looking ebooks, so you can focus on promoting and selling your products.
To create online courses, you can use:
To sell your courses, you can also use webinars.
Webinars are a great way to sell products because they allow you to interact with your audience and answer any questions they have. Plus, people are more likely to buy a product after they’ve seen it in action.
WebinarNinja is the best webinar software that I’ve found. It’s easy to use and it comes with all the features you need to run a successful webinar.
Offer Consulting Services
If you’re an expert in your field, you can also offer consulting services on your blog. This is a great way to monetize your blog and earn additional income.
For example, let’s say you’re a teacher and you have a blog about education. You could offer consulting services to schools and districts who are looking for help with their education programs.
You can also help students who are struggling in school or parents who are looking for advice on how to help their child succeed.
Offering consulting services is a great way to monetize your blog because you can set your own rates and you get to keep 100% of the profits. Plus, it’s a great way to help others while also earning money from your blog.
Sell Sponsored Posts
If you have a popular blog, you can also sell sponsored posts.
Sponsored posts are basically blog posts that are written with the sole intention of promoting a product or service.
For example, let’s say you have a blog about teaching math.
A company that sells math software could pay you to write a review of their product on your blog. Or, a company that offers online courses could pay you to write a post about how their course has helped you.
When you have a popular blog, people will contact you directly and ask if you’re interested in writing a sponsored post.
So, you don’t have to actively seek out sponsors.
But, it’s still a good idea to create a media kit and send it to potential sponsors. A media kit is basically a document that contains information about your blog, such as your monthly pageviews, your demographic information, and examples of previous sponsored posts. Having a media kit will make it easier to negotiate a higher price for your sponsored blog posts.
Sponsored posts are a great way to generate income from your blog, and they can be very effective if done correctly.
The best way to make money with your blog is to find a way that fits naturally with your content and your audience.
Whatever route you decide to go, just make sure that you’re providing value to your audience. You’re not trying to sell them something that they don’t want or need. If you do that, you’ll be well on your way to making money with your teacher blog and of course, impacting the lives of your readers.
Final Thoughts about Starting a Teacher Blog
Starting a teacher blog can be a great way to make some extra money. In fact, if you do it right, you can make a full time income or more.
But, as any business, it takes a lot of work to get to that point.
You need to be passionate about what you’re doing and be willing to put in the time and effort to make your teacher blog successful.
Start with excellent blog posts that help you audience.
Then, focus on promoting your blog through social media, email marketing, and guest blogging. Finally, think about ways to monetize your blog, such as selling courses, offering consulting services, or selling sponsored posts.
If you do all of these things, you’ll be well on your way to having a successful teacher blog that makes money.
So, what are you waiting for?
Get started today!
I hope this article has inspired you to start your own teacher blog. But, before you go, I want to leave you with one last piece of advice.
Most people don’t take action on their ideas.
Because they’re afraid of failure.
But, the only way to fail is if you don’t try at all.
So, don’t be afraid to take the leap and start your own teacher blog today. You never know where it might take you.
And, please share this blog post if you found it useful.
Create a Money Making Blog
If you want to start a blog that makes money and don’t know where to start, I strongly recommend Blogging from ZERO, a complete guide that can help you start a blog from scratch. This guide covers everything from choosing a niche to creating content, to making your first $1000 from your blog.
You can get the guide by clicking here
You May Also Like…
- 65 Top Blogging Tips for Ultimate Success
- How to Pick a Profitable Blogging Niche?
- The Ultimate SEO Checklist – 21 Best Practices
- 25 Best Web Hosting Services for Bloggers
- 17 Best SEO Tools for Beginners
- 10 Best Grammar Apps for Bloggers
- Try Cloudways for FREE Using This Link
Blogging from ZERO is the solution to all your blogging woes. It’s a step-by-step guide with all you need to know to create a life-changing blog and make an extra $1,000 to $5,000 or more.

