Looking for the best way to backup WordPress websites? This article is going to help you with step-by-step instructions.
If you have a WordPress blog or website, you need to make sure that you have a regular backup plan in place. This is because WordPress is a very popular target for hackers, and if your website is hacked, you could lose everything – including blog posts, your website content, images, and more.
Fortunately, there are a few ways that you can automatically backup your WordPress website for free. In this article, I will share one of the best options.
The best part?
My solution will be absolutely free and you’ll not have to pay a single penny for any WordPress backup plugins or services.
To be honest, there are plenty of WordPress backup plugins.
But, when it comes to free solutions, the most popular option is UpdraftPlus. In this article, I will show you how to configure the free version of this plugin so that it automatically keeps your WordPress website backed up. Within 15 minutes, you’ll be able to set up an easy backup solution for your WordPress website!
So, let’s get started…
What is UpdraftPlus?
![How to Backup a WordPress Website and its Database? [Complete Guide] 2 UpdraftPlus Home](https://digitalmillions.org/wp-content/uploads/2021/03/UpdraftPlus-Home.jpg)
UpdraftPlus is a popular WordPress backup plugin that allows you to automatically backup your website content, images, and more.
The plugin is free to use.
And, there is a paid version that includes additional features (such as the ability to backup to cloud storage services such as Dropbox or Google Drive.
It has been downloaded over 1 million times.
It is rated 4.9 out of 5 stars on the WordPress Plugin Directory, and it has been featured on popular websites such as WPBeginner, WPMU DEV, and more.
The free version of UpdraftPlus can be used to automatically backup your WordPress website content, images, and more.
So, if you are looking for an easy way to backup your WordPress website as well as database, UpdraftPlus is a must. It is a free WordPress plugin that can be installed and activated from within your WordPress admin area.
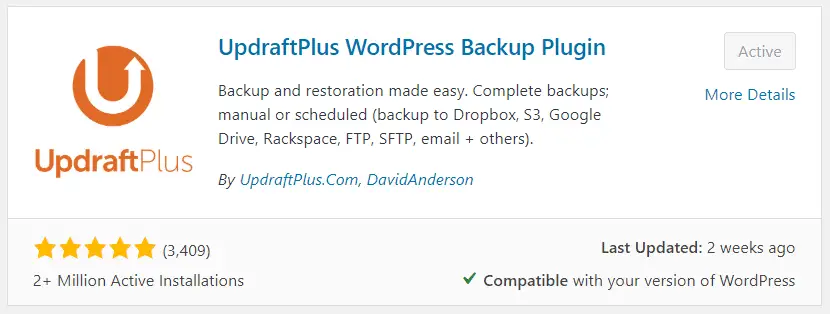
In this article, you are going to learn about the entire step-by-step process to install UpdraftPlus and configure it properly.
There are several different reasons why I like UpdraftPlus.
- It is free.
- There is an option to backup manually.
- You can take automated daily cloud backups.
- You can send your backups to 10+ different remote storage locations.
- Its beginner-friendly setup process is easy to follow.
This is not the end of all the outstanding features UpdraftPlus offers. But this list can be a determining factor to choose for your WordPress backup needs.
With millions of active downloads, it becomes a great solution when you are looking for an easy way to backup your website and database for free.
How to Install UpdraftPlus Plugin?
In order to install the plugin, log into your WordPress dashboard. Once logged in, select Plugins > Add plugins from the menu bar on the left.
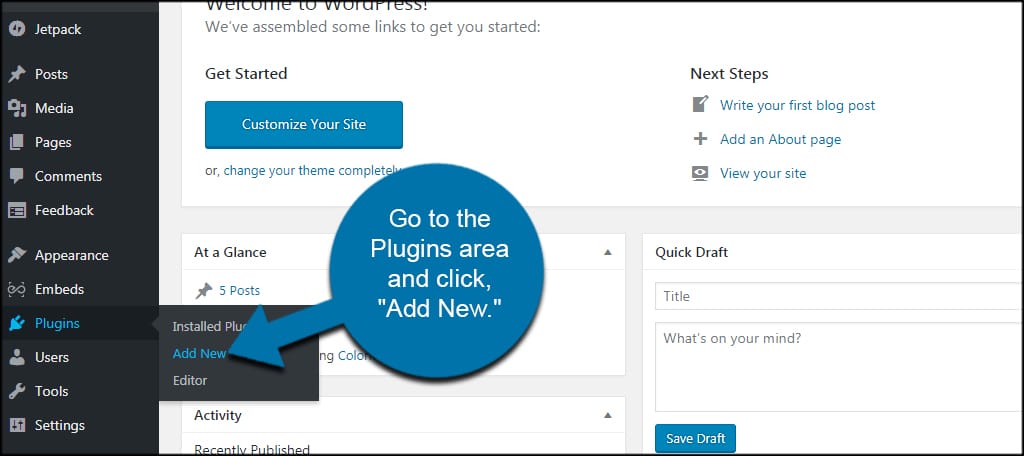
Then just type UpdraftPlus into the search box.

As you type, the plugin should appear in the search results below. Hit Install Now. Once installed, hit Activate, in order to get it activated for your site.

Congratulations! you’ve just installed UpdraftPlus.
You can also download the plugin from the WordPress plugin repository. All you need is to download the zip file and upload it to your site.
To upload a plugin zip file, use the Upload Plugin button. You’ll find this button on the plugin installation page on the top.
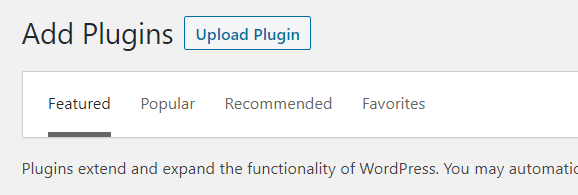
Once you hit Upload Plugin, you’ll be presented with the file uploader. Choose your file and hit Install Now, in order to install it on your website.

The entire installation process is pretty simple and straightforward. Even beginners, it doesn’t take much time to install UpdraftPlus.
So I don’t think you should be having any problem.
Once the plugin is installed, you’ll be able to configure all your settings from within your WordPress dashboard. Now that you have successfully downloaded, installed, and activated UpdraftPlus for your WordPress site, it’s time to configure it.
How to Configure UpdraftPlus?
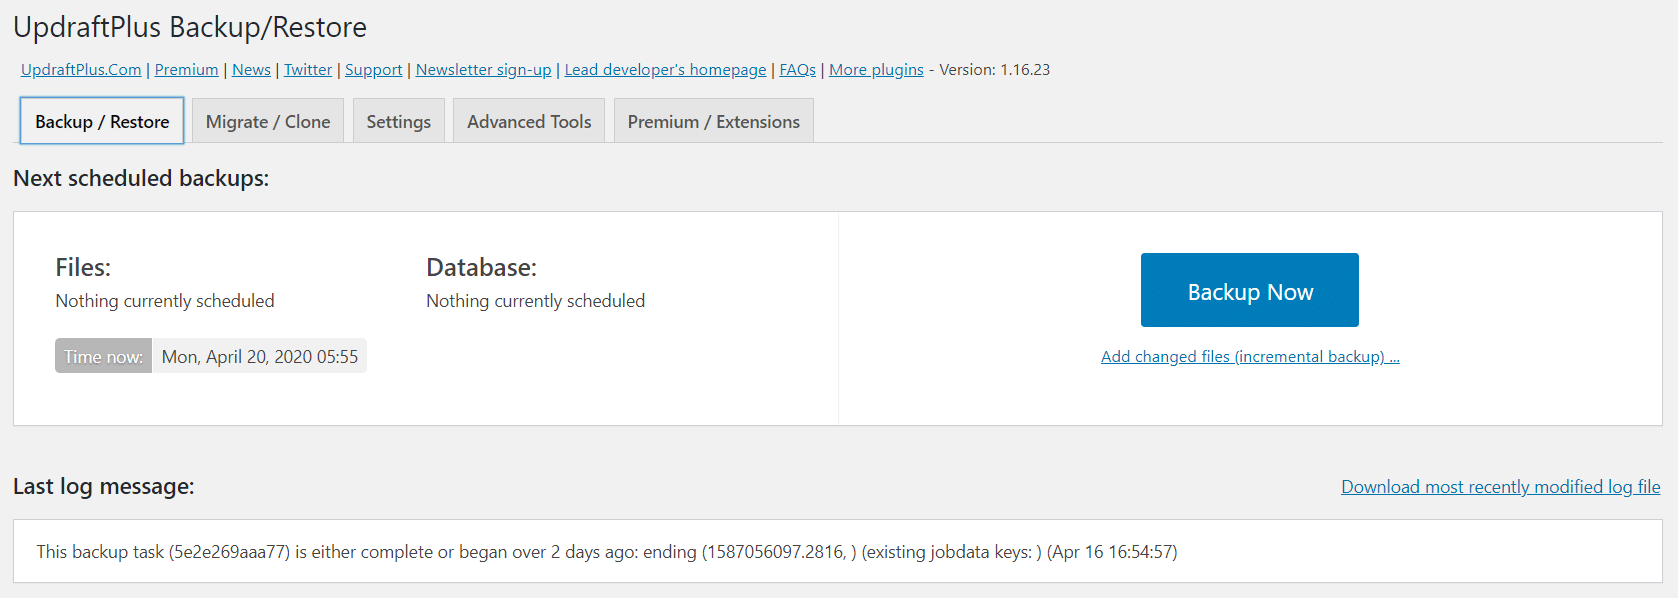
Just like the installation process, it is quite effortless to set up the plugin. In order to set up UpdraftPlus, proceed to Settings > UpdraftPlus Backups from the menu.
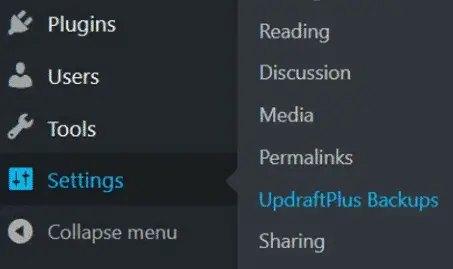
You’ll be taken to the UpdraftPlus Backup/Restore page where you can set it up with your desired backup configurations.
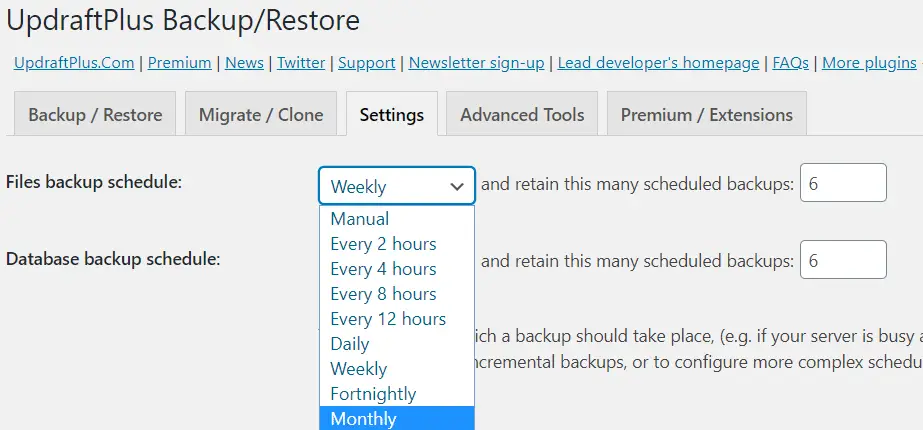
Choose the Settings tab at the top. From here you can choose the duration at which your backup should take place. Options include:
- Every 2 hours
- Every 4 hours
- Every 8 hours
- Every 12 hours
- Daily
- Weekly
- Fortnightly
- Monthly
You can also select how many backup copies you want to retain.
Please note that more backup copies will consume more storage space. So obviously choose a reasonable number you should be comfortable with.
A regular backup may be required if you update your website regularly. But you just update your site on a weekly basis, weekly backup is the right choice.
It will save more space and also give you peace of mind.
It’s not a smart choice to go for weekly backup if you are regularly updating your site. Because it may be a dangerous choice in case your site faces some issues. You may lose the last week’s data.
Next, choose your remote storage location.
There are over 10 different remote storage locations where you can send your backups. Options include:
- UpdraftPlus Vault
- Dropbox
- Amazon S3
- Rackspace Cloud Files
- Google Drive
- Microsoft Onedrive
- FTP
- Microsoft Azure
- SFTP/SCP
- Google Cloud
- Backblaze
- WebDAV
- S3-Compatible (Generic)
- OpenStack (Swift)
- Dream Objects
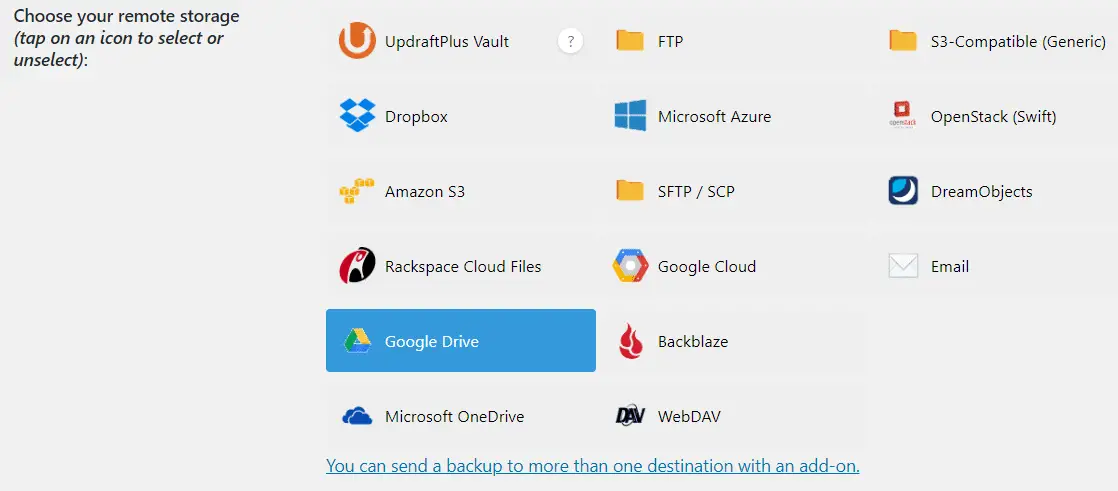
I personally suggest that you use Google Drive in order to store your backup files and database. It’s free as Google provides 15GB free storage with every account. With a free Gmail account, you get free 15 GB storage which you can use to store your website’s files and backup files and database.
In this tutorial, I will show you the step-by-step process to set up Google Drive as your remote backup location.
In fact, this is the most used storage option.
And, the best part?
It’s free to use.
So, let’s see how to set up Google Drive for UpdraftPlus Backups?
How to Set Up Google Drive Backup?
In order to start the setup process, choose Google drive as your remote storage and click “Save Changes”. Once clicked and saved, you’ll be asked to authorize access to your Google Drive account.

Follow the link to authorize UpdraftPlus to access your Google drive.
Click Allow button to authenticate.
![How to Backup a WordPress Website and its Database? [Complete Guide] 3 updraftplus google drive access](https://digitalmillions.b-cdn.net/wp-content/uploads/2020/04/updraftplus-google-drive-access.png)
Once allowed, you’ll be asked to complete the setup process in order to connect the two solutions. Hit the Complete Setup button to finish.
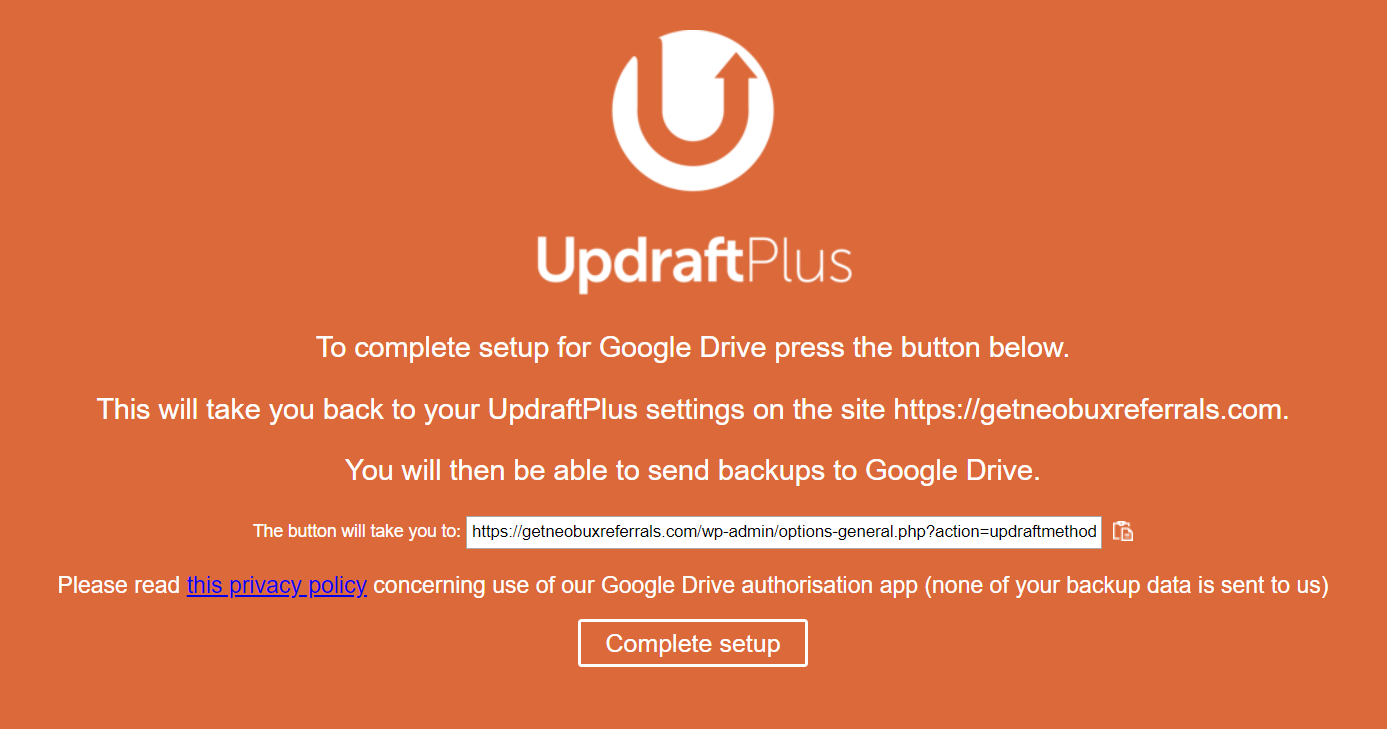
As a result, Google drive will be added as your default remote storage location and all your backups will be sent to Google Drive automatically, depending on the settings you have chosen for your backups.
Note: You can backup to only 1 location with the free version.
There is a premium version that can be used to back up to more than one remote storage location. There’s also a premium add-on that can be used.
So, you can see, it should not take more than 2 minutes.
How to Restore Your Backups?
If you have already set up UpdraftPlus and have the backups stored in Google Drive, you can easily restore your website to any previous backup dates.
Under the UpdraftPlus Backup/Restore section, you can see all the existing backups for your website. These backups can easily be downloaded with a click.

In order to restore your website to any previous backup date, click the Restore button for your desired backup date.
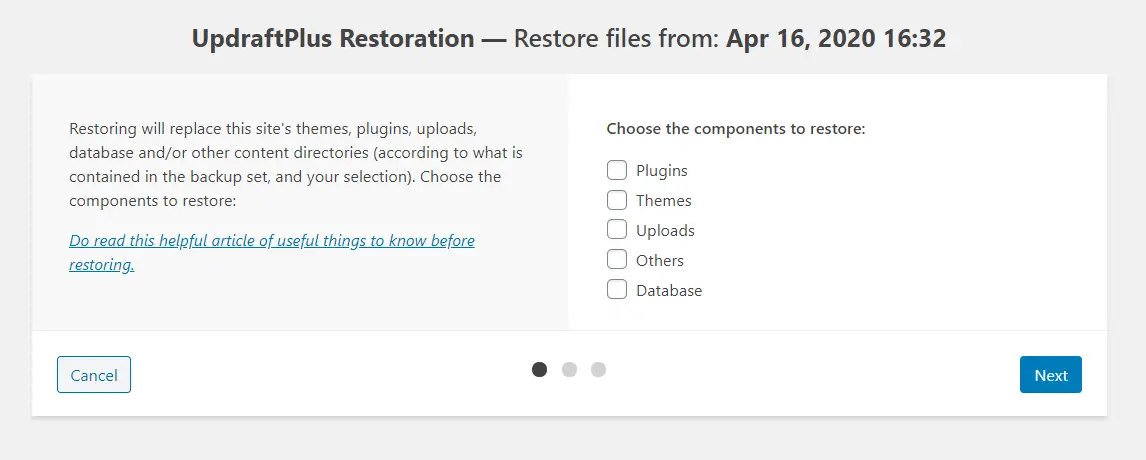
Next, you’ll be asked to choose which components to restore. Options include:
- Plugins
- Themes
- Uploads
- Others
- Database
Select all the components you would like to restore. And hit Next.
To restore your entire website, choose all the components.
It will start downloading all the required files from the remote storage.

Once the download completes and the backup archive files are successfully processed, you can press Restore again to proceed.
The restoration process will begin and get finished.
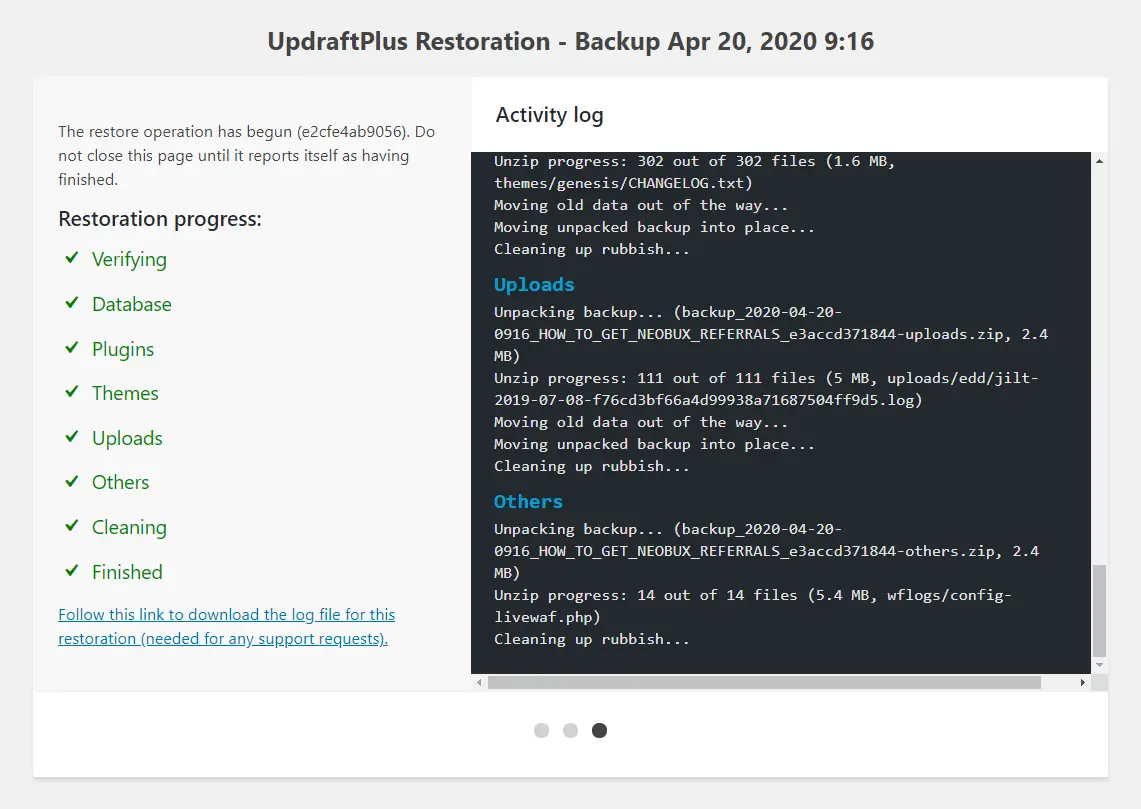
Congratulations!
You’ve just restored your website successfully.
And, that’s how easy it is to restore your website backups. You can set it up in less than 10 minutes. There are other ways to backup your website, but I find this to be the easiest and simplest way for beginners.
If you have any questions or concerns, please feel free to leave a comment below. I will be more than happy to help.

![How to Backup a WordPress Website and its Database? [Complete Guide] 1 Backup WordPress Website](https://digitalmillions.org/wp-content/uploads/2020/04/FEATURED-Backup-WordPress-Website.jpg)

