Are you tired of spending hours scrolling through social media, wishing you had a platform to share your stories, advice, and experiences with other moms? Well, it’s time to start your own mommy blog! And guess what? You can make money doing it too!
Starting a blog may seem overwhelming, I understand.
But, don’t worry, I’m here to guide you through the process step by step. You’ll be a pro in no time, and you might even make some cash on the side.
Frankly speaking, starting a mom blog is the perfect way to connect with other moms and share your stories, all while making some extra cash on the side.
Now, I know what you might be thinking –
“I’m not a writer”
or “I don’t know anything about blogging!”
But trust me, if thousands of moms out there can do it, so can you. All it takes is a little bit of determination and some guidance along the way.
That’s where I come in.
In this blog post, I’m going to take you through the process of starting your own mommy blog and making money from it step by step. From finding your niche to creating your blog, writing your first post, and monetizing your content, you’ll learn it all.
So, whether you’re a stay-at-home mom or a working mom, whether you have one child or ten, starting a mommy blog is the perfect way to make money online from home. So, are you ready to join the community of mom bloggers out there?
Let’s get started with the first step in this journey…
Buy Hosting and a Domain Name
With your own hosting, you have full control over your blog. You can customize your site according to your preferences. You can install your own themes and plugins, and make any changes you like to your website without any restrictions.
Hosting your blog with your own domain name will give your mom blog a more professional and credible appearance. It can help you attract more visitors and followers.
With your own hosting, you can take advantage of more advanced features such as e-commerce functionality, email hosting, and more.
So, if you are serious about building a successful mom blog, hosting is critical. You should not host your blog on free blogging sites like Blogger or free WordPress.
A reputable hosting provider will offer strong security features to protect your website from hacking attempts and other security threats. Also, with a good web hosting provider, you can ensure that your website runs smoothly and quickly. This is especially important if you want to attract more traffic to your website and earn through display ads.
But, with so many hosting services out there, it’s hard to choose one. So, let me help you find the best hosting option as a new mommy blogger, it’s Bluehost.
Bluehost Hosting Overview
Bluehost is a popular web hosting company founded in 2003. It’s one of the largest web hosting companies in the world, hosting over 2 million websites.
Bluehost offers various hosting plans, including shared hosting, VPS hosting, dedicated hosting, and WordPress hosting. They also offer domain registration services, website builders, and e-commerce tools, basically everything you need to run your website.

Bluehost is known for its user-friendly interface, reliable uptime, and excellent customer support. It’s a popular choice among bloggers, small businesses, and individuals who want to create a website without needing extensive technical knowledge or experience.
- User-Friendly Interface: Bluehost has a very user-friendly interface that makes it easy for beginners to navigate and use. It has a simple and intuitive control panel that allows you to manage your website without any technical knowledge.
- Affordable Pricing: Very affordable pricing for its hosting plans, starting at only $2.75 per month, making it an excellent option for beginners with a low budget.
- Reliable Uptime: Bluehost guarantees an uptime of 99.9%, which means that your website will be up and running most of the time.
- Great Customer Support: You will get an excellent customer support team that is available 24/7 via phone, live chat, and email. This is particularly helpful for beginners who might have technical issues or questions.
- WordPress Optimized Hosting: Bluehost is optimized for WordPress CMS, which is the most popular content management system for websites.
Overall, Bluehost is a great option for beginners who are just starting with blogging and website hosting. Its user-friendly interface, affordable pricing, reliable uptime, great customer support, and WordPress optimization make it a reliable choice.
The best part is that Bluehost offers a free domain name for new users.
Buy Web Hosting from Bluehost
Click here to visit Bluehost and click on the “Get Started” button.
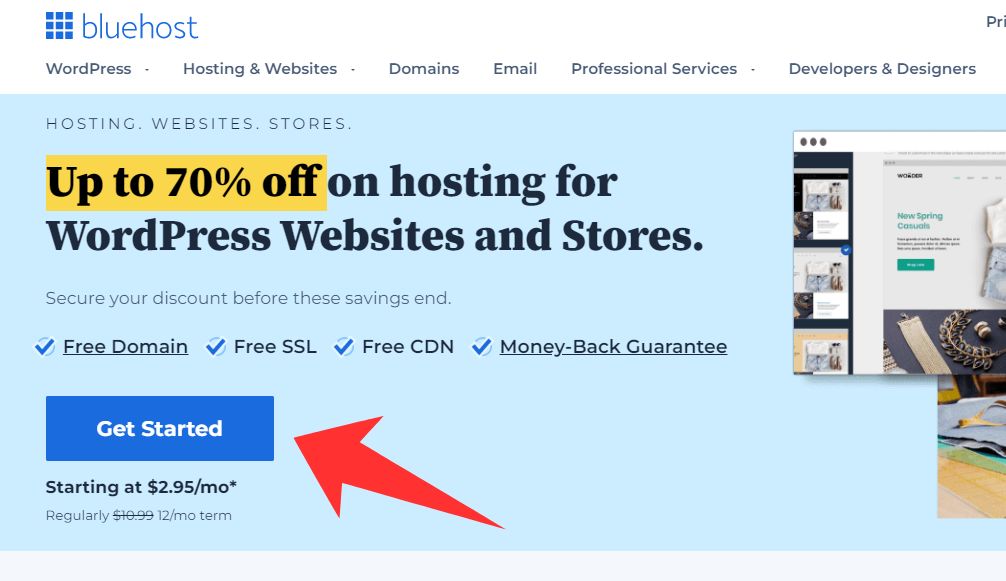
Choose a Bluehost plan
Now, select your preferred hosting plan. Bluehost offers four different hosting plans: Basic, Plus, Choice Plus, and Pro. For beginners, the Basic plan is usually the best option. Click the “Select” button underneath the plan you want to purchase.
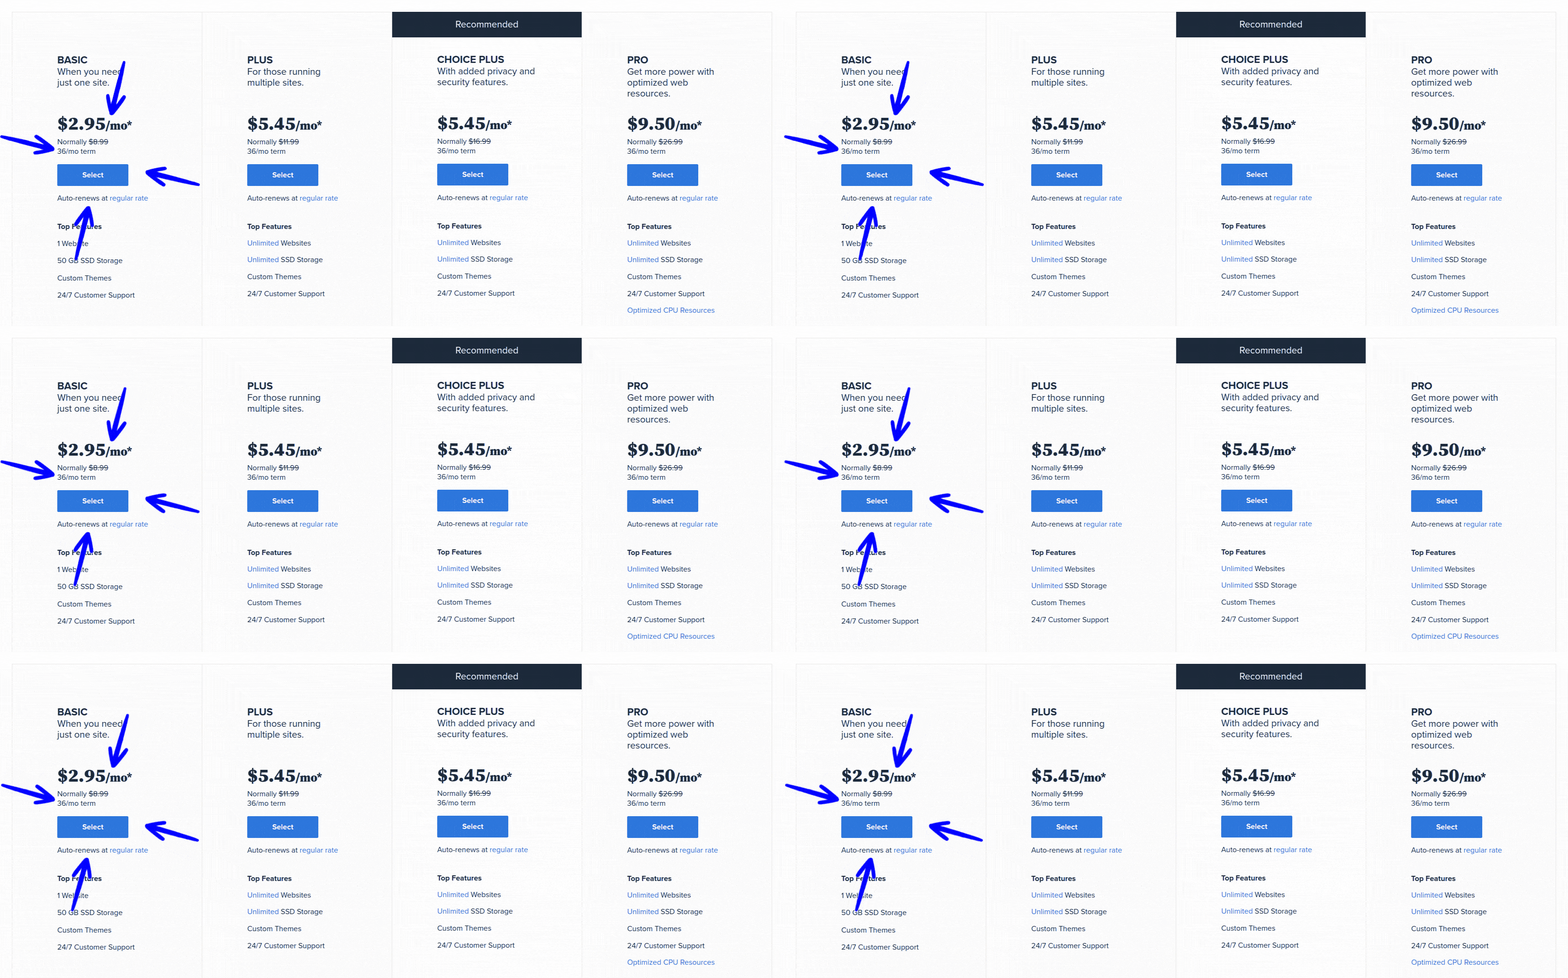
Bluehost offers several hosting plans, from shared hosting to managed WordPress, but for beginners, the Basic Plan is usually the best option. The Basic Plan is affordable and provides everything a beginner needs to start a blog, including:
- One blog or website
- 10GB of website space
- Unmetered bandwidth
- Free SSL certificate
- Easy WordPress installation
- 24/7 customer support
This plan is ideal for those who are just starting with a single website and don’t need advanced features such as unlimited websites or storage. As your website grows, you can always upgrade to a more advanced plan that suits your needs.
Choose a Domain for Your Mom Blog
In this step, you can either register a new domain or use an existing one.
If you’re registering a new domain, type in the domain name you want and click “Next“. If you’re using an existing domain, type it in and click “Next“.
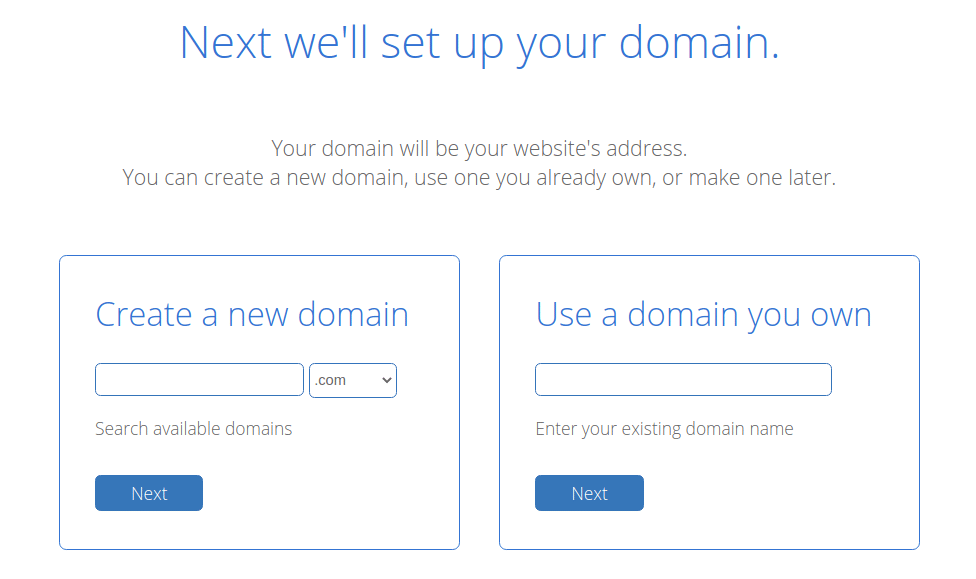
When choosing a domain for a mom blog, it’s important to consider your niche, target audience, and the availability of the domain.
A domain that reflects your niche and resonates with your audience is more likely to attract traffic and engagement. Additionally, choosing a domain that is easy to remember, spell, and pronounce can make it easier for readers to find and share your content.
Finally, it’s a good idea to check for any existing trademarks or legal issues associated with your chosen domain to avoid potential conflicts down the line.
Create Your Bluehost Account
Now, on the next step, fill out your personal information, and payment information, and select any additional services you may want to add.
You can also choose your hosting duration and add-ons like domain privacy. Be sure to review all the details carefully before proceeding.
Review your order summary to make sure everything is correct. This is your last chance to make changes before you make your purchase. Check that the hosting plan, domain name, and any additional services are all correct.
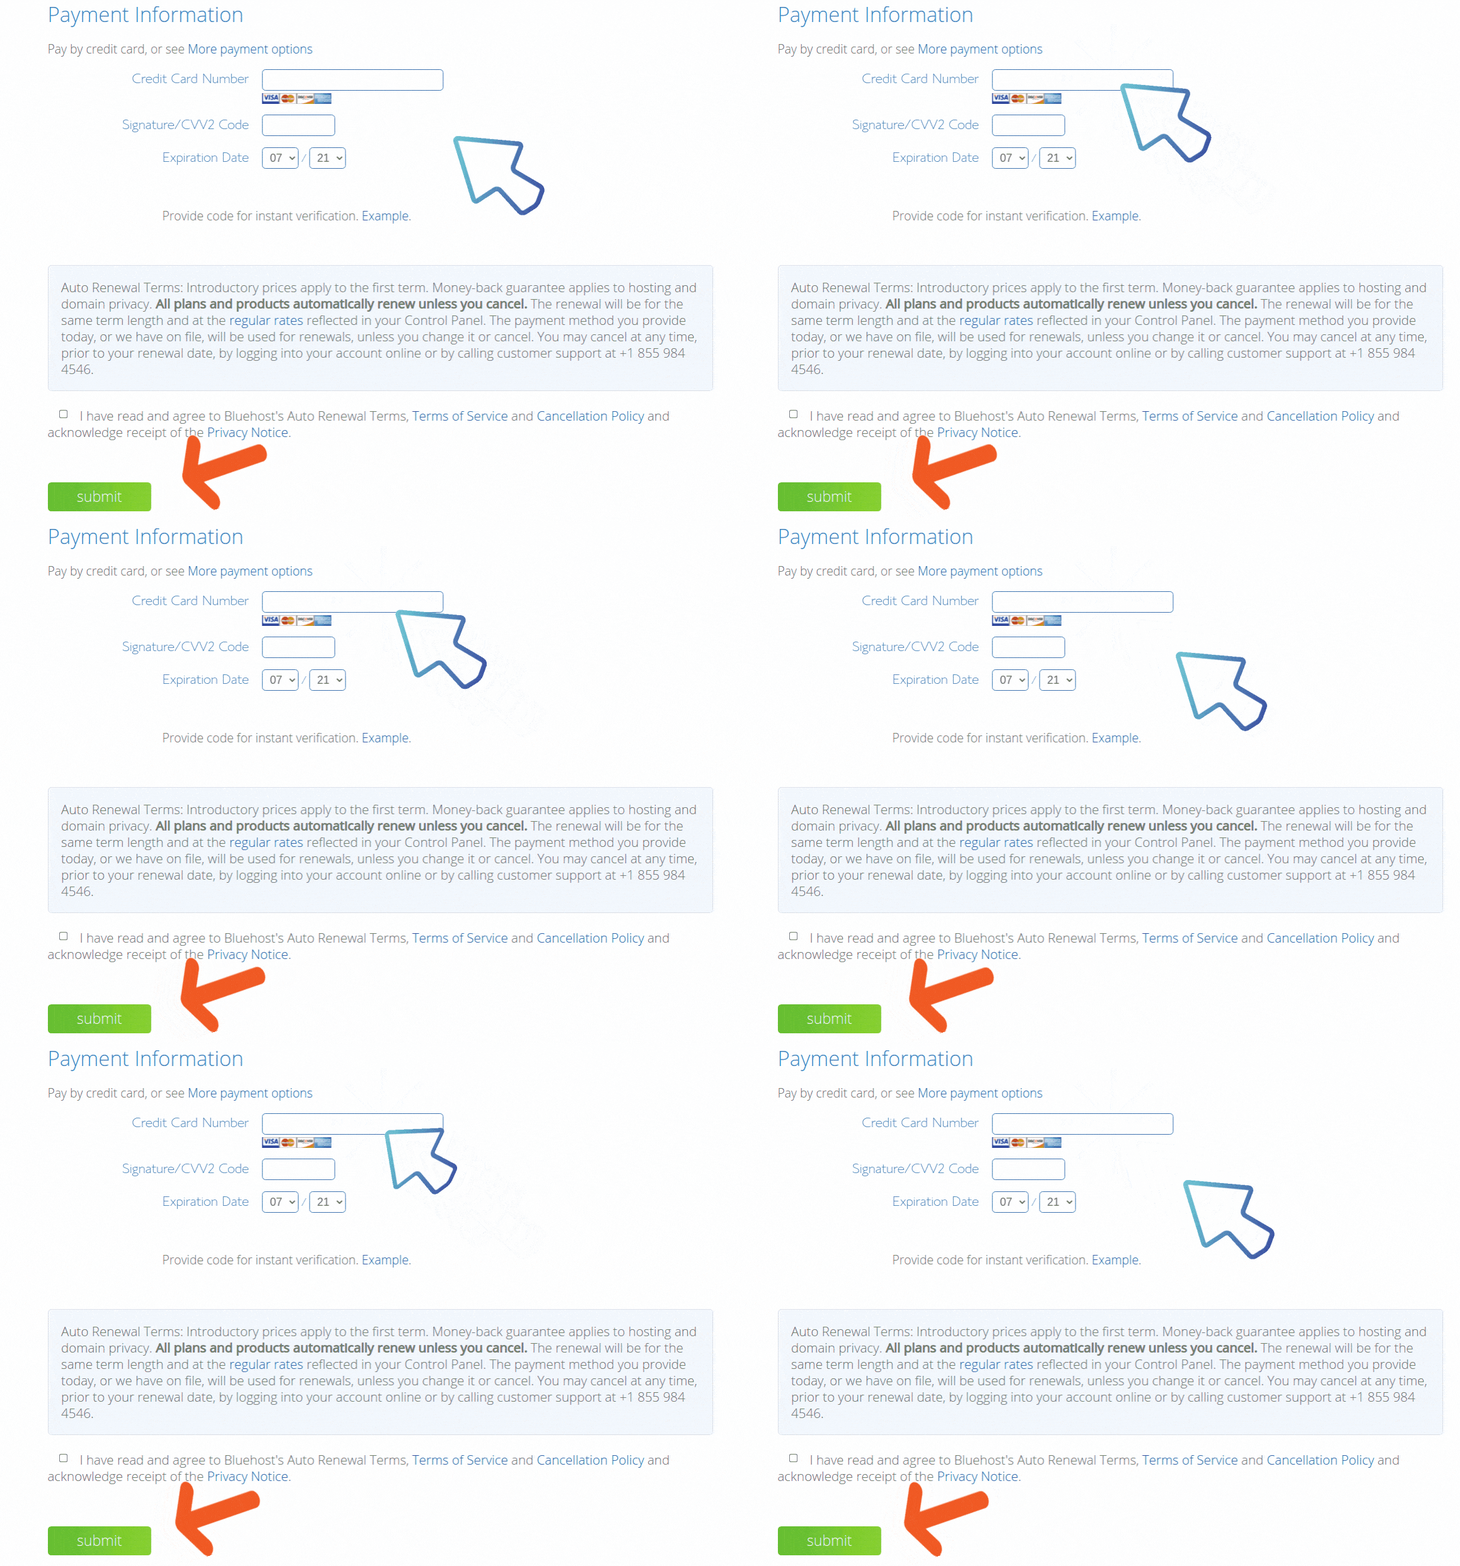
Complete your purchase by clicking on the “Submit” button.
You’ll be taken to a confirmation page, which will show you your purchase details and you’ll be able to create a password for your Bluehost account.
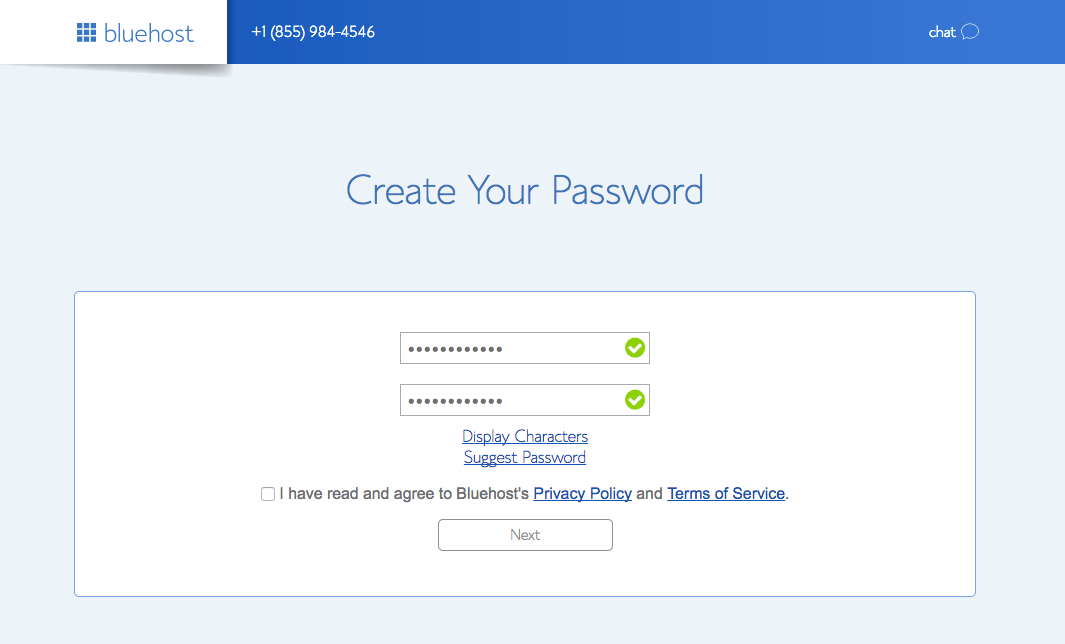
After completing your purchase, you’ll receive an email from Bluehost with instructions on how to log in to your account and get started. Follow the instructions in the email to log in to your account and start building your website.
Connect Your Domain to Bluehost Hosting
Connecting a new domain to hosting is critical. Otherwise, you’ll not be able to create a website that is accessible via that domain name. In other words, when you connect a domain to hosting, you are essentially telling the internet where to find your site.
To connect a domain to Bluehost hosting, you can follow these steps:
- Log in to your Bluehost account. Click on the “Domains” tab on the top menu.
- Select the “Assign” option next to the domain you want to connect.
- Click the Assign this Domain button at the bottom of the page.
- You should now see that the domain is listed in the Domains tab.
Source: Bluehost
As you can see, purchasing hosting from Bluehost is a straightforward and easy process that can be completed in just a few simple steps. By following the instructions outlined in this guide, you can ensure that you choose the right hosting plan for your mommy blog and get it up and running quickly and efficiently.
So, don’t hesitate to give it a try and start building your blog today!
In the next step, you’ll learn how to create a WordPress blog step by step.
Create a WordPress Blog
If you’re looking to start a blog, WordPress is the best platform to do so. It’s flexible, user-friendly, and has a huge community of users and developers constantly creating new tools and features. WordPress powers over 40% of all websites on the internet.
So, let me walk you through the process of creating a WordPress blog from scratch, starting with the installation process to writing your first blog post.
Install WordPress on Bluehost
If you’ve purchased hosting from Bluehost, you are in luck as they offer an easy one-click installation for WordPress. Also, if you are a new user, you don’t need to worry about manual installation, and WordPress is automatically installed in the background.
Simply, log into your Bluehost account, and once logged in, click on the “My Sites” tab at the left sidebar menu of the page. This will take you to a page that shows all the websites that you have hosted with Bluehost. Locate your WordPress site and click on the “Log in to WordPress” button. This will take you directly to the WordPress admin login page.
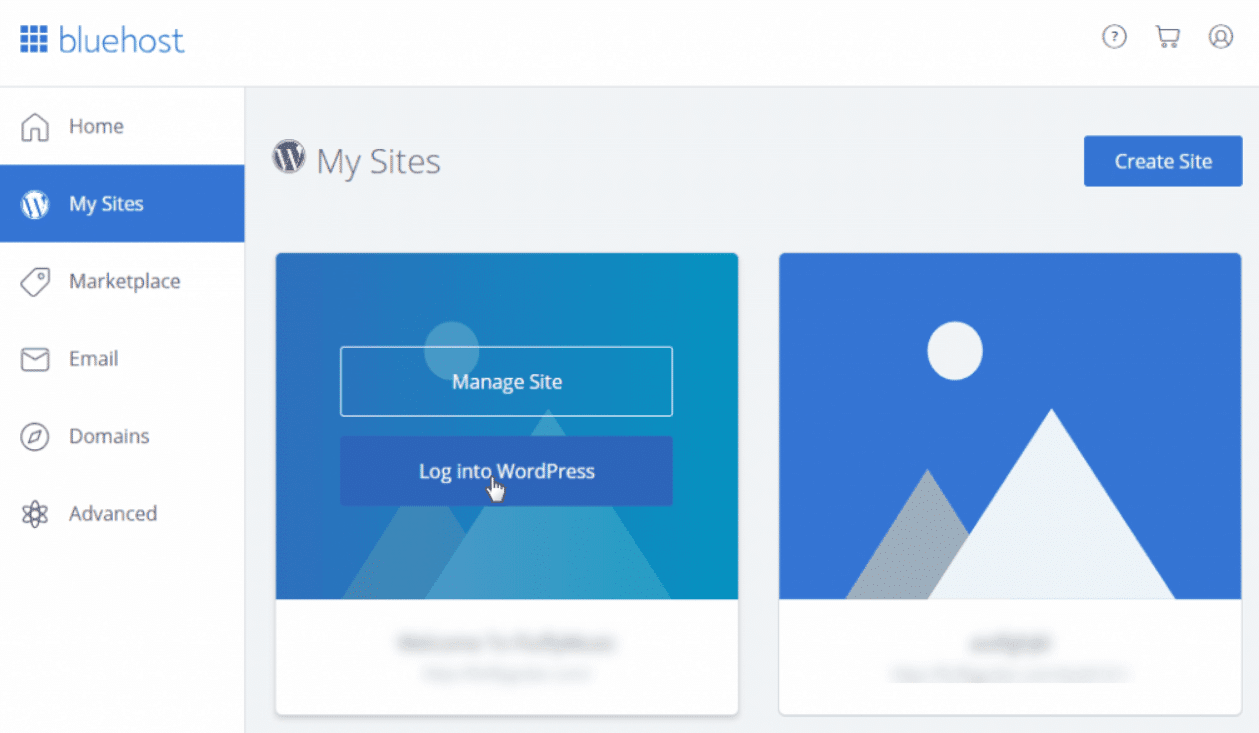
Enter your WordPress login details, which you’ll get in your email from Bluehost. Once you have entered your login details, click the “Log In” button to access your WordPress dashboard. From here, you can manage every aspect of your website.
Now that you are logged in to your WordPress admin, you can manage your blog by installing themes and plugins, adding pages and posts, and configuring settings.
As a new user, I understand it’s common to feel intimidated by the idea of using WordPress for the first time. But, don’t worry! It’s easier than you think.
In fact, it’s a requirement to successfully start a mom blog.
Don’t overwhelm yourself with all the features right away. Start with the basics like creating a post or page, adding images, and customizing your theme. As you become more comfortable with these features, you can gradually move on to learn more.
WordPress has a large and supportive community, with many online resources available for new users. Start by reading WordPress tutorials and documentation.
Trust me, you won’t regret it in the long run.
Set Up Basic WordPress Settings
After installing WordPress, you’ll need to set up some basic settings for your blog.
Here’s what you need to do:
- Log in to your WordPress dashboard.
- Click on “Settings” on the left-hand menu and then “General.“
- Enter the title and tagline for your blog.
- Choose your time zone and language.
- Click on “Save Changes“.
Next, you need to set up SEO-friendly permalinks on WordPress.
A WordPress permalink is the default URL that WordPress uses for your website content, such as posts and pages. By default, WordPress uses a permalink structure that includes the post ID number, which is not very user-friendly or SEO-friendly.
It’s relatively easy to set up permalinks and can be done in a few simple steps.
Here’s how:
- Navigate to Settings > Permalinks.
- Select the “Post name” option.
- Click the “Save Changes” button to save your permalink structure.
By setting up SEO-friendly permalinks, you’ll improve the readability and usability of your URLs, which can help to improve your site’s search engine rankings.
Navigate WP dashboard
Once you’ve set up your basic settings, you’ll want to familiarize yourself with the WordPress dashboard. Here’s what you need to know:
- The left-hand menu contains all the important sections of your WordPress dashboard, including Posts, Pages, Appearance, and Plugins.
- The “Posts” section is where you’ll write and publish blog posts.
- The “Pages” section is where you’ll create and manage static pages like your About page, Contact page, etc. Pages in WordPress are different from posts, which are typically used for dynamic content that is published regularly, such as blog posts.
- The “Appearance” section is where you can customize your website’s appearance by choosing a theme, customizing menus, and adding widgets.
- The “Plugins” section is where you can install and activate plugins to extend the functionality of your site. These are add-ons or extensions that can be installed on a WordPress website to add new features or functionality.
Customize the Site’s Appearance
Now that you’re familiar with the WordPress dashboard, it’s time to customize the appearance of your blog. You can do it by using a good-looking WordPress theme.
A WordPress theme or template determines the overall look and feel of your WordPress website. It includes the layout, color scheme, typography, and other visual elements that make your site visually appealing and user-friendly.
Additionally, many themes come with built-in features and functionalities that can enhance your site’s performance and user experience.
A theme can also help you establish and reinforce your brand identity online.
By selecting a theme that aligns with your brand’s colors, fonts, and overall aesthetic, you can create a cohesive online presence that reinforces your brand messaging.
Here’s how to Install a WordPress theme step by step:
- Go to “Appearance” and then “Themes“
- Choose a theme that suits your blog’s style and aesthetic.
- Once you’ve selected a theme, you can install, activate, and customize it.
- You can upload a theme file and activate it.
Next, you’ll need to activate a few plugins.
Read – 21 Best WordPress Themes for Bloggers and Businesses
Install and Activate Plugins
Plugins are an essential part of WordPress, and they can help you add all kinds of functionality to your blog. Here’s how to install and activate plugins:
- Go to “Plugins” and then “Add New“
- Search for a plugin by name or browse popular plugins.
- Once you’ve found a plugin you want to install, click on “Install Now“
- Once the plugin is installed, click on “Activate” to activate it.
So, as you can see, the basic process of installing a WordPress plugin is straightforward and can usually be completed in just a few clicks.
Read – 55+ Best WordPress Plugins You Can Install on WordPress
Manage Pages, Posts, and Menus
Now that you’ve set up the basic settings and customized your site’s appearance, it’s time to start creating content. Here’s how:
- Go to “Pages” and then “Add New” to create a new page.
- Enter a title for your page and add content using the WordPress editor.
- Once you’re finished, click on “Publish” to make your page live.
- Repeat the process for any other pages you want to create.
As a mom blogger, there are several essential pages that you should create on your WordPress blog to provide a great user experience and establish credibility with your audience. Here are some pages that you should consider:
- Home Page: Your homepage is the first page that visitors will see when they land on your blog, so it should be designed to give a good first impression.
- About Page: This page is where you introduce yourself to your audience and tell them about your background, your mission, and your values. You can also include your picture and share some personal details to connect with your readers.
- Contact Page: This page should include a contact form or your email address so that readers can get in touch with you. You can also include your social media links, phone number, or any other relevant information for your blog.
- Privacy Policy Page: This page outlines how you collect, use, and protect personal data from your readers. This is a legal requirement and can help build trust.
- Disclosure Page: If you plan to monetize your blog or receive products for review, it’s important to disclose this information to your readers. This page should outline how you make money from your blog and any brand relationships.
Understand that setting up these pages is essential and it can really help you establish your authority, improve the user experience, and even help you earn money from your blog. That’s why they’re critical for any blog, including a mom blog.
Optimize for Speed and Security
Speed and security are crucial for any website, especially a blog. Here are some tips to optimize your WordPress blog for speed and security:
- Install a caching plugin like WP Super Cache or W3 Total Cache.
- Use a security plugin like Wordfence or Sucuri to protect your site from hackers.
- Activate a backup plugin to back up your blog regularly.
- Keep your WordPress installation, themes, and plugins up to date.
- Use a strong password and two-factor authentication.
“Why are all the above steps necessary?” you may ask.
WordPress is a popular platform and hence, is often targeted by hackers.
Securing the blog ensures that it is protected against cyber threats such as malware, viruses, and other security breaches. A WordPress blog that has been hacked can damage the blogger’s reputation. If a hacker gains access to the blog and publishes inappropriate content, it can reflect poorly on the blogger and the blog.
To secure a WordPress blog, the blogger should install security plugins, activate a backup plugin, keep the plugins updated, use strong passwords, and implement other security measures to make sure everything is safe and secure right from the very beginning of your blogging journey. After all, you don’t want all your hard work to go wasted.
Finally, it’s time to write your first blog post for your new blog.
Write Your First Blog Post
Writing blog posts on WordPress is a simple and straightforward process:
- Go to “Posts” and then “Add New“
- Enter a title for your post and add content using the WordPress editor.
- Use categories and tags to help organize your content.
- Once you’re finished, click on “Publish” to make your post live.
While there may be numerous tasks involved in setting up a WordPress blog and publishing your first blog post, this is a basic outline of the process that a new mom blogger should follow. With your hosting and WordPress blog in place, it’s now time to determine the type of content you would like to publish on your blog.
Decide Your Blog Content Focus
One of the crucial steps to starting a mom blog is deciding on your content focus. It’ll help you pick a niche and differentiate yourself from other mommy bloggers.
The first thing to do is to brainstorm niche ideas for your mommy blog.
As a mom, you have a wealth of experience and knowledge about mom life that you can share with others. Do you want to focus on parenting, food, lifestyle, or twins mommy? Think about your passions and interests and choose a niche that you’re passionate about.
Do you have unique parenting techniques, love cooking, or have tips on how to balance motherhood and career? There’s no limit to what you can write about as a mommy blogger, but choosing a specific niche will help you stand out from others.
Why Should You Choose a Specific Niche?
Choosing a specific niche is critical for success.
There are thousands of mommy bloggers online, writing about all kinds of topics related to motherhood. If you try to write about everything, you’ll end up blending in with the crowd and not reaching the readers who are looking for what you have to offer.
When you choose a specific niche, you’re targeting a smaller audience, but one that is more likely to be interested in what you have to say.
Additionally, having a specific niche helps you establish yourself as an expert in your area of focus. If you write about parenting, for example, and offer unique perspectives or advice, you’ll be seen as an authority on the topic. This can lead to opportunities for sponsored posts, guest blogging, and other collaborations that can help you monetize your blog.
So, take some time to think about what you’re passionate about and what you can offer your readers that’s different from other bloggers out there.
Niche Ideas for a Mom Blog
- General Parenting
- Homeschooling
- Single parenting
- Working mom
- Pregnancy and postpartum
- Family meals/food
- Family budgeting
- Traveling as a family
- Adoption
- Kids health issues
- Mom fashion
- Styling for kids/teens
You can also write about smart mom ideas, parenting hacks, and other great content that will be useful for a specific type of audience. You can also write product reviews, sponsored posts, and related posts to keep your readers engaged.
Create a Content Strategy
A content strategy is a high-level plan that guides the creation, publication, and management of content. It mainly involves a systematic approach to understanding the needs of your target audience and creating content that aligns with those needs.
A good content strategy should ensure that the content produced is relevant, valuable, and useful to the intended audience and that it is distributed effectively.
Once you’ve identified your niche, research your target audience.
Who are you writing for?
What do they need, and what problems can you solve for them?
You can use Keyword Research Tools like SEMrush to find questions your target audience mostly asks. You can do thorough keyword research and find topics you can cover on your mom blog. Understanding your target audience will help you create content that resonates with them and keep them coming back for more.
To differentiate yourself from other mommy bloggers, develop a content strategy that sets you apart. Create a unique blog name, choose a theme that reflects your personality, and add some creativity to your posts. Share personal stories and photos.
Remember that creating a successful blog takes time and effort, so be patient and persistent. Develop a schedule for posting content, promote your blog on social media, and engage with your readers. Over time, your mommy blog will become a go-to source for other moms, and you’ll establish yourself as an authority in your niche.
Once you’ve identified a niche you want to focus on, you can start creating content.
With a well-defined niche and a strong content strategy, you’ll be on your way to achieving success as a mommy blogger!
Create Content for Your Mom Blog
Creating a content strategy is only the beginning.
But, you’ve done a great job so far. Now, you need to start creating content. Let’s see how to create engaging content for your mommy blog.
So, how should you write your first blog post and all the next ones?
You can share your experiences and life stories in a conversational tone that your readers will find relatable. Try to inject some humor and personality into your writing to keep things engaging and interesting. You could even consider inviting other moms to contribute to your blog, creating a sense of community and variety.
Attention-grabbing headlines are essential in getting your blog noticed.
Use strong, attention-grabbing language to draw your reader in and make them want to click through to your post. Be descriptive, and don’t be afraid to be a little provocative.
But remember, your headline should always be relevant to your post’s content.
Including visuals and multimedia in your blog posts can make them even more engaging. People are often drawn to visual content, so try to include images, videos, or infographics that support your blog. This could be as simple as snapping a few photos with your phone, or you could invest in a high-quality camera and some basic editing software.
Canva is an excellent free online tool for creating any type of graphics.
Optimizing your blog for SEO is crucial if you want people to find your content. Start by using related keywords in your blog post’s body and titles, and include internal and external links to related posts. Use top SEO tools to optimize your website for SEO.
Plus, you can use online tools to improve your writing, save time, and increase your productivity. Grammar checker apps like Grammarly can help improve the quality of your writing by detecting and correcting grammatical errors, spelling mistakes, and punctuation errors. AI content writing tools can also help you save time by generating content ideas, creating outlines, and even writing entire articles for you in many cases.
Although there is a vast amount of knowledge to acquire when it comes to producing high-performing content, bearing these tips in mind will provide a solid foundation for embarking on your journey. Gradually improving your content creation skills in accordance with these guidelines can lead to success as a mommy blogger.
Promote Your Mom Blog
First things first, you need to build a social media presence. Facebook, Instagram, and Pinterest are excellent platforms to share your content and connect with other moms. Share your blog posts and add some catchy captions to attract readers. Use hashtags that are related to your blog niches, such as #momlife, #smartmomideas, and #family. The more people see your content, the more likely they are to check out your blog.
Speaking of content, make sure your blog posts are shareable.
You can add images, videos, and infographics to your blog posts. People are more likely to share content that is visually appealing and informative. You can create your own graphics or use websites like Canva to design eye-catching images.
Another great way to promote your mommy blog is to connect with influencers. Reach out to other mommy bloggers in your niche and ask if they would be interested in collaborating on a blog post or social media campaign. This can help you gain exposure.
Guest posting on relevant blogs in your niche is also another effective way to promote your blog. So, how would you start? Look for blogs that are relevant to your niche and ask if you can submit a guest post. Make sure your post is high-quality and informative. Include a link back to your blog in your author bio to drive traffic to your site.
Quora is a popular platform for people to ask and answer questions. Use it to your advantage by answering questions related to your blog niche.
Instagram is a great platform for promoting your mommy blog.
Starting an Instagram blog can be a great idea. You can use your Instagram account to showcase your blog content, behind-the-scenes photos, and mom life moments. Use relevant hashtags and interact with other mom bloggers to grow your following.
Instagram is a visual platform, which makes it perfect for showcasing your lifestyle and parenting experiences through photos and videos.
Being a busy mom is tough. But, with different ways to promote your mommy blog, you can make money online while sharing your parenting experiences with others.
Whether you’re a new blogger or an experienced mommy blogger, there are always ways to grow your blog traffic and increase your blog income.
In the next step, we’ll see how to make money from your blog.
Make Money from Your Mom Blog
There are many ways to make money blogging. However, as a mom blogger, the following are some of the best ways to generate income from your blog.
First up, let’s talk about affiliate marketing.
Become an Affiliate Blogger
An affiliate blogger is a blogger who earns money through affiliate marketing.
It’s the process of promoting other people’s products or services on your blog and earning a commission for each sale through your unique affiliate link.
This is one of the most popular ways to make money from a blog.
This is a great way to monetize your blog without having to create your own products or services. Start by finding affiliate programs that align with your niche and audience, and then create valuable content that promotes those products.
Affiliate bloggers can usually earn a significant income if they have a large and engaged audience and promote high-quality products that are truly valuable.
Look for companies that offer high commission rates, have a good reputation, and provide marketing materials to help you promote their products.
Next, let’s talk about sponsored posts.
Sponsored Posts
Brands are always looking for influencers to promote their products, and that also includes mom bloggers like you! With sponsored posts, you’ll be paid to create content (blog posts) that promotes a specific product or service. Make sure you only work with brands that align with your values and are relevant to your audience.
Sponsors generally want to work with bloggers with a large and engaged audience that matches their target demographic.
Create and Sell Digital Products
If you’re feeling a bit more ambitious, you could also create and sell your own digital products. This could be anything from an e-book to a course to a printables pack. The key is to create something that your audience will find valuable and that aligns with your blog’s niche. Once you’ve created your product, promote it on your blog and social media channels.
Avoid pricing your ebook too high or too low, in the beginning.
Think about what makes your ebook unique and valuable to readers. If it offers a lot of value, you may be able to charge a higher price.
Try out different price points and monitor sales to see what works best for your ebook. You can always adjust the price later if necessary.
There are many platforms to sell digital products online, such as Payhip. These platforms help you effortlessly and easily sell your digital products from anywhere, at any time. Starting from secure payment processing to automated delivery of digital products, these sites make the whole process of selling digital products easy.
Blog Advertising
You can also make money through ads on your blog. Google AdSense is one of the most popular ad networks for bloggers. Simply install the AdSense code on your blog and earn money whenever someone clicks on one of the ads. Keep in mind that you’ll need a decent amount of traffic to make a significant amount of money from ads.
You can also use the power of Ezoic to maximize your ad revenue. It uses machine learning and AI algorithms to optimize ad placement to improve user experience and overall ad revenue. Ezoic’s platform allows publishers to run multiple ad networks simultaneously, including Google AdSense, in order to maximize ad revenue.
In short, a mom blog can be a lucrative and fulfilling way to make money while also sharing your experiences as a mother. By following the steps outlined in this post, including creating quality content, building a strong online presence, and leveraging affiliate marketing and other monetization strategies, you can turn your blog into a profitable venture.
Learn and Keep Growing Your Blog
The key to success is to keep learning and growing.
It’s essential to stay updated with trends.
As a mommy blogger, it’s crucial to be aware of the latest trends in the niche. You can do this by following other successful mommy bloggers, joining blogging communities, and reading mom blogs regularly. By staying on top of trends, you can create blog posts that resonate with your audience and keep them engaged.
There are many mom blogging communities out there that you can join.
These communities are filled with other mommy bloggers who share their tips and tricks on how to start a mom blog and make money successfully.
Taking courses can also be a game-changer for your mom blog. You can learn about different ways to monetize your blog and succeed. Investing in blogging courses can pay off in the long run and help you achieve your goal of making money online.
Analyzing your blog performance is also a critical part.
By analyzing your blog’s performance, you can make data-driven decisions that will help you create great content and increase your blog income.
Don’t be afraid to experiment with new strategies.
Try different blog topics and see which ones resonate with your audience. Use social media to promote your blog posts and build an email list. Join affiliate programs and include affiliate links in your blog posts. By experimenting with new strategies, you can find what works best for your blog and help you become a successful mom blogger.
Final Words and Thoughts
So, by now, you should have a pretty good idea of how to start a mommy blog and make money. You’ve learned about the importance of choosing a blog niche, picking the perfect domain name, and setting up your WordPress blog.
You’ve also discovered how to get blog traffic, monetize your blog through affiliate marketing and display ads, and write great content that keeps performing.
As a mom blogger, it can be challenging to juggle your family life and your blog, but trust me, the rewards are worth it. And, I hope this post has motivated you to take action.
Don’t forget to share this blog post with others who may be interested.
By sharing this blog post, you’ll be helping other moms achieve their blogging dreams and find success in the world of mom blogging.
So go ahead and share it – you never know who you might inspire!


