Would you like to speed up your WordPress site?
Of course, you do.
In fact, speeding up WordPress site is highly crucial these days.
In this post, I’ll show you how WP Rocket plugin boosts up your site speed with the help of Imagify image optimization plugin.
Interested?
Then, read on…
First, let’s face the facts:
A recent Google study found that around 79% of all pages on the web are over 1 MB, 53% were over 2MB, and 23% over 4MB. What’s more surprising is that they found an image with size as much as 16 MB.
Obviously, the average size of web pages is increasing continuously. And, a large part of it can be attributed to over-sized images.
And, here’s the truth you should be aware of:
By using over-sized high-resolution images, you may satisfy a few visitors, but you are essentially destroying your chances of ranking well on Google.
But wait… it’s not the only problem.
There’s more…
Webpages with lots of over-sized images take a long time to load. And, people don’t like to wait long for webpages to load. Multiple studies discovered that more than 50% of visitors leave if pages take longer than 3 seconds to load.
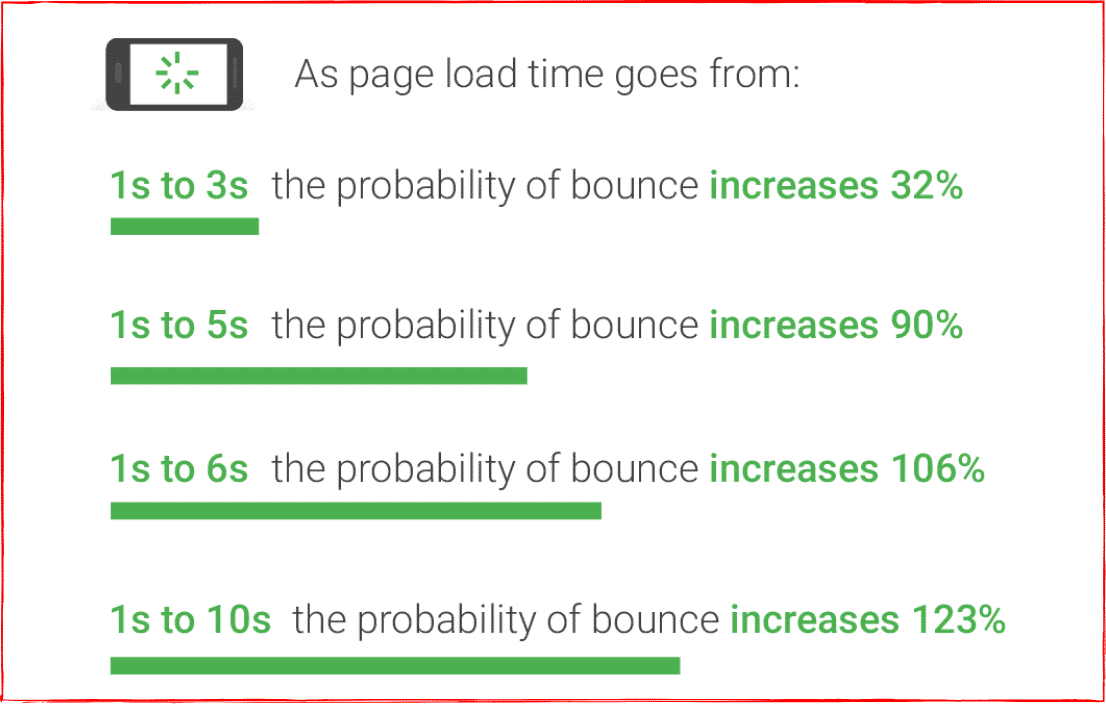
A 1 second delay in loading time can mean a significant portion of revenue lost. I’m sure, you don’t want that to happen to you.
But, that’s exactly what happens if you don’t optimize images.
Image optimization is the number #1 step to optimize the loading time of your website’s pages. It can’t be ignored.
But of course, you don’t want to be too technical about this.
You want an easy solution. Here it is: Imagify
Pretty interesting name. Isn’t it? 🙂
It’s like the ultimate shortcut to image optimization.
Wait… wait… before you scream “I want to know more about this”, let me quickly introduce you to what Imagify really is and how it can help you.
What is Imagify?
Imagify or WP Rocket Imagify, whatever you can call it, is an easy-to-use powerful image compression tool that helps you compress your website images without losing their quality. It improves your website’s page loading time.
You can also convert your images to WebP format which further reduces the size of your images. Result? A faster page loading speed.
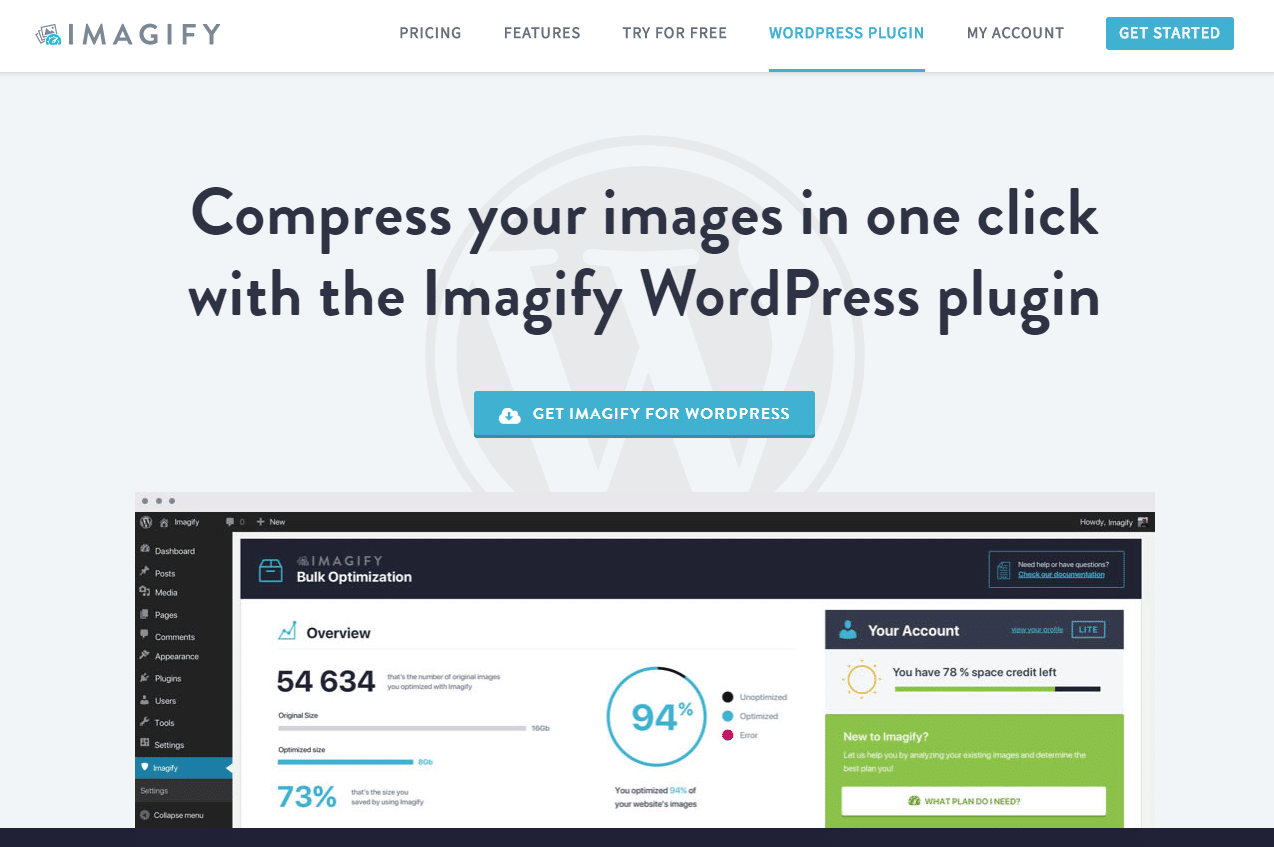
And you’ll be happy to know that they offer a WordPress plugin that makes the job easier and faster. The plugin can be used on your WordPress site. It automatically compresses your images when uploaded to your site.
And the best part?
Your images don’t lose quality. Only the size is reduced while keeping the quality based on your desired level of compression.
Pretty amazing, right?
As you click on the button above, you’ll be taken to Imagify’s official website where you’ll be able to download the plugin for free.
Imagify WordPress Plugin
Imagify comes with a free WordPress plugin.
The plugin is built by the same developers who gifted us WP Rocket, the #1 loading speed optimization plugin that always amazed me with every new update.
I know… I know… it’s not enough. My claim has to be proven.
Am I right?
Then, take a look at my complete WP Rocket review to see what I mean.
As I already said before, optimizing your website for loading speed starts from Image optimization. So first, go ahead and download Imagify plugin.
Here’s the fact:
The best loading speed can be achieved only when you combine Imagify with the power of the WP Rocket, one of the best WordPress cache plugins, I found.
How do I know this?
I’ve done it with my site.
WP Rocket and Imagify Performance Results
Take a look at this to see what I mean:
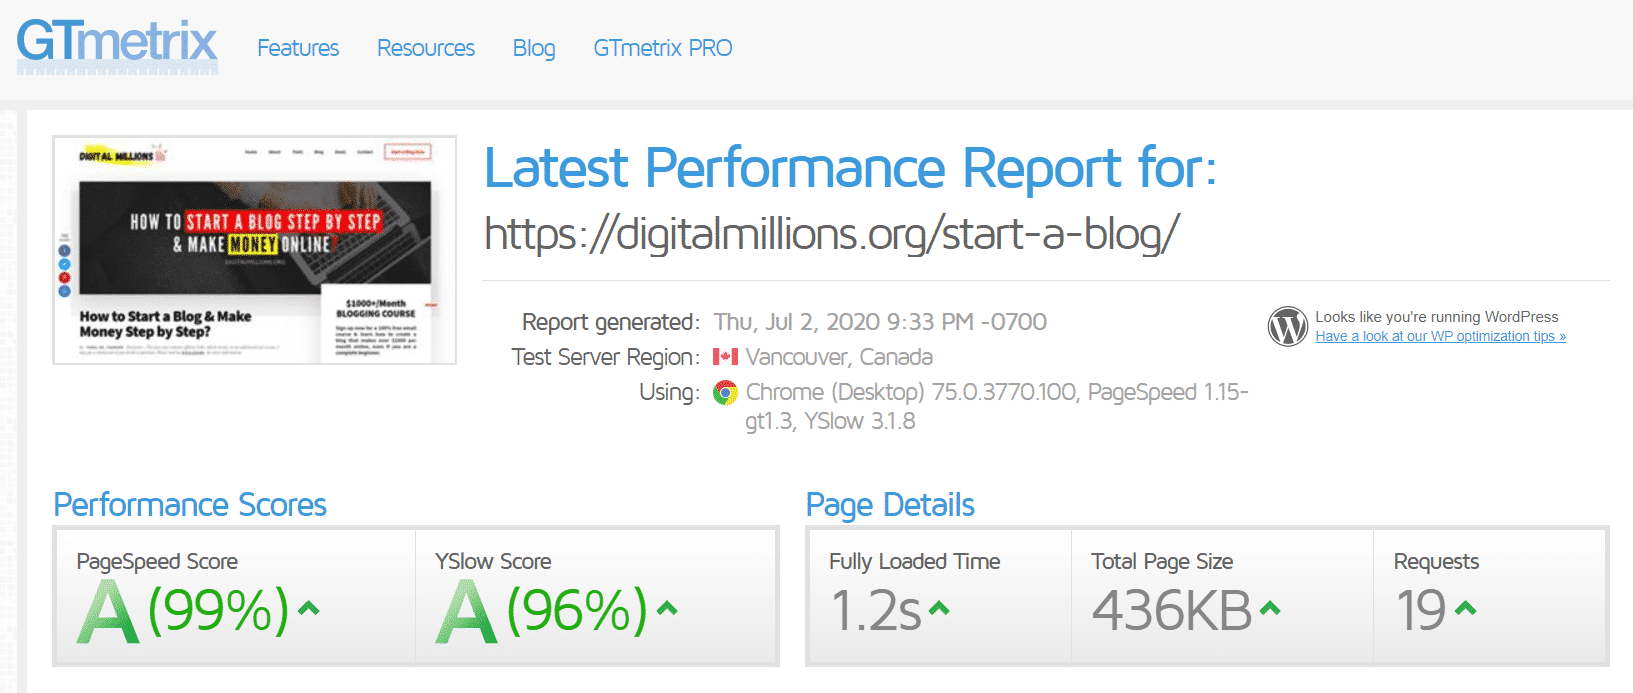
Did you notice the magic of combining WP Rocket and Imagify?
One of my most image-heavy blog posts loads within just 2 seconds. Now take a look at the loading time when I don’t use WP Rocket.
I’ve used ?nowprocket parameter to bypass WP Rocket.
And, here’s the result:
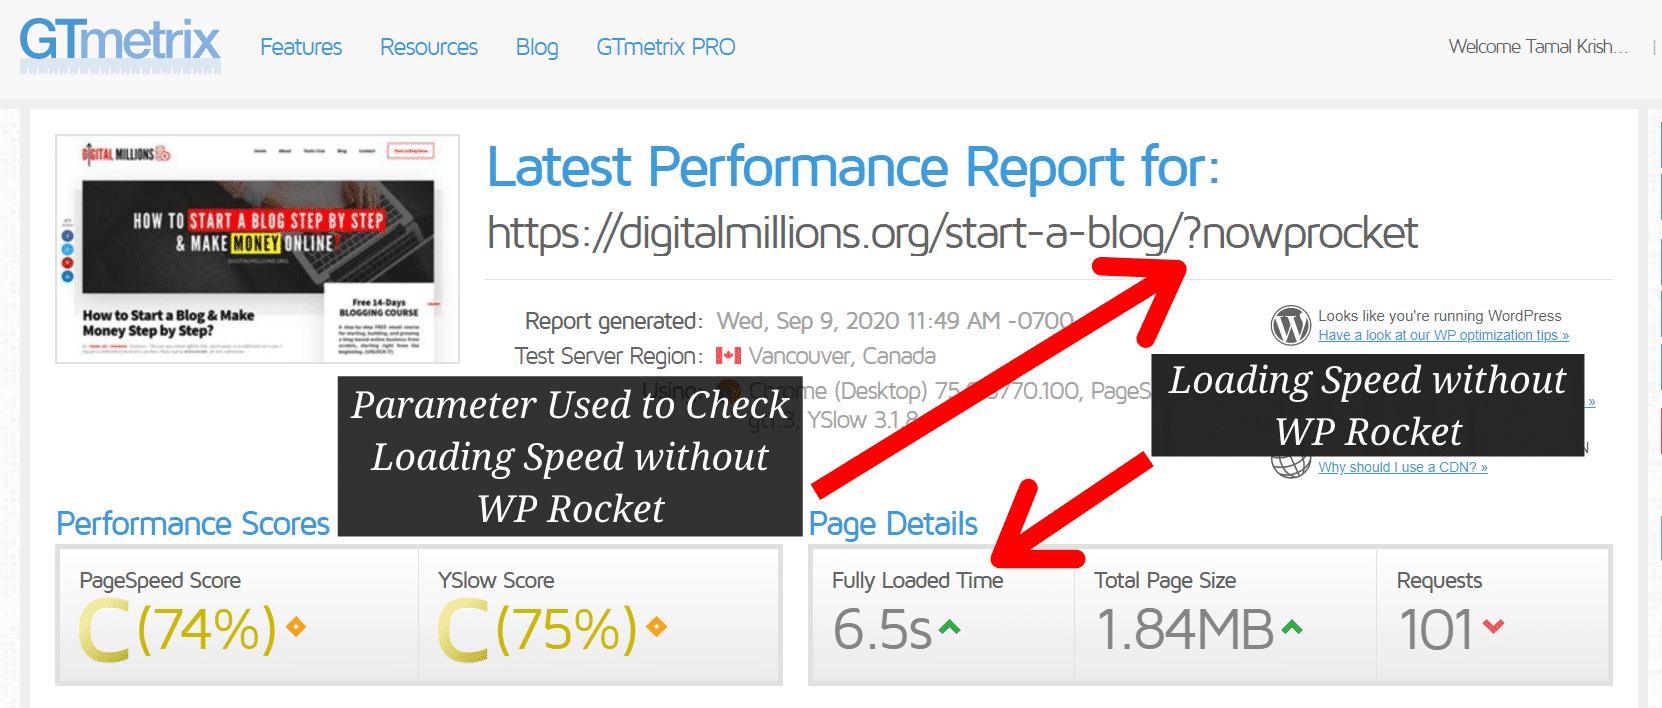
Did you notice the difference?
Quite surprised, right? 😯
That’s the kind of result you’ll get when you use Imagify to compress your images and use WP Rocket to optimize the loading speed.
To get started, the first step is to download the plugins and get the required zip file that you can install in your WordPress site.
Once you have the zip file, log into your WordPress dashboard.
Now, click Plugins > Add New.
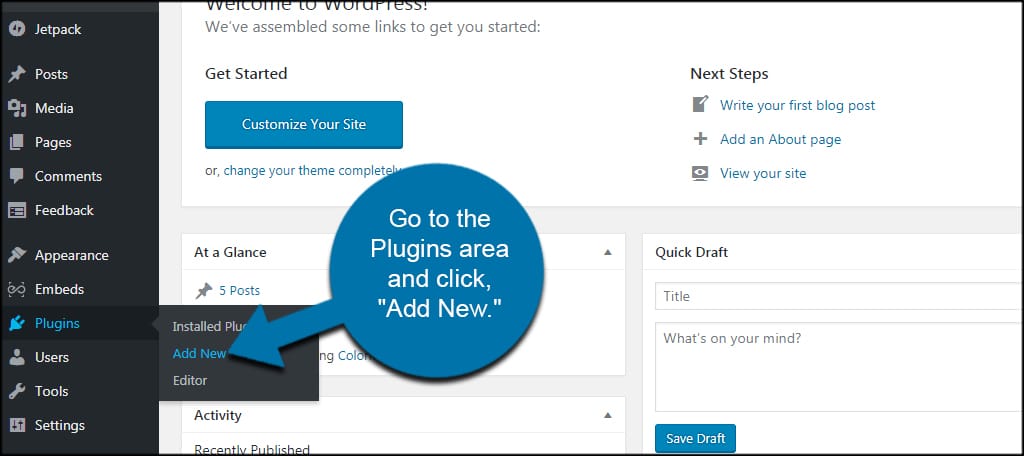
Next, you’ll reach plugin installation page.
Now use the Upload Plugin button to upload the plugin’s zip file to WordPress and install it. Hit the Activate button when prompted.
Congratulations!
You’ve just activated your plugin.
It doesn’t matter which plugin you want to install, the process is the same. Please note that you can download Imagify from the admin area. But you won’t be able to get WP Rocket from there. You must visit the official site only.
So till now, we learned both Imagify and WP Rocket is quite important.
Imagify is essential to compress your site’s images automatically and WP Rocket is required to optimize every aspect of loading speed optimization.
The result?
The fastest loading time you never thought possible. 🙂
By combining both of these plugins, you don’t only help your website achieve better ranking in search engines, but also provide greater user experience.
Now let’s learn a little more about these plugins one by one.
Imagify Plugin Interface
Here’s what Imagify’s optimization page looks like:
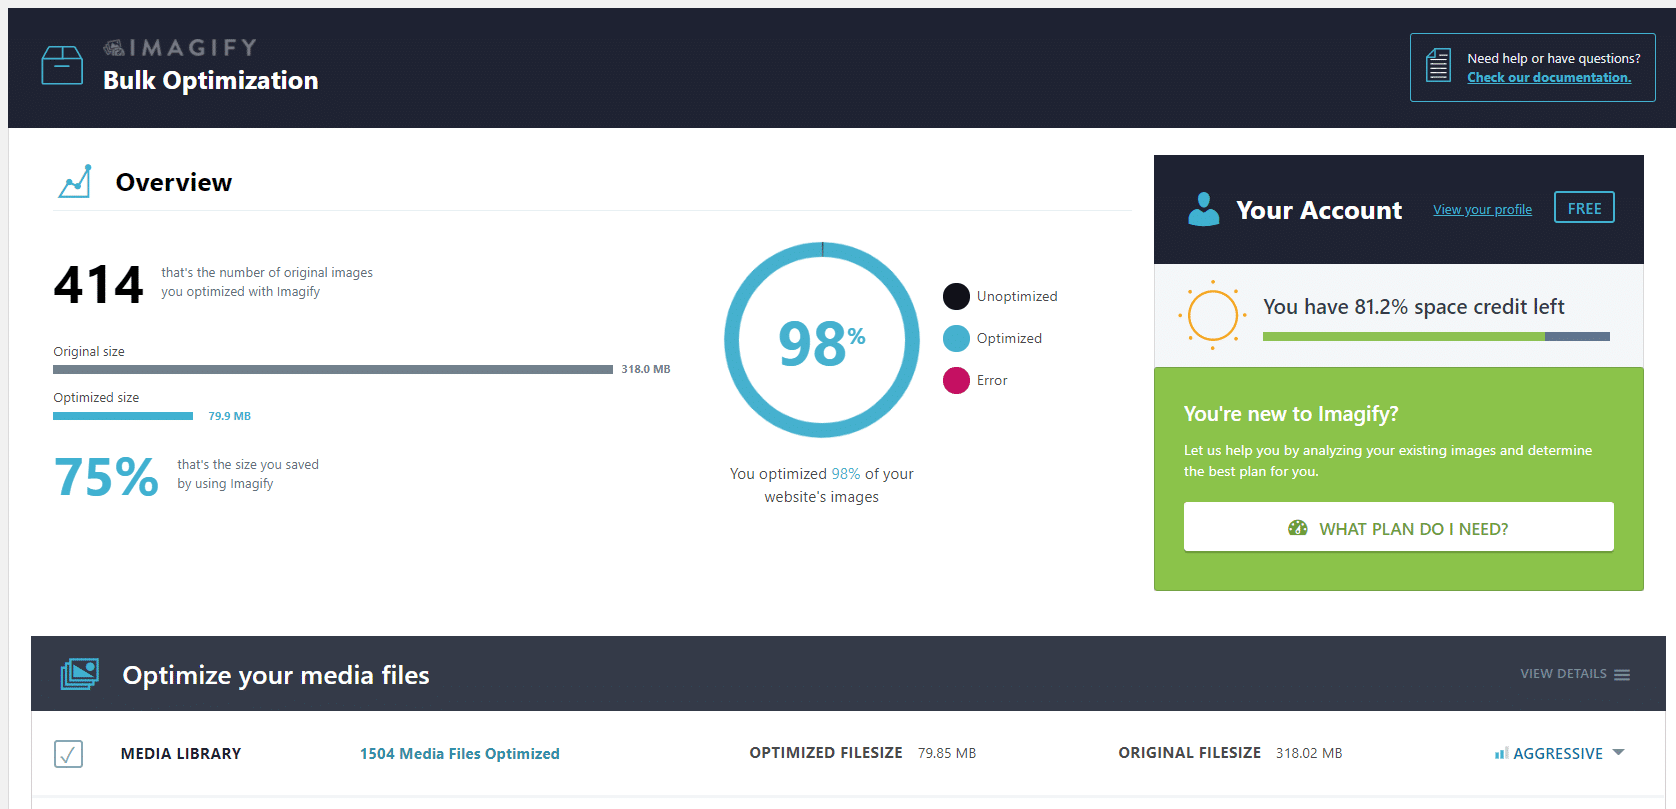
Quite user-friendly interface. Isn’t it?
From the overview page, you’ll be able to see how many images your website contains, how many images you have optimized or yet to optimized.
You’ll be able to know how much space credit is left.
And the best part?
The IMAGIF’EM ALL button that helps you optimize all your website’s images at a single click. That’s right, you’ll be able to do it at a single click.
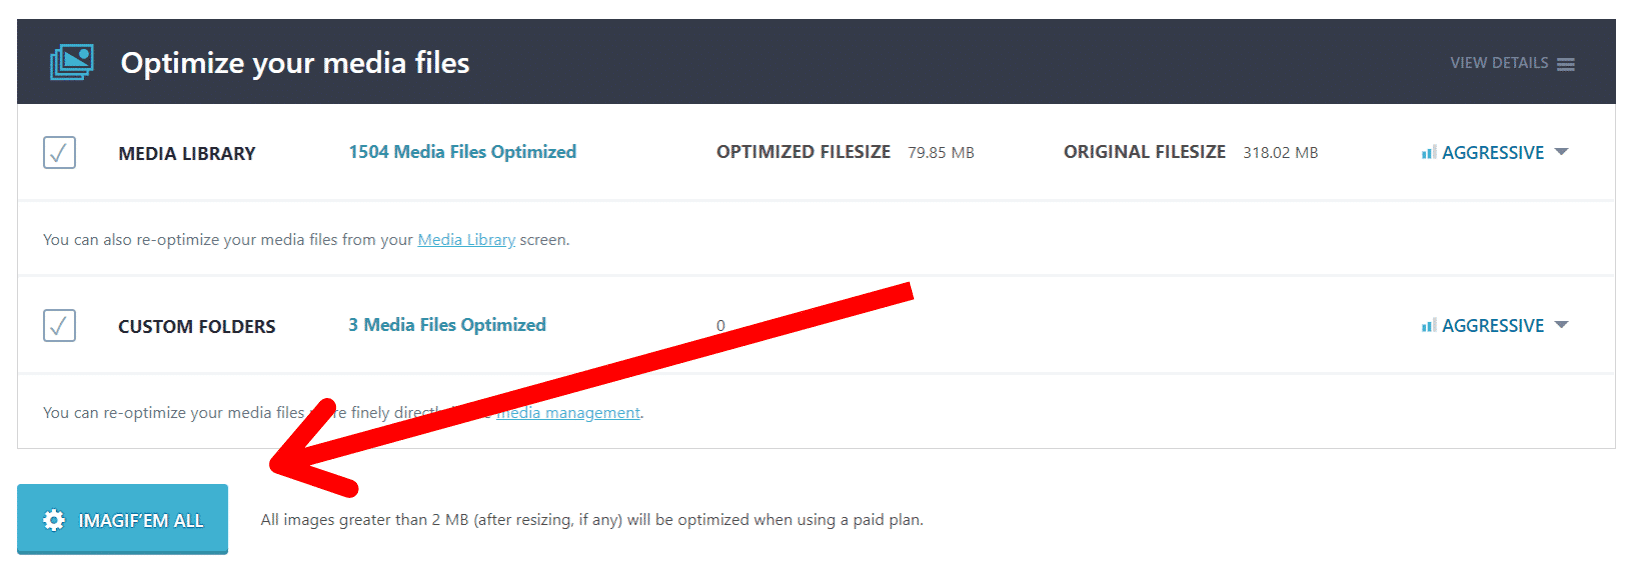
Depending on how large your website is and how many images it contains, it may take anywhere between 10 minutes to more than an hour.
The end result?
All your website’s images will be optimized and reduced in size.
There are 3 different levels of compression you can choose for the images. Different modes function differently and deliver different results.
Here are the available levels:
- Normal
- Aggressive
- Ultra

To make things easier for you, you’ll be able to visually compare the optimization levels by clicking on the Try the Visual Comparison button.

Key Features of Imagify WordPress Plugin
- Automatically optimize every image you upload to WordPress
- Keep your original images in a separate folder before optimizing
- Remove or keep all EXIF data from your images
- Create webp version (lighter images) of your images automatically
- Display images in webp format on your site
- Set a maximum limit for large images
- Choose additional image sizes to be excluded or included
- Choose your website’s theme related images to optimize
- Display a Quick Access menu on the toolbar
Do you have anything else to ask for?
You can try Imagify for free. The free account offers 20 MB per month on unlimited websites. And you don’t need a credit card to sign up.
The free account is enough if you have a small site and you don’t need optimization for hundreds of images every month.
A premium account will be required for larger sites with thousands of images.
Imagify Pricing
Imagify offers 2 simple pricing structures:
- Monthly plans
- One time plans
Monthly plans have 5 different options:
- Lite – 1 gb/month – $4.99/month
- Basic – 2 gb/month – $8.99/month
- Standard – 5 gb/month – $19.99/month
- Plus – 15 gb/month – $39.99/month
- Enterprise – 50 gb/month – $69.99/month
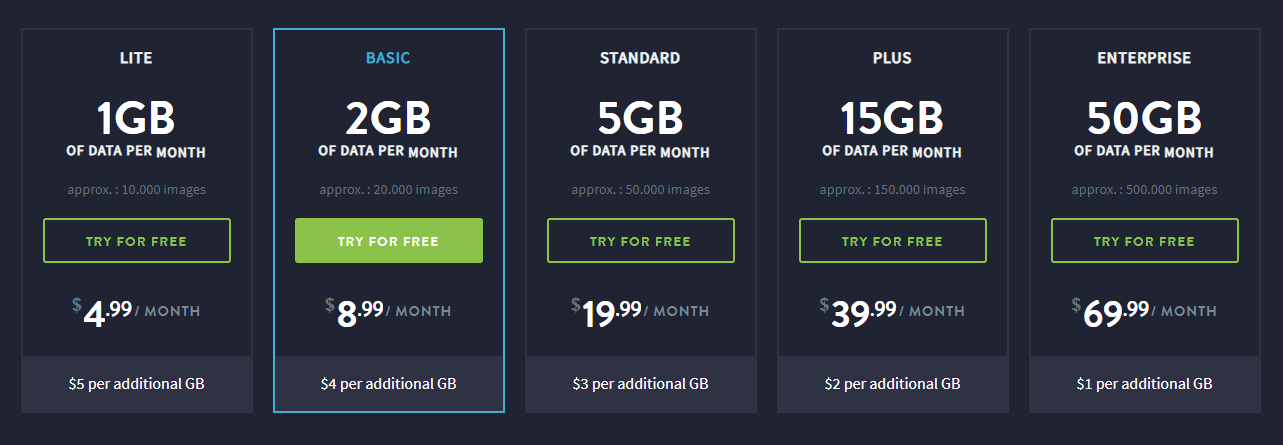
If you decide to pay annually, you’ll able to get 2 months free.
Under one-time plans, you have 3 different options:
- 1 gb – $9.99 – approx: 10,000 images
- 3 gb – $19.99 – approx: 10,000 images
- 10 gb – $49.99 – approx: 10,000 images

The best thing about Imagify I like is that you can use the account for unlimited sites. So you are not limited to only one site.
Pretty cool, right?
Quite a long ride, I must say. And if you remember I said, image optimization is only the 1st step to reduce the loading time of a website.
Lots of additional optimizations are required.
Speed Up Your WordPress Site
Here’s my solution to speed up WordPress:
As already shared before, this is a WordPress plugin that can help your website pages load super fast. I’ve already experienced it. Now it’s your time.
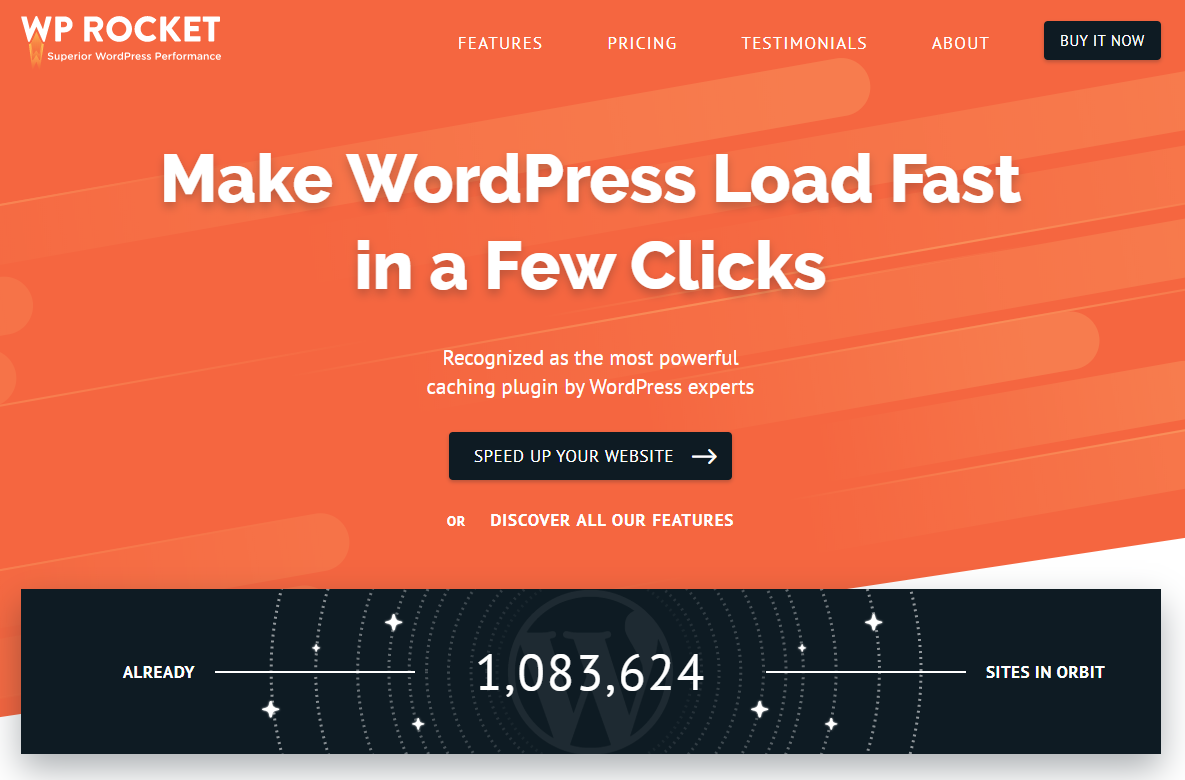
WP Rocket is mostly known as a cache plugin.
But truly speaking, it does much more than what most cache plugins do. It performs many small optimizations to speed up your site as much as possible.
Please note that there are free cache plugins available to get the desired results. But none of them come close to what WP Rocket can do for your site. And, you’ll need to download more than one plugin while WP Rocket performs all the optimizations on its own. You can get up and running within just a few minutes.

What do I mean by all these?
This is a powerful plugin. So it’s a brilliant decision to go for it.
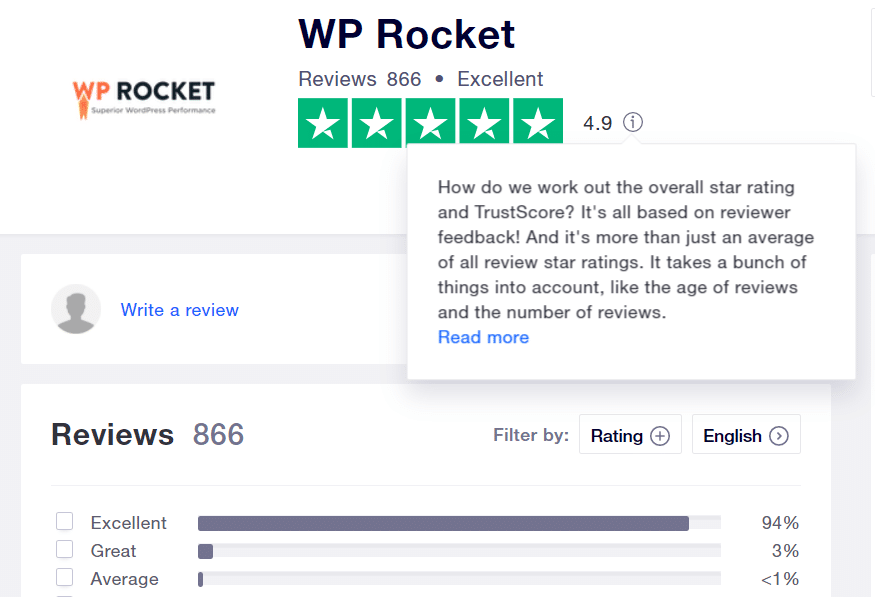
Let’s check out what people are saying about this plugin on TrustPilot. It has received a whopping 4.9 rating based on 800+ reviews, as I’m writing this.
While most cache plugins are free to use, you may be a little disappointed to know that this plugin is not free. So unless you decide to pay for the premium price you cannot take advantage of this wonderful plugin.
But trust me, it will be worth it.
Here are the plans:
- $49/year for 1 site
- $99/year for 3 sites
- $249/year for unlimited sites
You get a 30% discount on renewal charges.
To get started, first, visit the official WP Rocket site. Choose your desired plan and make a successful payment to create your account.
Download WP Rocket
Once the account is set up, log into your newly created WP Rocket account, and find the special download link, as shown in the image below.
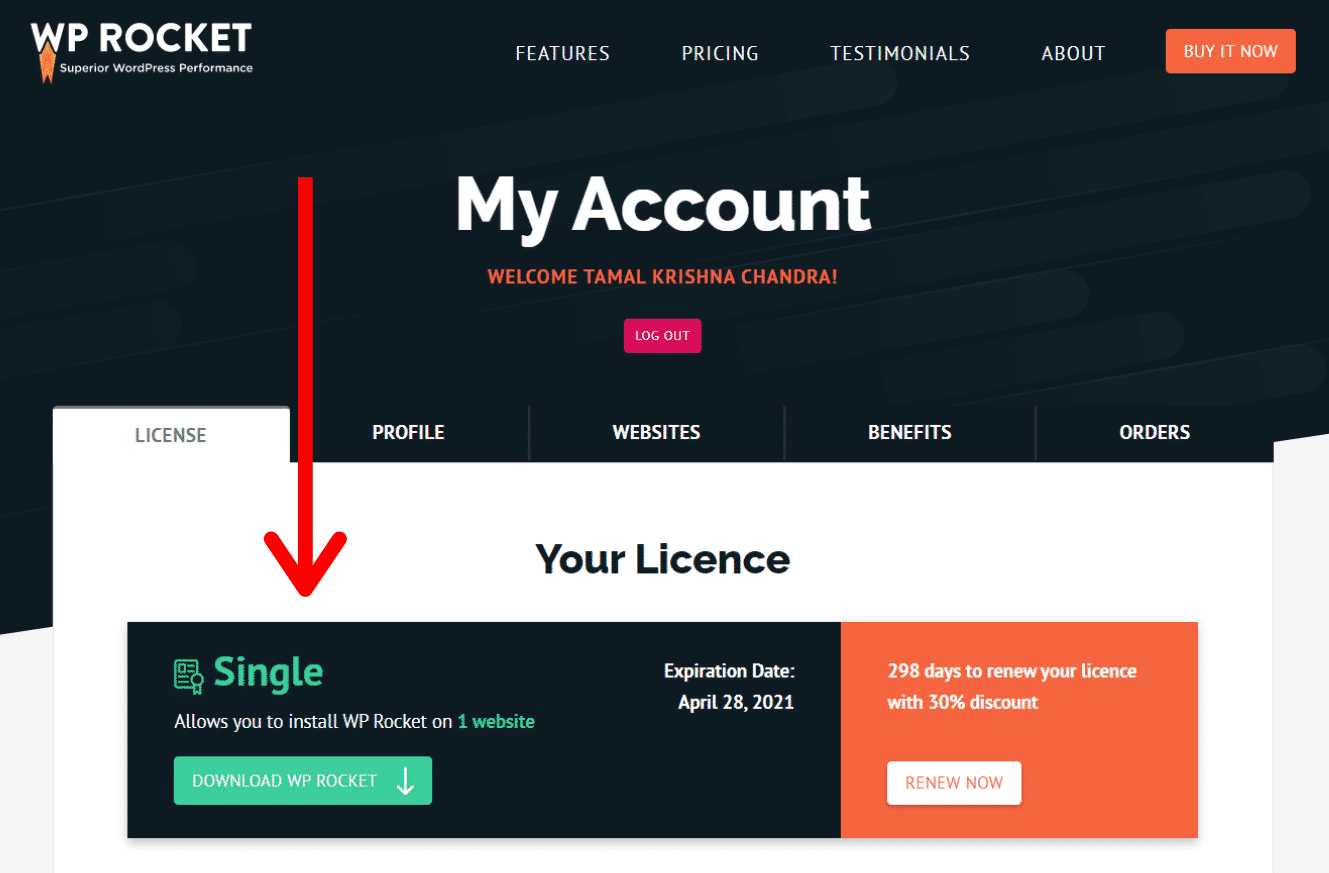
Once downloaded, upload the zip file to your WordPress site.
Pretty simple, right?
As you install and activate the plugin on your site, you should instantly notice a significant improvement in the loading time.
By default, WP Rocket activates the most popular settings.
However, you can make changes whenever you want. For best results, I suggest you read this: How to Set Up WP Rocket Correctly (Best Settings)?
Here’s how the interface looks like:
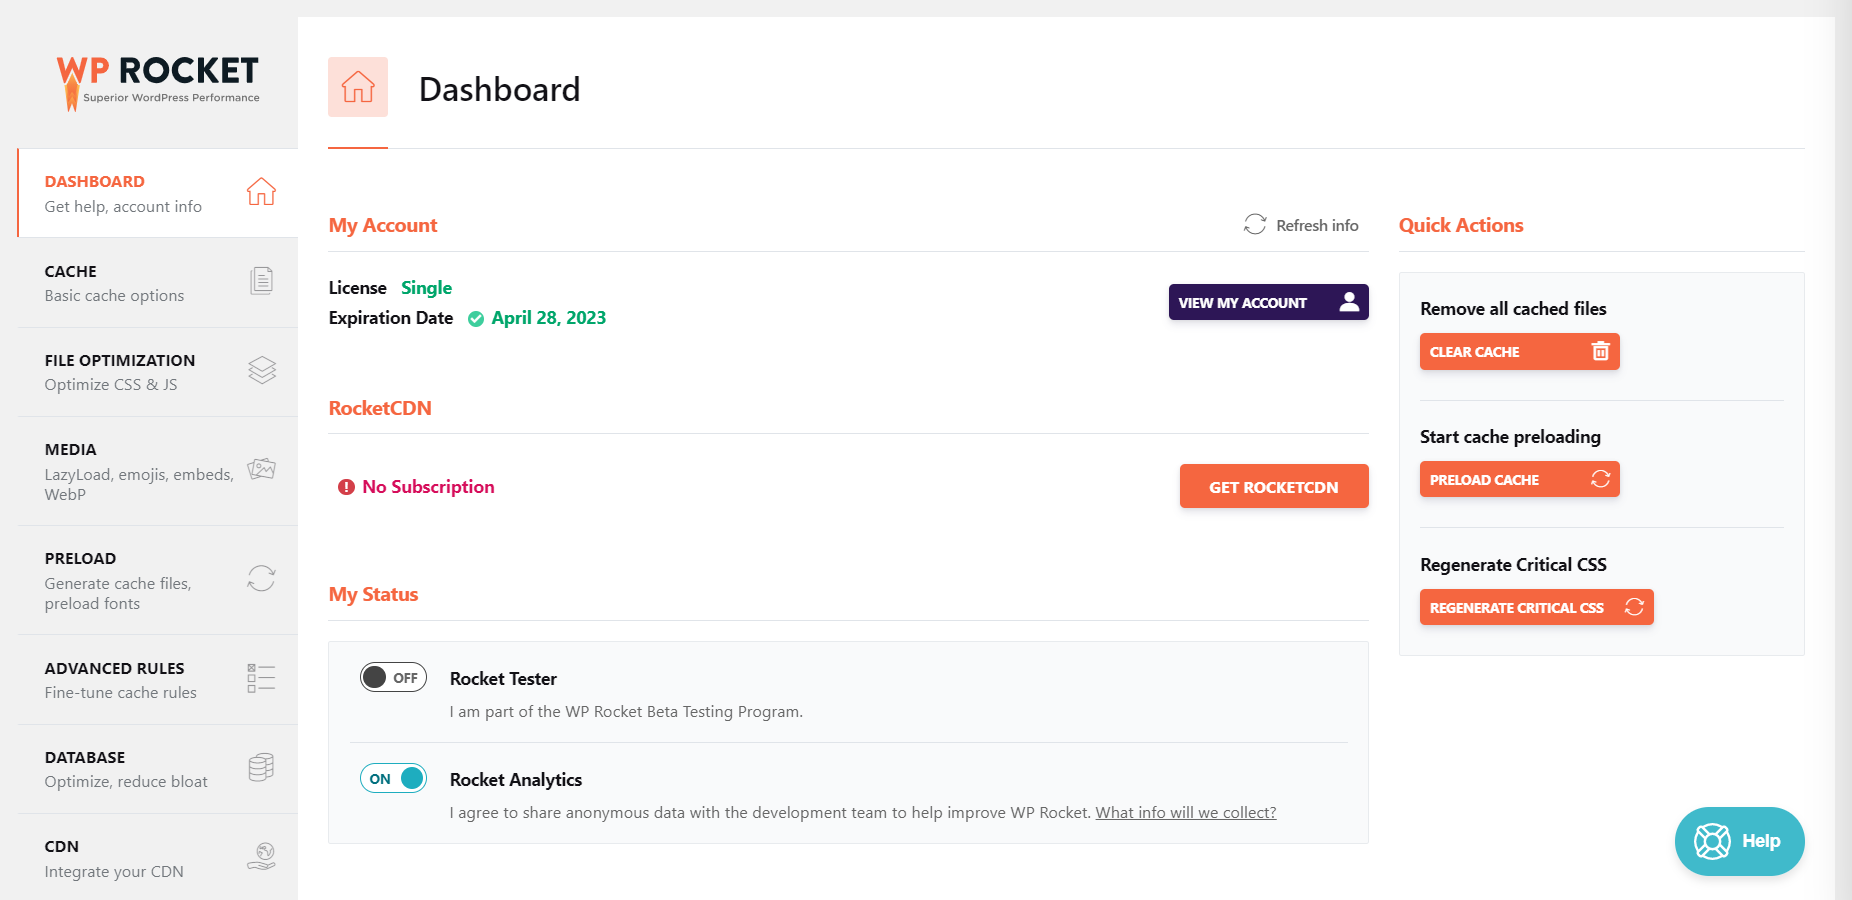
Different settings are arranged under multiple tabs that you can find on left side. From the dashboard, you get quick actions menu to do the following:
- Remove all cached files
- Start cache preloading
- Regenerate critical CSS
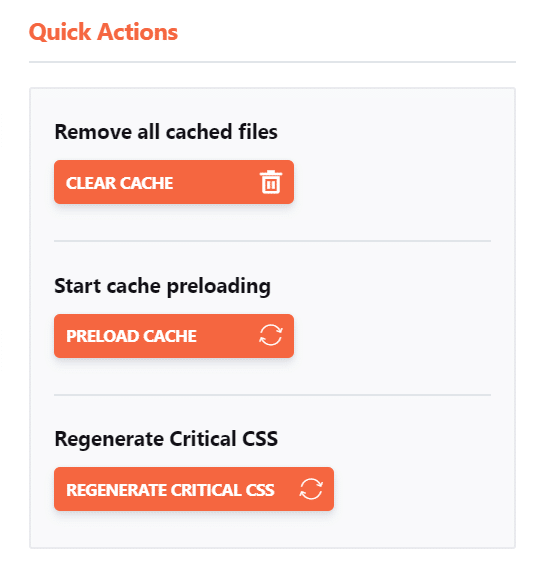
You’ll however find all the advanced features and settings in the left sidebar properly organized under different categories.
It’s easy to explore the settings and make changes as you wish.
For the complete overview of the settings available and my personal review, I would suggest you read this: WP Rocket Review & Tutorial + Real Testimonials.

With the help of Imagify and WP Rocket, I’ve been able to achieve excellent page-loading performance on this website. And, that’s why I strongly recommend you take advantage of both of these tools.
I promise you’ll never face loading issues again.
Bold promise, right?
If you are still not convinced, do your own research and let me know what you discover. I would love to know if you have a better solution.
You probably wouldn’t find one.
But let’s not disappoint you.
Because I’ll love it if you find something better. I haven’t found it yet. And, I’m not searching since the day I started using WP Rocket.
Use CDN or Content Delivery Network
Finally, I would like to add a few words about CDN.
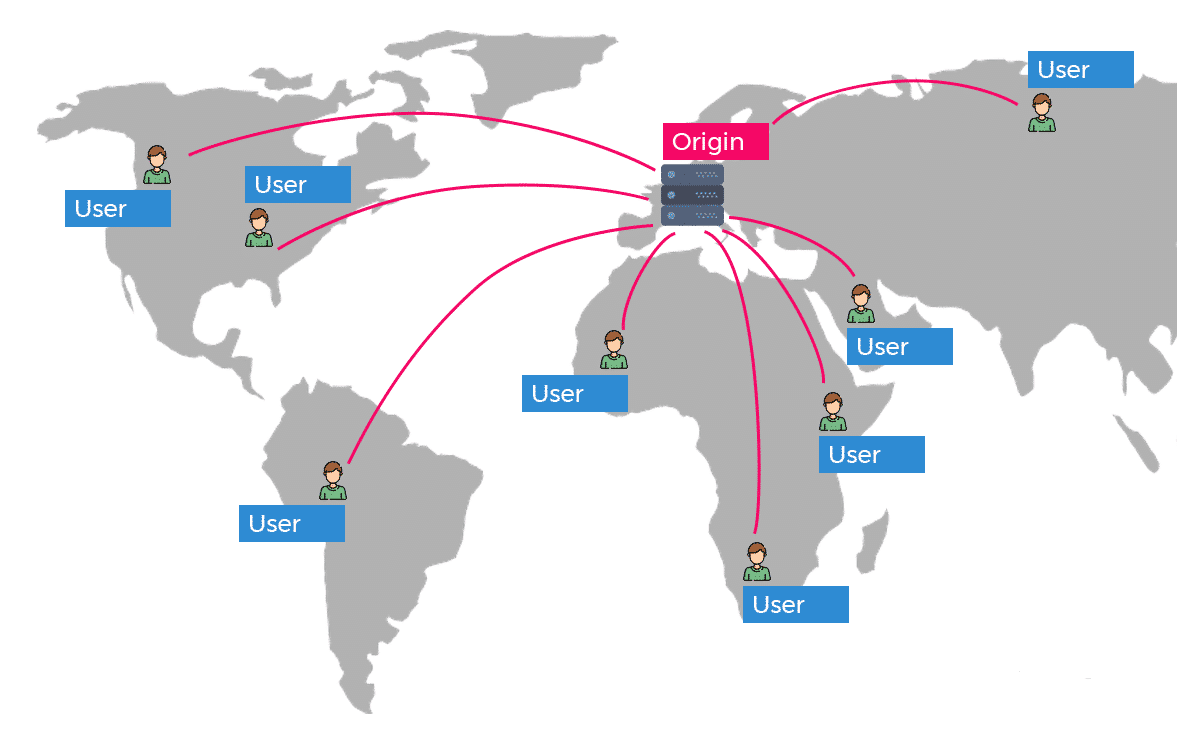
While cache plugins do a great job to improve page loading time, a great CDN can additionally boost the loading speed by over 50%.
CDN or a content delivery network stores the static files of your blog (or website), like images, CSS, Javascript in multiple geographical locations. It helps to minimize the distance between the visitors and your website’s server. As a result, it takes less time to deliver your site content when requested by a user.
By storing your image files, CSS, or other static files in a CDN, you can deliver these files to your website visitors quicker.
WP Rocket has its own CDN, called Rocket CDN.
I personally think that BunnyCDN is a better alternative than Rocket CDN. It’s cheaper, better and works the same way. With only $0.01/GB pricing, it can’t be cheaper than this. Click Here to Try it FREE.
Rocket CDN Benefits
- Best Automatic Configuration
- Easy Integration with WP Rocket plugin
- StackPath’s Reliable network with 45 Edge locations
- Unlimited bandwidth
- Valid for 1 domain
- All CDN files automatically served over HTTPS
- SSL traffic
- All Global Pops
- Excellent support
Rocket CDN Pricing
There is a monthly plan that costs $8.99/month per site. And, you get unlimited bandwidth. If you go for annual plan which gives you a better deal, it costs you $89.99/year. The pricing couldn’t be simpler than this.
So what do you need for a super fast website?
You know the answer, right?
- Imagify – for optimizing images
- WP Rocket – for optimizing page loading performance
- Rocket CDN – for faster delivery of static files
That’s all. 🙂
Final Words
Finally, you are near the end of this article.
And, if you are still with me, I’m sure, you enjoyed the journey.
Then, please share this article. It doesn’t only help more people find this information but also gives meaning to the endless hours I put into it.
But don’t worry!
I wouldn’t mind even if you decide not to share.
And I promise, next time when you come back, there will be another awesome piece of content waiting for you. All good? Great!
You May Also Like…
- Comprehensive WP Rocket Review: Unleashing Website Speed
- BunnyCDN and WP Rocket Setup: Easy Beginner’s Guide
- 10 Most Effective Ways to Speed Up Your WordPress Website
- Top 13 WordPress Cache Plugins for Speed and Performance
- 7 Best Free Trial Web Hosting Services – No Credit Card Needed
- Cloudways vs Hostinger Hosting – What’s The Best Hosting Provider?
- Showit vs WordPress – Choosing the Right Blogging Platform

