Are you a creative individual with a passion for crafting? Do you find yourself always making something with your hands and wanting to share your creations with the world? If so, starting a craft blog might just be the perfect outlet for you.
Blogging is a fantastic way to showcase your work, connect with like-minded individuals, and even make some money on the side. However, if you’re new to the world of blogging, it can seem daunting at first. With so many technical aspects to consider and the fear of putting yourself out there, it’s easy to get overwhelmed.
But fear not, because in this blog post, we’ll be breaking down the simple steps you need to take to start your very own craft blog and make money doing what you love.
But, why you should start a craft blog.
Not only will it give you a creative outlet to showcase your work, but it can also help you build a community around your craft. By sharing your ideas and techniques with others, you’ll be able to connect with like-minded individuals who share your passion.
In addition, a craft blog can also help you make money on the side.
There are various ways to monetize your blog, such as through sponsored content, affiliate marketing, and even selling your own products.
So, let’s move on to the first step in starting your craft blog.
Pick a Craft Niche to Focus on Your Blog
Before you start a blog, you must know what a niche is and how to choose a niche for your blog. This is the very first step to start a successful blog in any niche.
What is a Niche or Topic?
A niche is a specific area of focus in a particular industry.
It helps you to differentiate your blog from others. Choosing a niche is essential as it helps to attract a specific audience interested in that particular topic.
When it comes to a craft blog, you can choose from a wide range of niches like knitting, crochet, paper crafting, sewing, and more.
But, how do you choose the right niche?
How to Pick a Niche for a Craft Blog?
Here are some tips to help you choose a craft niche for your blog.
- Choose Something You Enjoy: The first and most important thing to consider is your interest. Choose a niche that you enjoy and have a passion for. Crafting can be therapeutic, and if you enjoy what you do, it will show in your blog. You can also provide your readers with valuable insights and personal experiences, making your content more engaging and relatable.
- Identify Your Audience: Before picking a niche, it’s essential to identify your target audience. Research what they are looking for and what topics interest them. You can use social media platforms like Instagram, Pinterest, and Facebook to get an idea of the type of content your audience is looking for. Understanding your audience will help you create blog content that resonates with them.
- Research Your Competition: While choosing a niche, it is important to research your competition. Look for blogs that cover similar topics and analyze their content. Find out what works for them and what does not. You can also look for gaps in their blog content and fill them with your own unique perspective. You can use SEO tools like SEMrush or Ahrefs to help you speed up the research process.
- Choose a Niche You Can Monetize: Crafting can be a hobby, but it can also be a business. If you plan to monetize your blog, it is essential to choose a niche that has the potential to make money online. Look for niches with a large audience and high demand for products. You can then consider affiliate marketing and sponsorships as potential revenue streams in the future.
Choosing a niche for your craft blog is essential, but it is not the only factor that determines the success of your blog. You need to create valuable content, engage with your audience, and promote your blog through various channels.
Well, for now, the next step is to set up your blog and get it online.
Choose a Blogging Platform
Whether you are a professional blogger or just getting started, choosing the right blogging platform is crucial. It can truly make or break your blogging future.
But, what exactly is a blogging platform?
What is a Blogging Platform?
A blogging platform is basically a software or service that allows you to create, publish, and manage your blog on the internet. It provides you with a user-friendly interface and all the necessary tools to publish your content, including text, images, and videos.
Now, there are many blogging platforms available today.
- WordPress
- Blogger
- Tumblr
- Medium
- Wix
- Squarespace
- Ghost
Click here for more blogging platform options available now.
But, not all are created equal.
Most blogging platforms also offer features like templates, plugins, and widgets that you can use to customize your blog and make it more functional and appealing.
Choosing the right blogging platform can be a daunting task, especially if you are new to blogging. But don’t worry, I have got you covered.
How to Choose a Blogging Platform?
Here are some factors to consider when choosing a blogging platform:
- Ease of use: Look for a blogging platform that is easy to use, even if you don’t have any technical skills. It should have a user-friendly interface that allows you to create and publish your content without any hassle.
- Customizability: Your blog platform should allow you to customize your blog to your liking. It should have a wide range of templates, plugins, and widgets that you can use to personalize your blog and make it stand out.
- SEO-friendliness: A good blogging platform should be SEO-friendly, which means it should have features that help you optimize your blog for search engines. It includes features like meta tags, sitemaps, and clean URLs.
- Support: Look for a blogging platform that offers good customer support, so you can get help if you run into any problems.
- Cost: Consider the cost of the blogging platform. There are some free blogging sites, while others require a subscription fee.
Now, let’s talk about WordPress and this is what I recommend.
Why Choose WordPress for Your Blog?
WordPress is the most popular blogging platform that powers more than 40% of all websites on the internet. It is a free, open-source software that you can download and install on your own web hosting account. WordPress is simple to use, customizable, and SEO-friendly, making it the perfect choice for beginners.
One of the biggest advantages of WordPress is its flexibility.
It has a vast library of 60,000+ plugins and free themes that you can use to add functionality and design to your blog. Whether you want to add social media buttons, contact forms, or e-commerce functionality, there is a plugin for that. Plus, WordPress is easy to customize, so you can make your blog look exactly how you want it to.
WordPress is also SEO-friendly, which means it has built-in features that help you optimize your blog for search engines.
For example, it has clean URLs, which are easy for search engines to read, and it allows you to customize your meta tags, so you can include your target keywords.
Finally, WordPress has a large and supportive community, which means you can find help and resources whenever you need them.
There are countless tutorials, forums, and blogs dedicated to WordPress, so you can learn how to use it and troubleshoot any issues you might encounter.
In short, if you are a beginner blogger, WordPress is the best option for you.
The blog you are reading right now is based on WordPress too!
So, let’s see how to start your WordPress blog today.
Start Your WordPress Blog Step by Step
While the WordPress software is open-source and 100%, you cannot build a website with just WordPress. You’ll also need a domain name and hosting.
The Need of Hosting and a Domain
Hosting is like the storage unit for your website.
It’s where your website’s files, images, and content are stored.
Without hosting, your website won’t exist.
A domain, on the other hand, is the address of your website, like “www.yourwebsite.com“. You need a domain to make it easy for people to find your website.
Now, there are many hosting providers out there.
But, I highly recommend Bluehost. It’s very affordable, reliable, and comes with excellent customer support. Plus, it’s officially recommended by WordPress.
Why Choose Bluehost Hosting?
Here are some reasons why you need to choose Bluehost:
- Reliable hosting with high uptime
- Affordable pricing plans ($2.95/month)
- 24/7 customer support
- User-friendly interface
- One-click WordPress installation
- Free domain registration for the first year
- Automatic backups and site security
- Scalable options for growing websites
- 100% Money-back guarantee
- Trusted by WordPress.org as a recommended hosting provider.
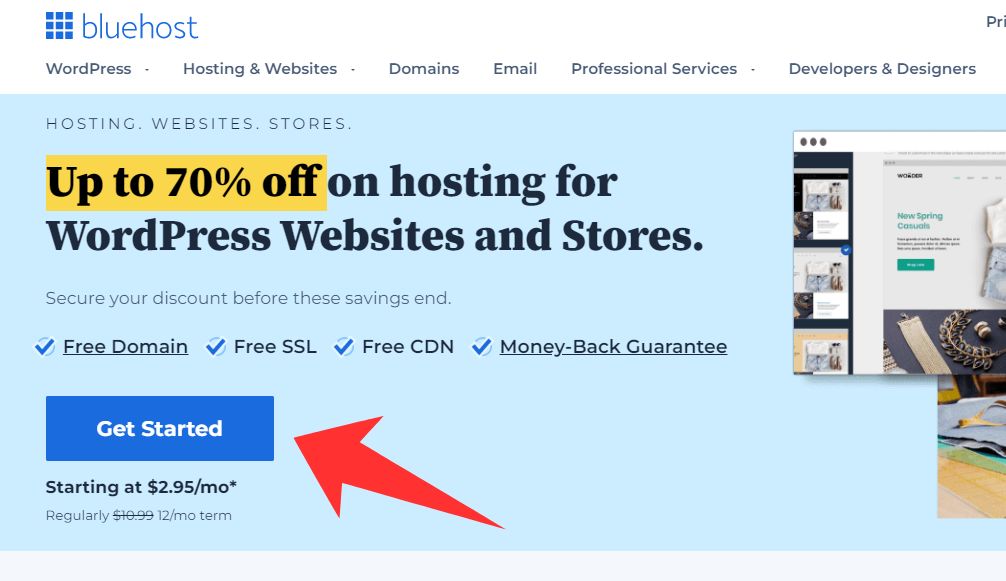
So, how do you buy hosting from Bluehost?
How to Buy Hosting from Bluehost?
- Step 1: Go to the Bluehost website at www.bluehost.com.
- Step 2: Choose your hosting plan: On the homepage, you’ll see the three hosting plans offered by Bluehost: Basic, Plus, and Choice Plus. Choose the plan that best suits your needs by clicking the “Select” button below the plan.
- Step 3: Choose your domain name: Next, you’ll be asked to choose your domain name. If you already have a domain name, you can enter it in the “Use a domain you own” section. If you don’t have a domain name yet, you can enter your desired domain name in the “Create a new domain” section.
- Step 4: Enter your account and payment information: After choosing your domain name, you’ll be asked to enter your account and payment information. You’ll need to provide your name, address, email, and payment details.
- Step 5: Choose your hosting add-ons: Bluehost offers several add-ons to enhance your hosting experience, such as SiteLock security, CodeGuard backup, and Bluehost SEO tools. You can choose to add these to your order or skip them if you prefer.
- Step 6: Review and confirm your order: Before completing your order, review the details of your hosting plan, domain name, and add-ons. Once you’re satisfied, click the “Submit” button to complete your order.
- Step 7: Set up your Bluehost account: After completing your order, you’ll be abel to create a password and you’ll also receive an email with your login information and instructions on how to set up your Bluehost account. Follow the instructions to log in to your account and start building your website.
That’s it! With these simple steps, you can easily buy hosting from Bluehost and start building your WordPress website. Bluehost also offers excellent customer support, so if you have any questions or issues, don’t hesitate to contact them for help.
Now that you have your hosting and domain name, it’s time to install WordPress.
Don’t worry; it’s easy! Bluehost offers a one-click WordPress installation, so all you have to do is follow the on-screen instructions.
The best part?
You don’t have to do it manully the first time. Because Bluehost automatically installs WordPress when you were signing up for the account.
Logging into WordPress Admin Area
Once you are logged into your Bluehost account, you can access your WordPress dashboard by clicking on the “Log into WordPress” button or by typing “/wp-admin” after your domain name in the browser.
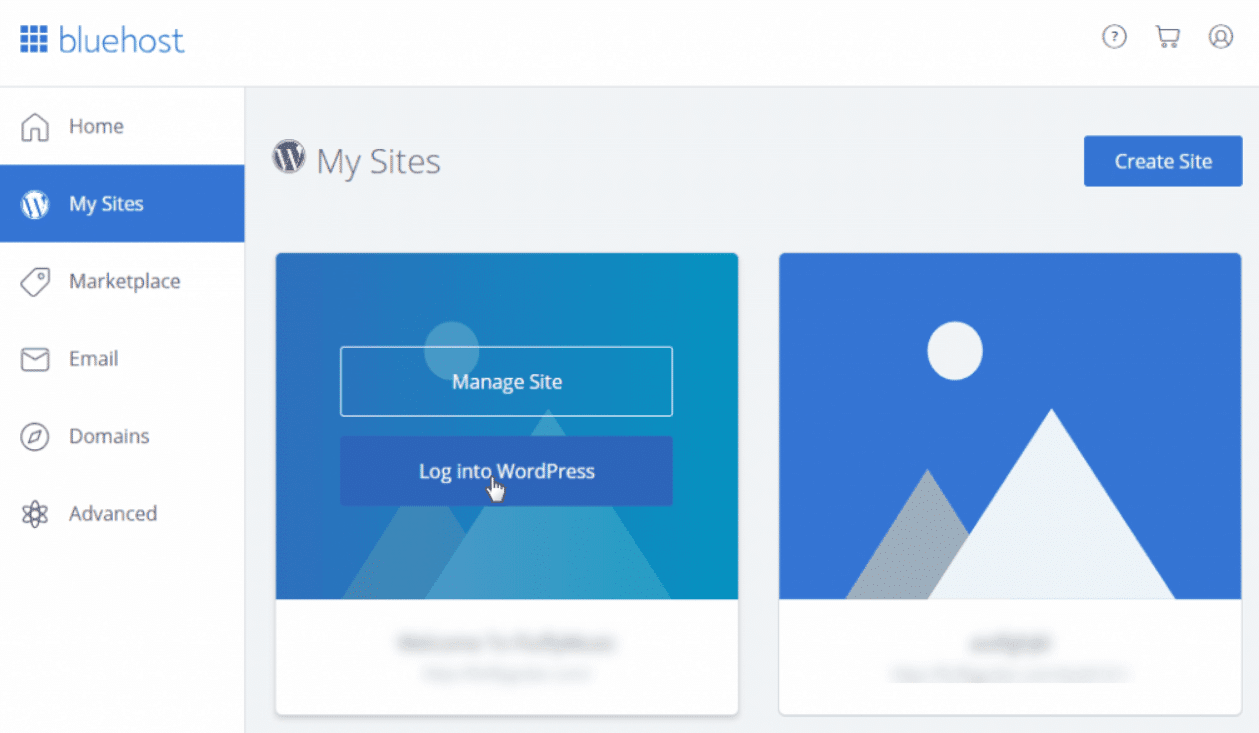
From there, you can start customizing your WordPress site.
If you are new to WordPress, don’t worry.
There are plenty of resources available to help you get started. Bluehost has a knowledge base with helpful articles and tutorials, and WordPress.org has a vast community of users and developers who are always happy to help.
Here is a quick overview of how to set up WordPress:
To log in to your self-hosted WordPress site, you’ll need your website URL, your username, and your password. Once you have those, go to your website’s login page (usually located at yourwebsite.com/wp-admin) and enter your credentials.
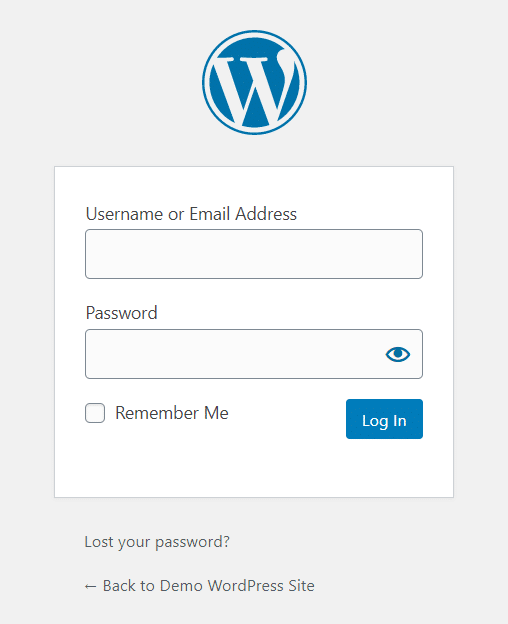
Voila! You’re in.
Note that your DNS should point to your hosting. Otherwise you won’t be getting access to your WordPress login page.
Now that you’re in, it’s time to set up your website for blogging.
Start by setting up WordPress permalinks.
Setting Up WordPress Permalinks
In simple terms, permalinks are the permanent URLs of your website’s pages and posts. They help search engines understand the content of your website and allow your readers to easily navigate through your site. If you have a messy URL structure, it will confuse your readers and make it harder for them to find what they’re looking for.
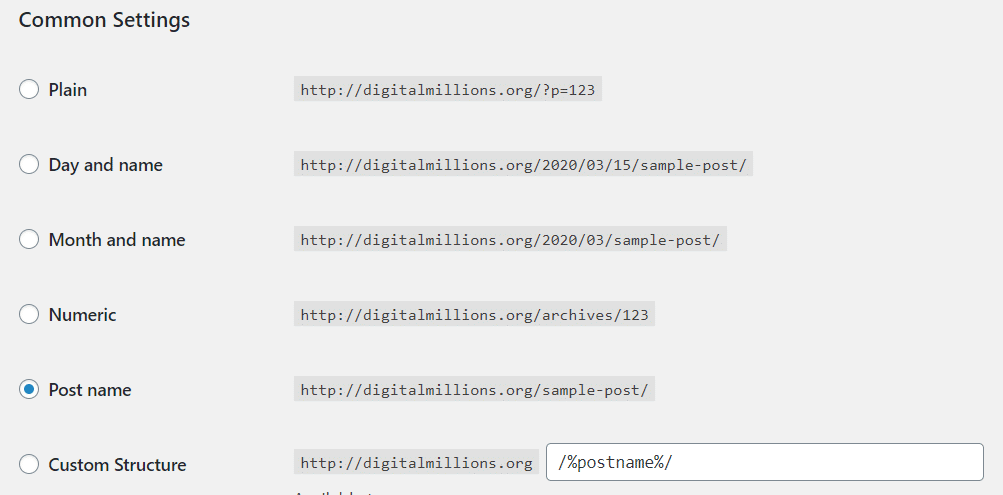
So, how do you set up permalinks in WordPress?
It’s actually pretty easy.
Just go to your WordPress dashboard, click on “Settings”, then “Permalinks”.
From there, you can choose from several permalink structures, including “Plain”, “Day and name”, “Month and name”, “Numeric”, “Post name”, and more.
In general, the most SEO-friendly permalink structure is the “Post name” option. This structure includes the title of your post in the URL, making it easy for search engines to understand what your content is about.
Search engines like Google prefer clean URL structures, so by setting up your permalinks correctly, you’re giving your website a better chance to rank higher.
Picking a Theme and Plugins
The next step is to choose a theme that suits your website’s niche and your personal taste. WordPress offers a wide variety of themes to choose from, both free and premium, so take your time and find the one that’s perfect for you.
Once you’ve chosen your theme, click on “Appearance” and then “Themes” on your WordPress dashboard. From there, click on “Add New” and search for the theme you want to install. Once you’ve found it, click on “Install” and then “Activate” to make it live.
Next up, plugins!
Plugins are essential tools that can help you customize and optimize your website.
From social media sharing buttons to SEO tools, there are thousands of WordPress plugins available to choose from. To install a plugin, go to “Plugins” on your WordPress dashboard and click on “Add New”. From there, you can search for the plugin you want to install and then click on “Install Now” and “Activate”.
Creating New Posts inside WordPress
Now, let’s talk about creating content for your craft blog.
To create a new blog post, click on “Posts” on your WordPress dashboard and then “Add New”. From there, you can enter your post title and content, and then add media such as images and videos. Make sure to optimize your content for SEO.
Read – How to Set Up Your WordPress Blog Step by Step?
Create Content for Your Craft Blog
So far, we’ve learned how to set up your blog. Now that you know how to write blog posts, let’s see how create the best content for your craft blog.
There are a few key elements that make a blog post truly exceptional.
The first is expertise. If you’re going to be writing about crafting, you need to know your stuff. You need to be able to provide unique insights and value to your readers. You need to be able to share tips and tricks that they won’t find anywhere else. And you need to be able to do it in a way that is engaging and easy to understand.
Secondly, your blog posts need to be well-written, well-researched, and well-structured. You need to be able to communicate your ideas clearly and concisely.
And, you need to be able to do it in a way that is visually appealing. Use images and videos to help illustrate your points and break up long blocks of text.
Use headings and subheadings to help guide your readers through the post.
Your blog posts also need to be relevant to your audience.
They also need to be optimized for search engine rankings so that people can find them easily. And they need to be tailored to the needs and interests of your readers.
It all starts from identifying your niche, as already discussed.
What sets your crafting blog apart from all the others out there? Is it your focus on a particular type of craft? Is it your unique perspective on the crafting world? Whatever it is, make sure that it’s clear from the very beginning what your blog is all about.
Next, you need to create a content calendar.
This will help you stay organized and on track.
Do deep keyword research to find out popular questions people ask in your niche. Find questions from forums and QnA websites like Quora.
Then, plan out at least 30-50 topics for your blog posts in advance so that you always know what you’re going to be writing about. This will also help you make sure that your content is balanced and fully covers your chosen topic.
When it comes to actually writing your blog posts, don’t be afraid to inject some of your own personality into them.
Write in a way that feels natural to you.
Use emotional one-liners to express your joy or frustration. Share real-life experiences and use them to provoke thought and connect with your readers.
And finally, make sure that you’re optimizing your blog posts for search engine rankings. Use relevant keywords throughout your post, but don’t overdo it.
Make sure that your post is well-structured and easy to read.
So there you have it.
A quick guide to creating craft blog content that makes an impact.
Remember, it’s all about expertise, quality, and relevance. And don’t forget to inject some of your own personality into your posts.
Read more: How to Write a Blog Post? [Complete Step-by-Step Guide]
Ways to Promote Your Craft Blog
So, you’ve started pouring your heart and soul into your craft blog.
But, it’s not enough!
You’ll still need to promote your blog and get traffic. I have compiled a list of 7 effective ways to promote your craft blog online and get visitors!
Utilize Social Media
Social media is a fantastic way to promote your blog.
In order to get started, create social media accounts for your blog on platforms like Instagram, Twitter, Facebook, and Pinterest.
Share your blog posts on these platforms.
Consider joining relevant groups and engaging with your followers to build a community around your blog. When sharing your blog posts on social media, make sure to include an attention-grabbing caption and a visually appealing image.
Collaborate with Other Bloggers
It really works, trust me. Collaborating with other bloggers is a powerful way to expand your audience and tap into new markets.
Reach out to other craft bloggers in your niche and propose a collaboration.
It could take the form of a guest post, a joint project, or a social media takeover. Collaborating with other bloggers not only helps you reach new audiences, but it also helps build relationships within your industry.
Focus on SEO
Search engine optimization (SEO) is crucial.
You can’t ignore it when it comes to promoting your blog and driving traffic.
Start by using relevant keywords in your blog posts and meta descriptions. This will help search engines like Google understand what your blog is about.
Make sure your blog is mobile-friendly and has a fast loading speed, as this can also affect your search engine rankings. Use tools like Google Analytics and Google Search Console to track your website’s performance and identify areas for improvement.
Create Video Content
Video content is becoming increasingly popular.
It can be a great way to engage with your audience and promote your blog.
Consider creating video tutorials or behind-the-scenes content that showcases your crafting process. Share these videos on YouTube or other social media sites and your blog to attract new visitors to your craft blog.
When creating video content, make sure to use high-quality equipment and edit your videos to ensure they are visually appealing.
Similar to any business, promoting your craft blog and building an audience takes time and effort, but it’s worth it to see your traffic grow.
By utilizing the above-mentioned strategies, you should be able to build a loyal following and establish yourself as an authority in your niche. Remember to stay true to your unique voice and let your passion for crafting shine through!
Next, we’ll see how to make money from your blog.
Ways to Make Money from Your Blog
Here, I will share 7 effective ways to monetize your craft blog online.
These ways are tried and tested and can help you make a steady income stream through your passion. So, let’s dive in!
Sell Your Products
The most obvious way to monetize your craft blog is by selling your products.
If you have a craft blog, it is very likely that you have some creative skills. Use those skills to create unique and interesting products that people will love to buy. Use your blog to showcase your products and drive traffic to your online store. You can also use platforms like Etsy, Amazon Handmade, or Shopify to sell your products.
Offer Online Courses
Another great way to monetize your craft blog is by offering online courses. You can teach your readers how to make your craft, and charge a fee for your expertise. You can use platforms like Udemy, Skillshare, or Teachable to create and sell your courses. This way, you can reach a wider audience and make more money from your blog.
Affiliate Marketing
You can also make money from Affiliate marketing.
It is one of the most popular and profitable ways of monetizing blogs.
In affiliate marketing, you promote other people’s products on your blog and earn a commission on every sale made through your affiliate links.
You can promote products that are related to your craft, such as tools, materials, or even books. You can use affiliate marketing networks like Amazon Associates, ShareASale, or ClickBank to find products to promote.
Read – How to Start an Affiliate Marketing Blog?
Sponsored Content
You can also partner with brands for sponsored content.
You can write a blog post or create a video showcasing a brand’s product and earn money for it. You can use platforms like AspireIQ, TapInfluence, or Cooperatize.
Advertisements
You can also earn money by displaying ads on your blog.
You can use platforms like Google AdSense, Ezoic, or Media.net to display ads on your blog. However, keep in mind that displaying too many ads can be annoying for your readers and can lead to a negative user experience. Make sure to find a balance between displaying ads and providing valuable content.
Paid Memberships
You can also offer a paid membership program to your readers.
You can offer exclusive content, early access to your products, or one-on-one coaching sessions to your members. This way, you can earn a steady income.
Ask for Donations
Finally, you can also ask for donations from your readers.
You can use platforms like Patreon or Ko-fi to accept donations from your readers. This method works best if you have a loyal following that loves your work.
In short, there are many ways to monetize your craft blog.
Final Words and Thoughts
I hope you’ve learned a lot and are now feeling inspired to take action.
In this post, I’ve covered everything from finding your niche and setting up your blog to creating content, growing your audience, and monetizing your blog.
In short, starting a craft blog can be fun and rewarding too!
By following the steps outlined in this post, you can set yourself up for success and create a blog that truly stands out from the competition.
I’d love to ask you a favor before you go.
If you found this post on how to start a craft blog and make money helpful, please consider sharing it with others who might benefit from it too. By sharing this article, you’re not only helping others discover their passion for crafting but also supporting this blog and enabling me to create more helpful content like this.
So go ahead, click that share button, and spread the word!

